This Guide is for Managers. A Manager serves like a Waiter, so for service read the
Waiter guide; this Guide holds only what a Manager adds: the admin app in a
browser, test mode, and money matters on any Tab in the staff app. Each topic is one task, with an
example from Beizli Muster, where Michael is the Manager, Silvia serves and Anna is the Tenant
admin.
Open app.zahli.ch in a browser on a laptop or tablet and sign in. The
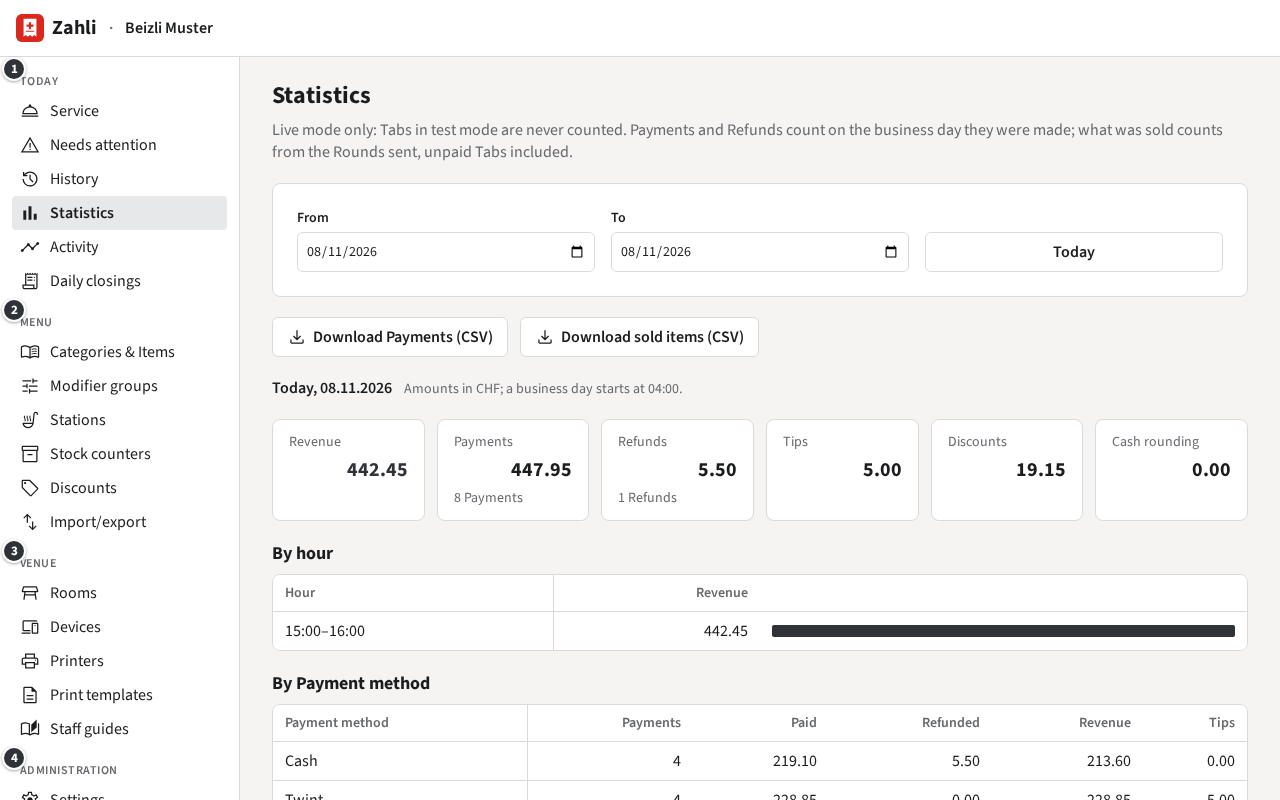
sidebar groups the pages:
① Today: the day. Service opens the staff app; then
Needs attention, History, Statistics,
Activity and Daily closings.
② Menu: Categories & Items, Modifier groups,
Stations, Stock counters, Discounts and
Import/export.
③ Venue: Rooms, Devices, Printers,
Print templates and Staff guides.
④ Administration: for a Manager only Settings.
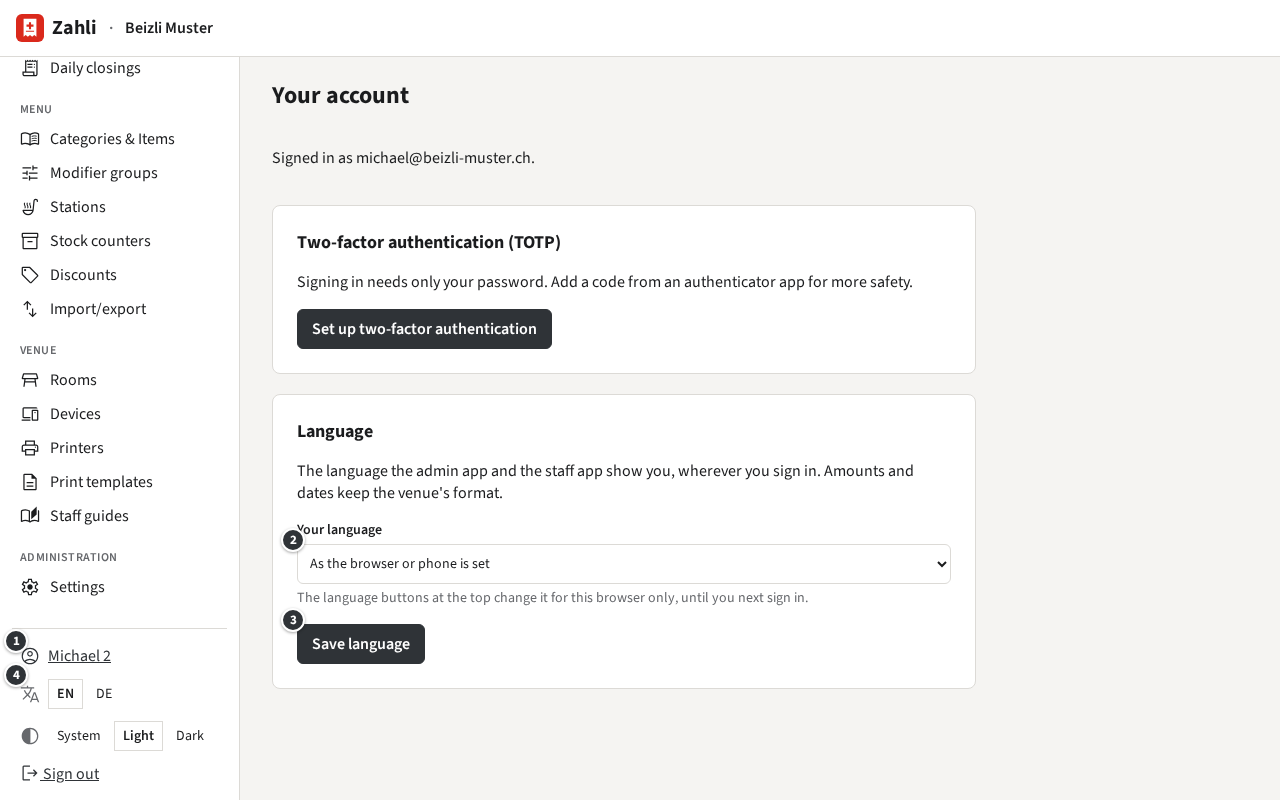
The foot of the sidebar holds your name (it opens Your account), the language and
colour switches, and Sign out.
A Tenant admin looks after the rest: Staff members with their passwords and Staff QRs, VAT rates,
Payment providers, the Audit log and new Discount presets. In Settings a Manager
sees the Twint code and Locale and security but cannot change
them. At Beizli Muster
that is Anna’s; see the Tenant admin guide.
On the venue’s phones you sign in like everyone else, with your name and password or your Staff
QR (see Signing in in the Waiter guide). In a browser, a Manager signs in
with email and password and lands in the admin app.
Enter your Email and Password, for Michael
michael@beizli-muster.ch, and click Sign in.
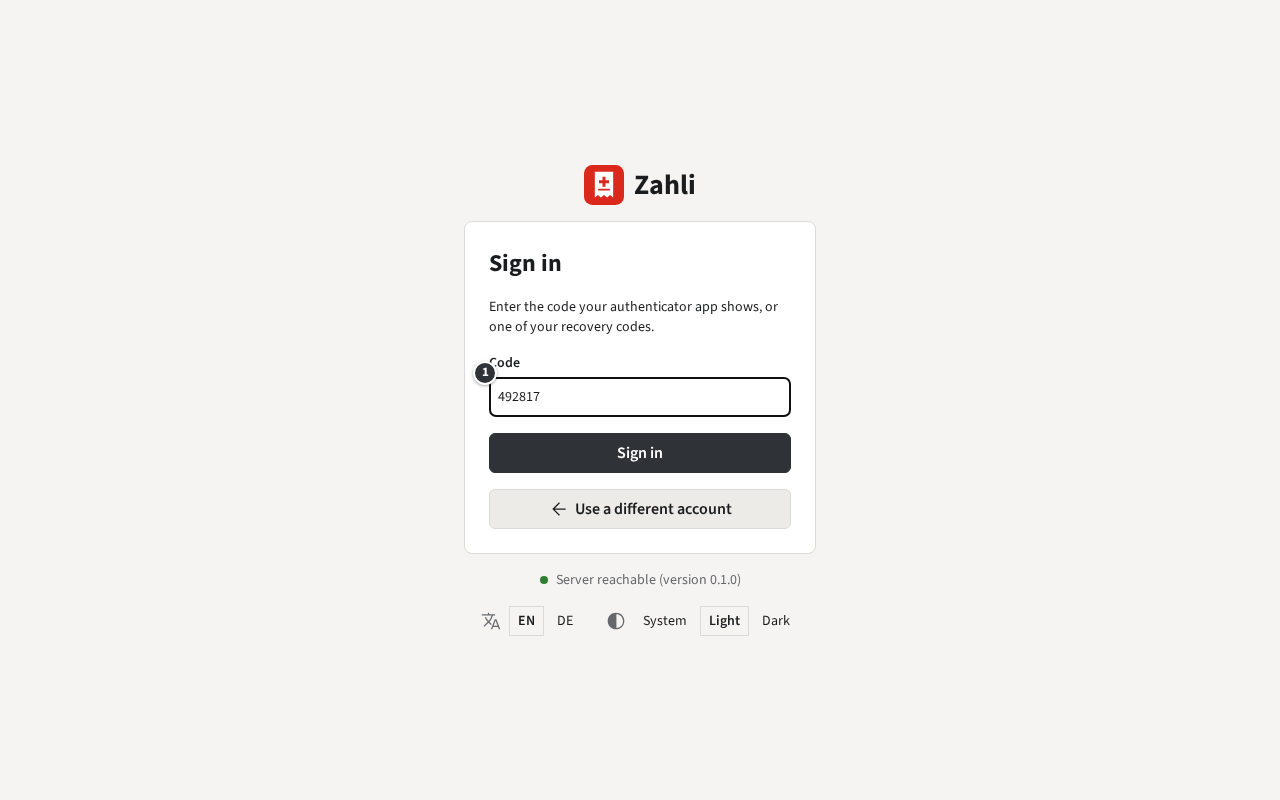
If you have set up two-factor authentication, the page then asks for a Code
①: the six digits your authenticator app shows now, or one of your recovery codes. Click
Sign in again.
The admin app opens at Today → Needs attention. On a computer others use too, sign
out when you leave: Sign out at the foot of the sidebar.
Two-factor authentication is optional for Managers, and worth it: someone who learns your password
still cannot sign in without your phone. It applies to signing in with your email in a browser; on
the venue’s phones nothing changes.
Click your name at the foot of the sidebar: Your account opens.
Click Set up two-factor authentication.
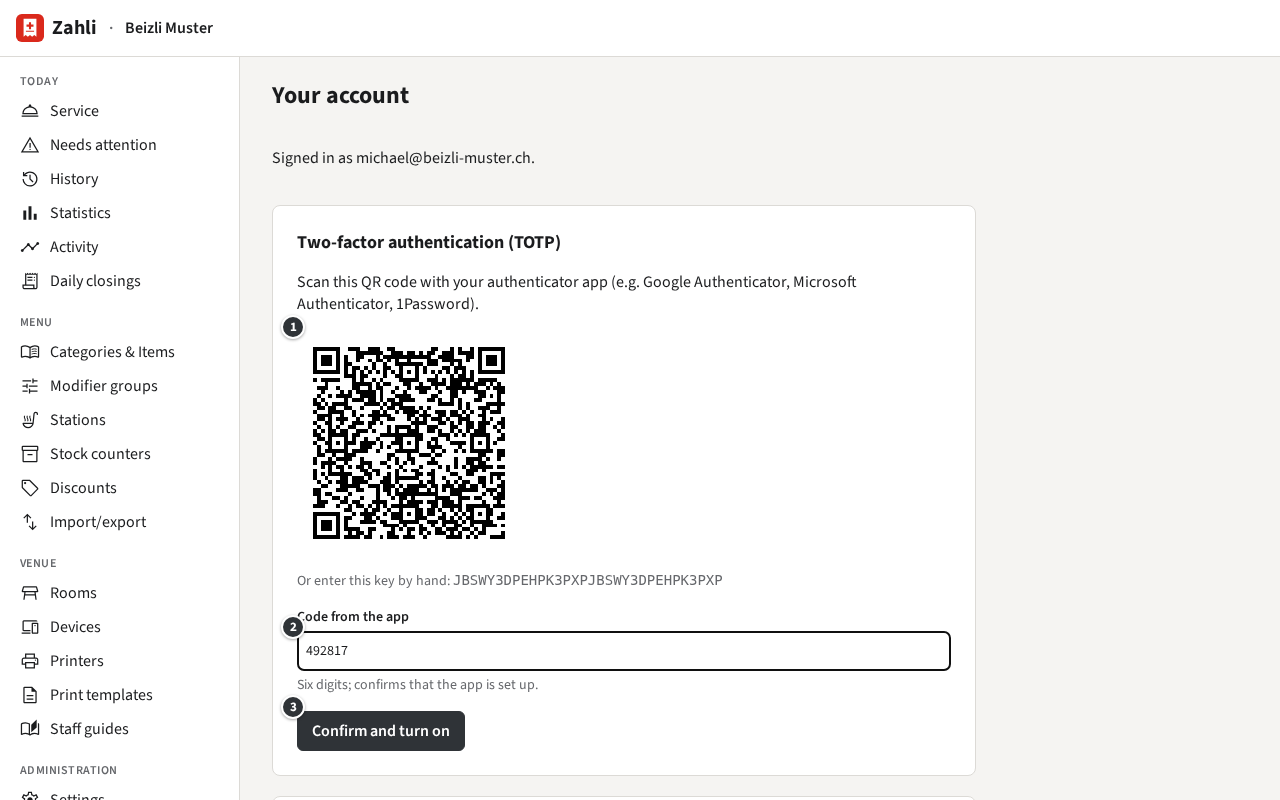
Scan the QR code ① with an authenticator app on your phone, such as Google Authenticator. Enter
the six digits it shows ② and click Confirm and turn on ③.
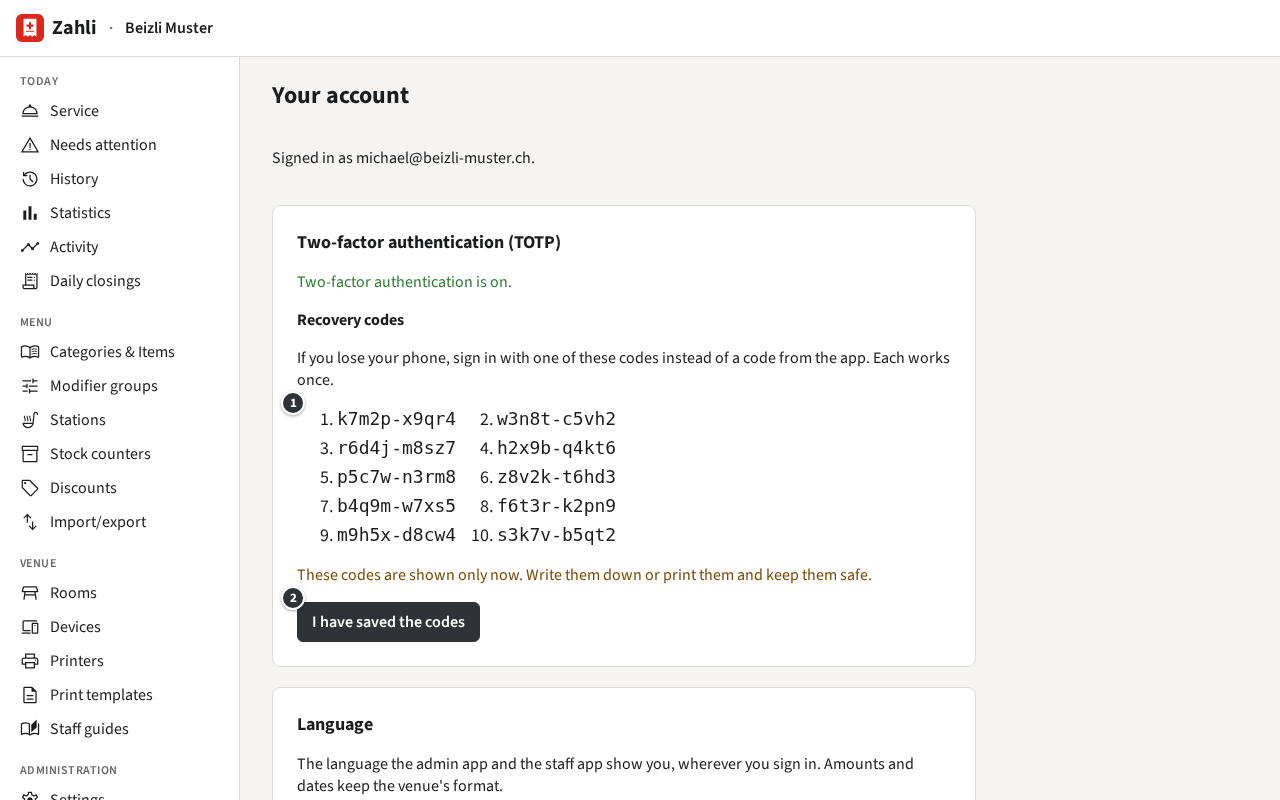
Zahli now shows ten Recovery codes ①, this once only. Each one works once
instead of a code from the app, for when your phone is lost. Write them down or print them,
keep them away from your phone, and click I have saved the codes ②.
Keep the recovery codes safe: without your phone, they are the only way in. To turn two-factor
authentication off, for example before moving to a new phone, enter your
Password on the same page and click Turn off; then
set it up again on the new phone.
Today → Service opens the staff app in a browser tab of its own, the same
tab each time, so the admin page stays where it was. Serve there as the
Waiter guide describes; see also Service.
To go back, switch to the browser tab of the admin app.
Sign out in either app signs this browser out of both.
Example: Michael has the Statistics open on the office laptop when Table 6 wants to pay. He clicks
Service, takes the Payment in the staff app’s tab, and switches back to the
Statistics.
Your language
The admin app and the staff app speak English and German. Your choice is saved with you, so both
apps show it in every browser and on every phone you sign in to. Amounts and dates keep the
venue’s format, such as CHF 1’234.50.
Click your name ① at the foot of the sidebar: Your account opens.
Under Your language ②, pick English or
German. As the browser or phone is set follows the browser’s or the
phone’s own language.
Click Save language ③.
Example: Michael picks German. The admin app switches at once, and the staff
app shows German too, on the office laptop as on the phone S-001.
The language switch ④ at the foot of the sidebar, EN and DE, changes the language of this browser
only, until you next sign in. In the staff app the same choice of your own is under
Settings → Your language, as in
Your language of the Waiter guide.
Test mode
In test mode every new Tab is a test Tab: it moves no real money, counts in no statistics and
no revenue, and its Tickets and Receipts print with a large TEST. Card Payments go to the Payment
provider’s test account. What staff see then is in What TEST means.
A test Tab is real data with a flag: it stays in the History with a TEST badge. Each Tab keeps the
mode it was opened in, so switching changes only the Tabs opened afterwards. A phone or browser
picks the change up at its next sign-in or refresh.
For training on one phone while the venue stays live. Example: before the evening, Silvia shows a
new colleague the staff app on the phone S-001.
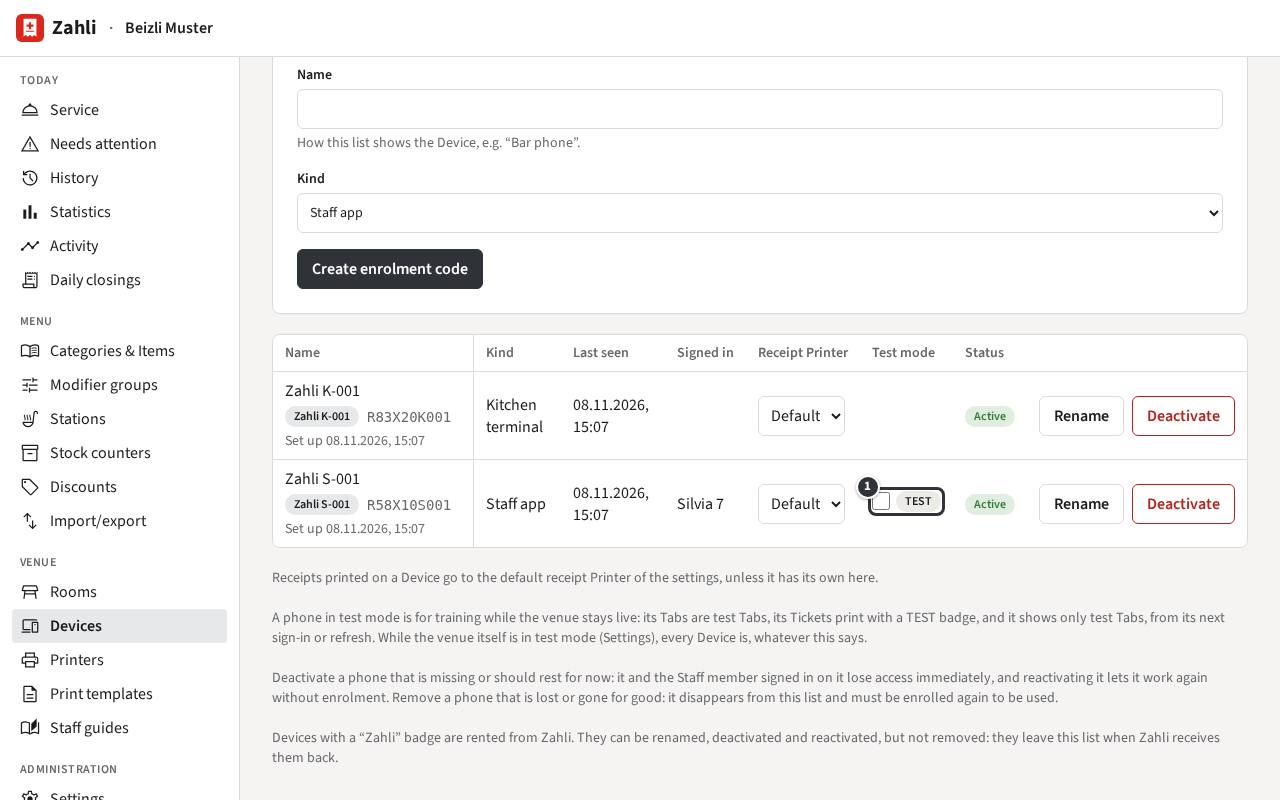
In the admin app, open Venue → Devices.
In the phone’s row, tick TEST ① under Test mode, and
confirm.
The phone stays in test mode until you untick it, and meanwhile shows only test Tabs. A Manager
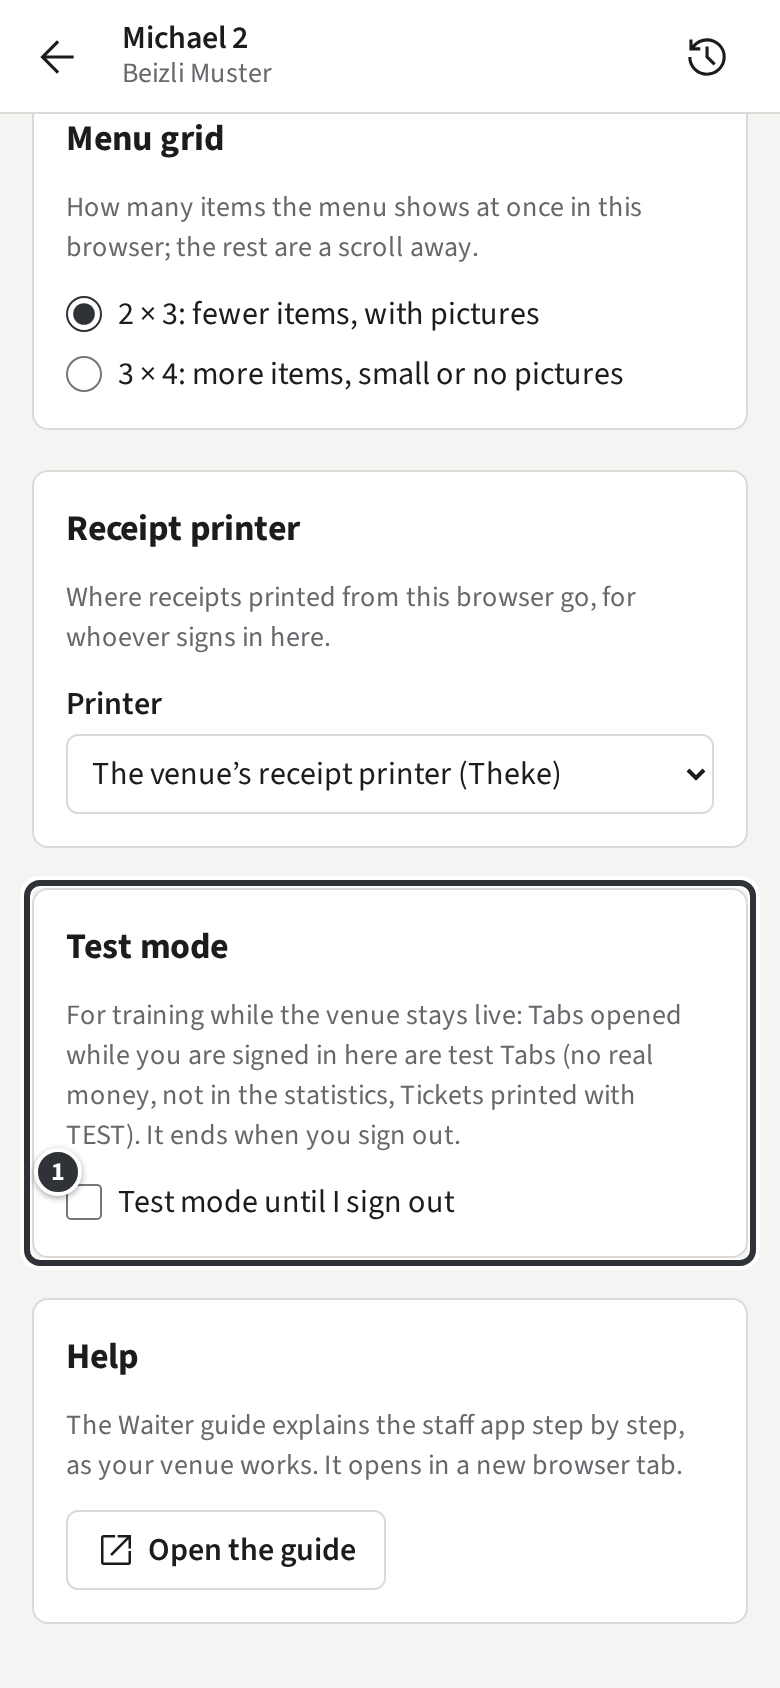
signed in on the phone itself finds the same switch in its Settings:
Test mode on this phone. The kitchen terminal has no switch; it shows test
Tickets with a TEST badge.
Before the venue goes live, or to train everyone at once.
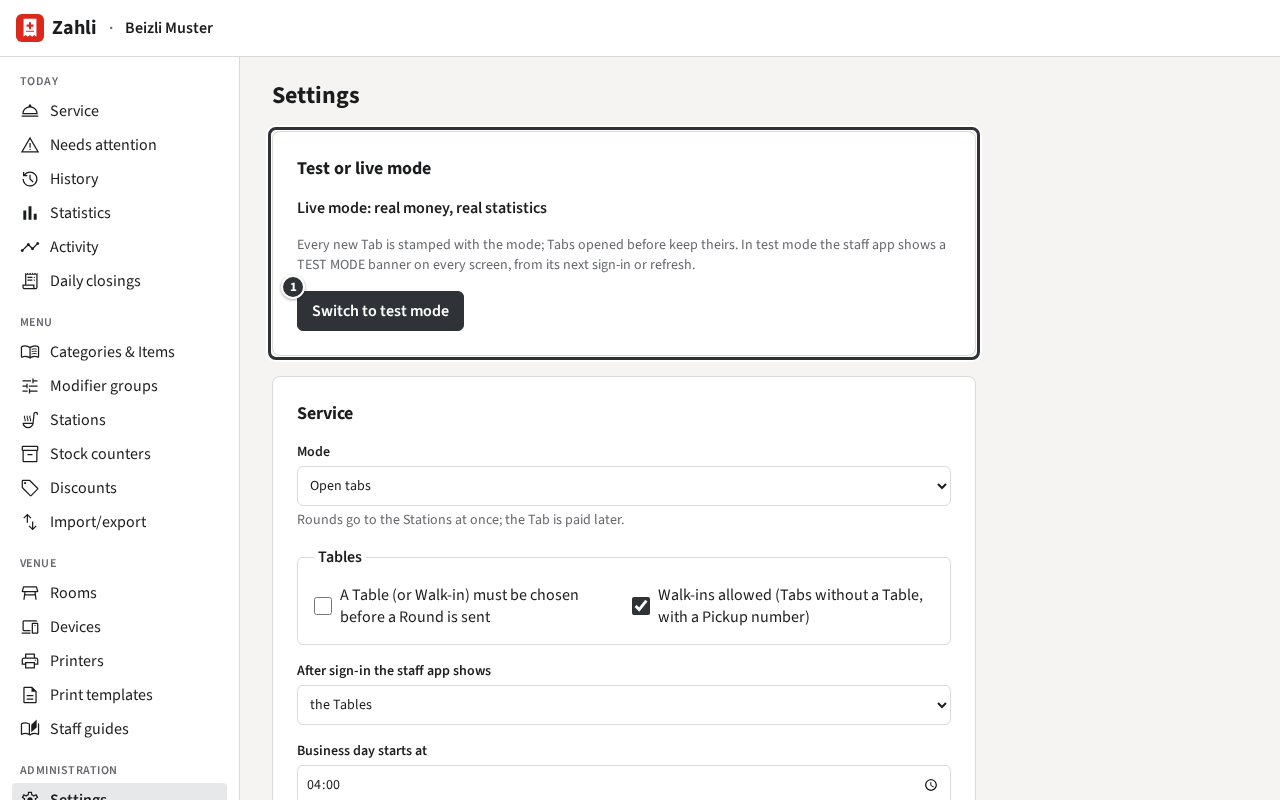
Open Administration → Settings.
Under Test or live mode, click Switch to test mode ① and confirm.
Every phone and browser is then in test mode, whatever its own switch says, and shows the
TEST MODE banner. Switch to live mode ends it. Never switch
the venue during service: the Tabs opened meanwhile would be missing from the day’s revenue.
When a staff phone loses its network, Waiters can still take cash and Twint on Tabs opened on that
phone (see Working offline). Back online, the phone books each such
Payment, unless the Tab changed meanwhile. Then the guest has paid, but nothing is paid on the
Tab. Zahli keeps the Payment aside for a Manager: the Tab shows
Needs attention in the staff app, and the Payment is listed under
Today → Needs attention, the page the admin app opens after you sign in.
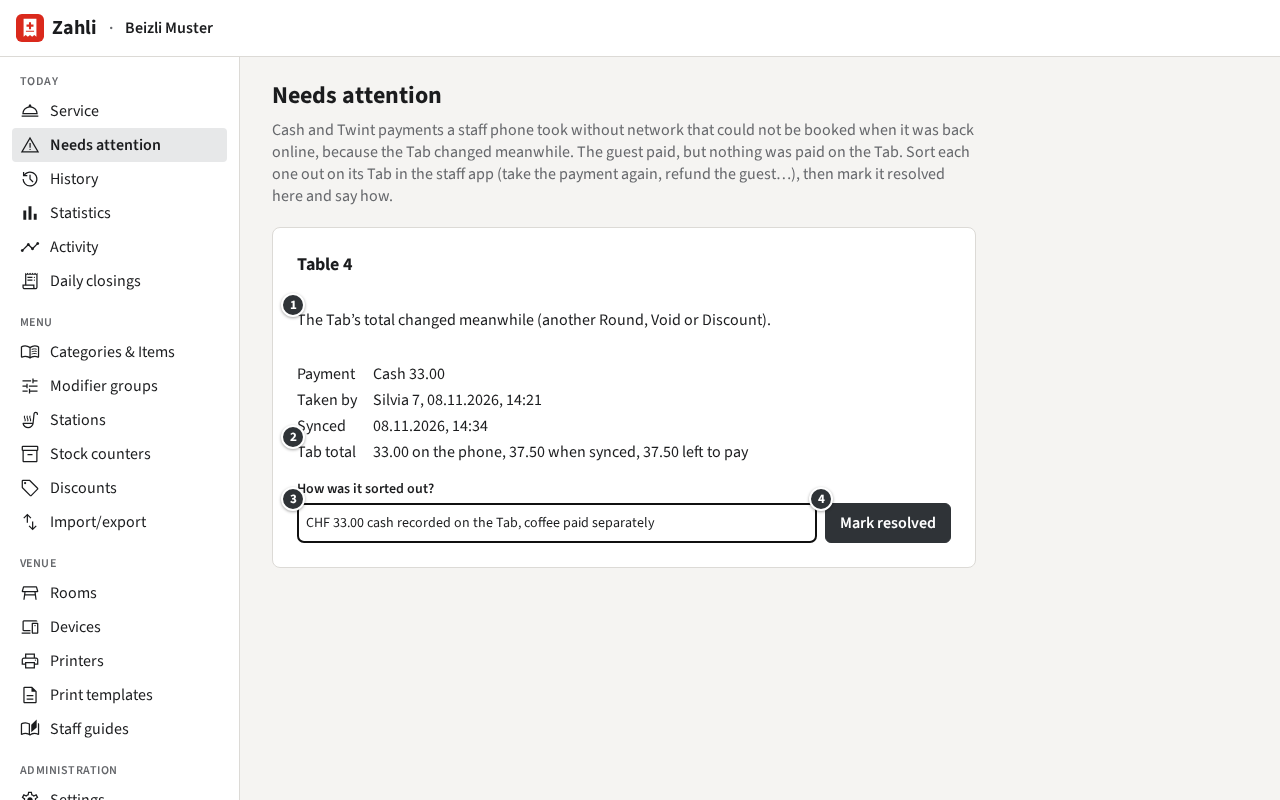
Example: on Table 4, Silvia’s phone had no network. She took CHF 33.00 in cash for the menu of the
day, the mineral water and the coffee. Meanwhile Michael added a second coffee from his browser, so
when the phone synced, the Tab came to CHF 37.50 and the cash was not booked.
① says why the Payment was not booked; ② what the Tab came to on the phone and when it synced,
and what is left to pay. To sort it out:
Open the Tab in the staff app and put it right with what you know: here, take the CHF 33.00
again as a cash Payment, since Silvia has the money, and let the guest pay the second coffee. If
the guest paid twice, refund the difference.
Back under Needs attention, write how you sorted it out ③ and click
Mark resolved ④.
The entry leaves the list, and the Tab no longer shows it. Look at
Needs attention every day before the Daily closing: the
cash in the drawer includes these Payments.
History and Tab detail
In the staff app you see the History as a Waiter does, with one addition:
Mine and Everyone switch between your own Rounds and Payments
and those of every Staff member. The admin app has the same History for the whole venue, always
everyone’s.
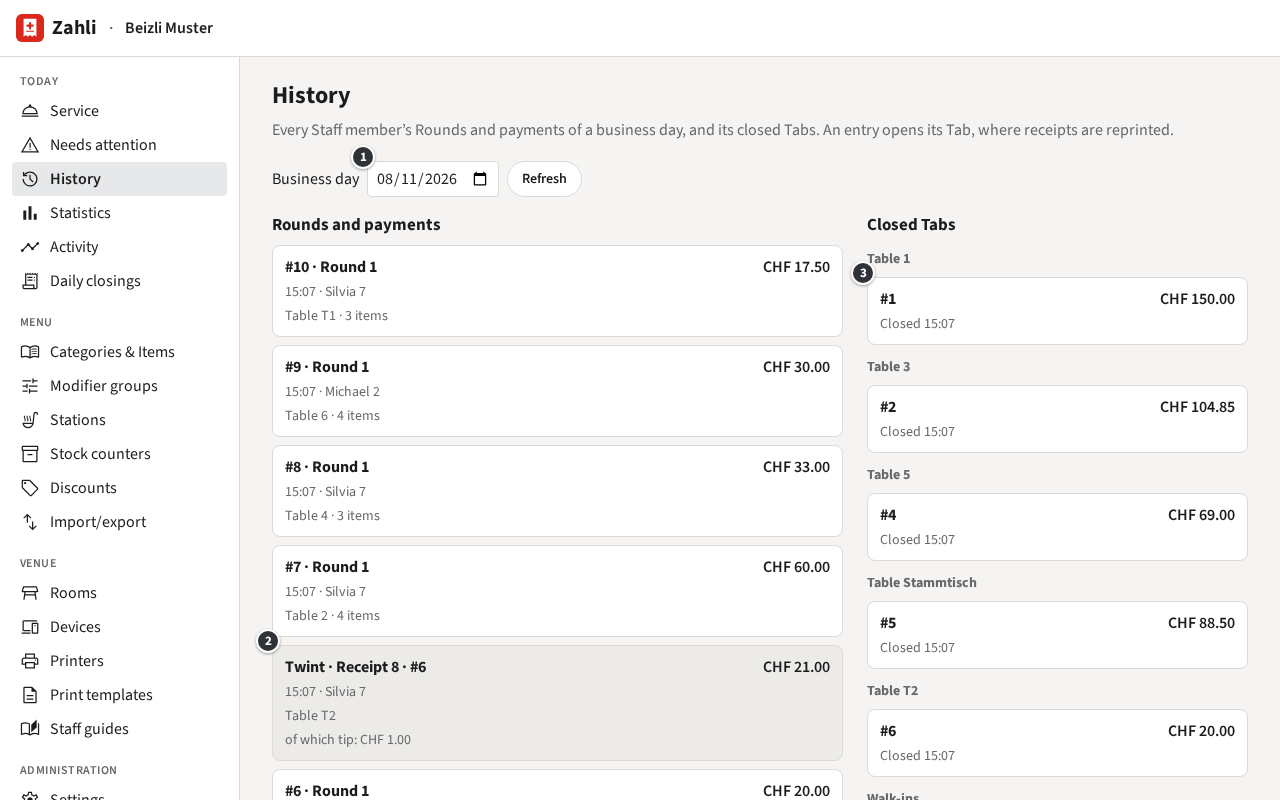
① picks another business day; Back to today comes back. Refresh
loads the day again.
On the left, every Round and Payment of the day, the latest first, with the time and who sent or
took it. A Payment ② shows its Tip and anything refunded.
On the right, Closed Tabs ③: the Tabs closed that day, by Table, the Walk-ins
last.
A test Tab carries a TEST badge. Click any entry to open its Tab detail.
The Tab detail shows one Tab as it happened, without changing anything: where it was, who opened
it and when it closed, its Rounds with Modifiers and Notes, Voids, Discounts, moves to another
Table, its Payments with Tips and Refunds, and the amounts down to the balance. Open the Tab page
shows the guest’s page of the Tab.
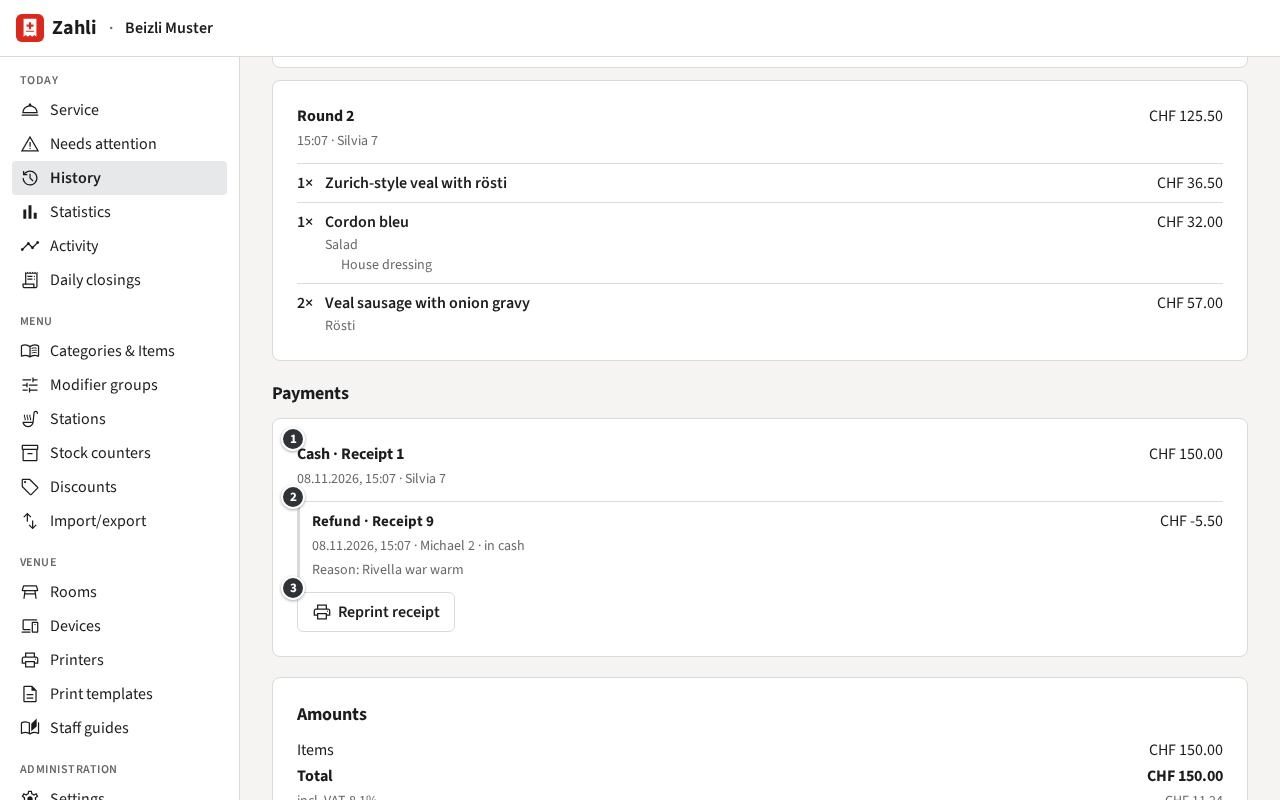
① each Payment, by method and Receipt number; ② a Refund made against it, with who made it and
the reason.
Reprint receipt ③ prints that Payment’s Receipt again. It goes to this browser’s
receipt Printer: the one chosen under Settings → Receipt printer
in the staff app in this browser, otherwise the venue’s default receipt Printer.
Open in service at the top opens the same Tab in the staff app, in its own
browser tab, to void, pay or correct there.
Back to the History returns to the History on the day you left it.
Example: the family from Table 1 asks for a copy of their Receipt. Michael opens
Today → History, clicks #1 under Table 1 and sees the cash Payment of
CHF 150.00 with his own Refund of CHF 5.50 for the warm Rivella. He clicks
Reprint receipt and the Receipt comes out of the Theke Printer.
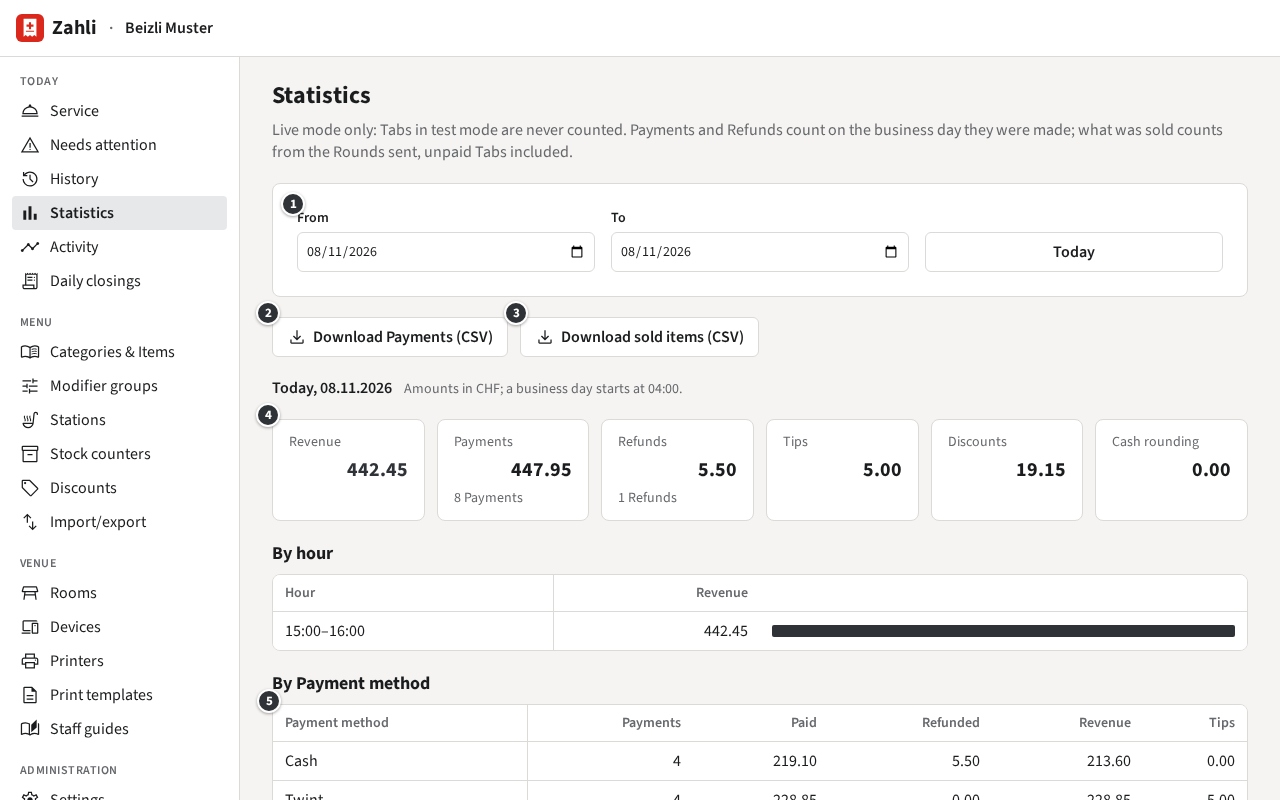
① From and To pick a range of business days; the page
opens on today’s, and Today goes back to it. A business day runs from the
cut-off (04:00 unless the venue settings say otherwise) to the next,
so a Payment at 01:30 still counts on the evening before.
Revenue: what Payments took off their Tabs, less what Refunds gave back.
Payments and Refunds: the money taken and given back,
with how many.
Tips and Cash rounding: taken on top, never revenue.
Discounts: what Discounts took off the Tabs.
Below come the breakdowns: By business day (for more than one day),
By hour, By Payment method ⑤ (a Refund counts under the method it
was paid back by), By Category, By Item,
By Staff member (the Rounds each sent, the Payments each took with their Tips, the
Refunds each made) and Discounts given.
Payments and Refunds count on the business day they were made. What was sold, by Category and Item,
counts from the Rounds sent, Tabs still open included; so its total is not the revenue.
② Download Payments (CSV) downloads every Payment and Refund of the range, one per row,
with business day, time, Receipt number, method, Payment provider, amount, Tip, rounding, Staff
member and Table. ③ Download sold items (CSV) downloads every line of the Rounds sent, with
Category, Item, Modifiers, quantity, units on the house, revenue and VAT rate. Both open in any
spreadsheet; send the Payments file to your bookkeeping.
Example: after lunch Michael checks the day. Revenue is CHF 442.45: the
Payments of CHF 447.95 less his Refund of CHF 5.50 for the warm Rivella. The CHF 5.00 in Tips, CHF 1.00
for Silvia and CHF 4.00 for himself under By Staff member, are not part of it. At the
end of the month he sets From to the first and To to the
last day and clicks Download Payments (CSV) for the bookkeeper.
Activity
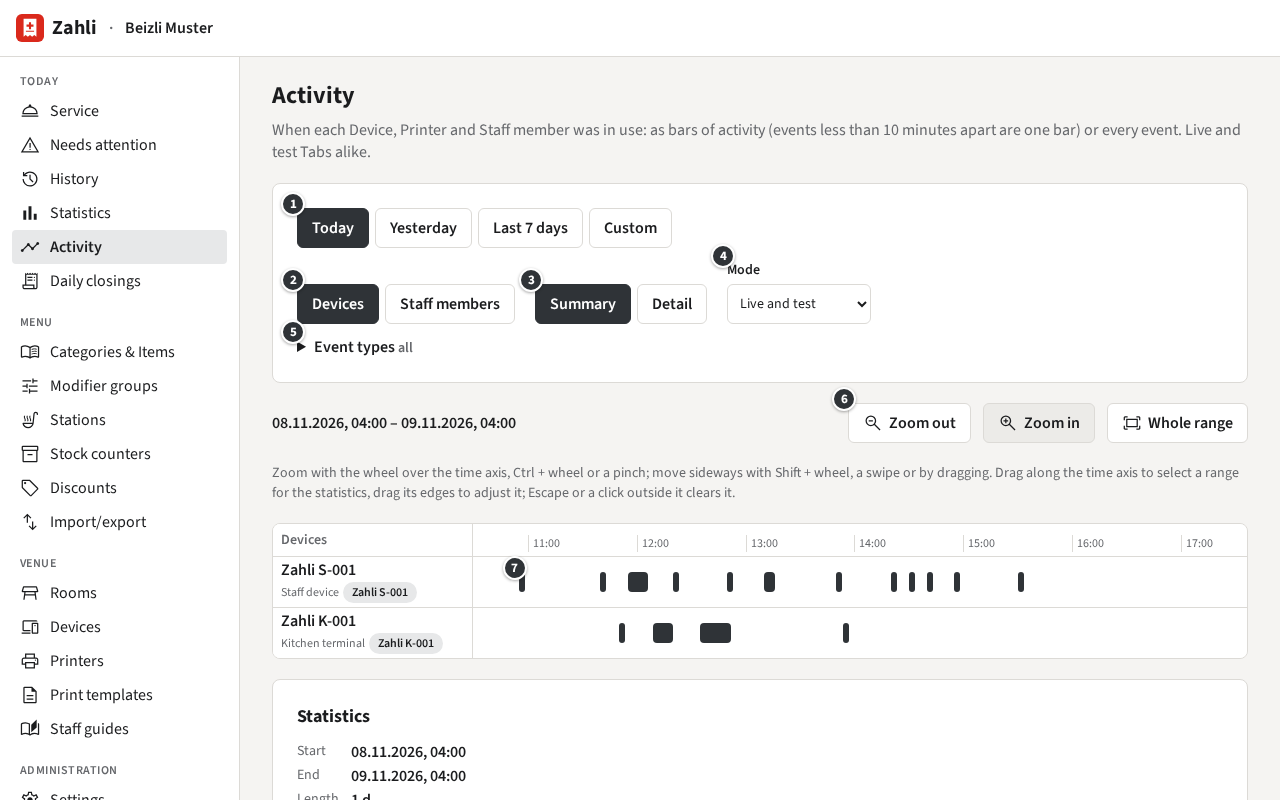
Today → Activity draws the venue’s day as a timeline: one row per Device or
Staff member, time running from left to right. It shows live and test Tabs alike.
① The range: Today (the current business day),
Yesterday, Last 7 days, or
Custom with a start and end time and Show.
② The rows: Devices (staff Devices, kitchen terminals and Printers,
Zahli’s with their Asset number) or Staff members. A row shows only once
it has something in the range. On a Staff member’s row a pale bar is the time they were signed in
on a staff Device.
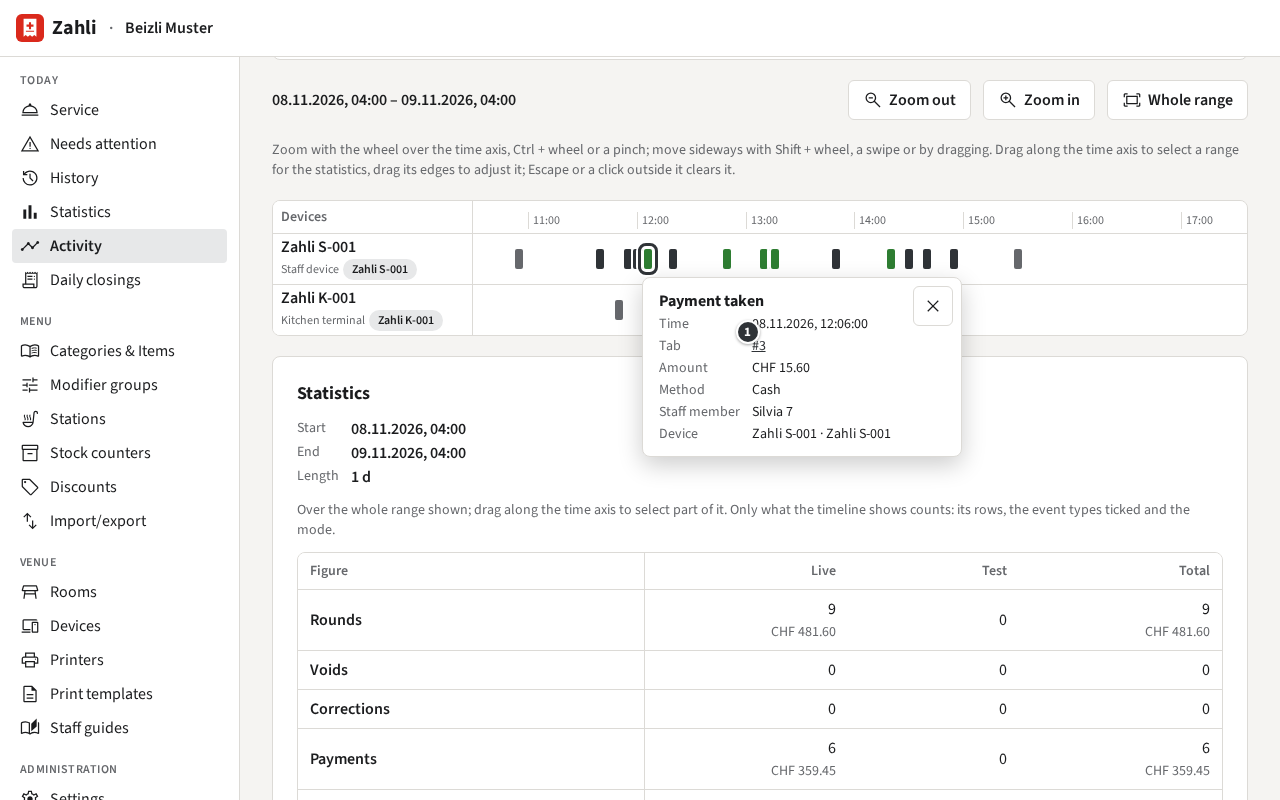
③ Summary draws bars ⑦, events less than 10 minutes apart forming one;
Detail draws every event as a mark of its own.
④ Mode: Live and test, Live only or
Test only; test events are drawn in the TEST style.
⑤ Event types: tick which to show, from Round sent,
Payment taken and Refund to
Ticket done on the kitchen terminal and Not printed
on a Printer.
⑥ Zoom in, Zoom out and Whole range; the mouse
wheel over the time axis zooms too, and dragging the rows moves sideways.
Rounds and Payments made in a browser belong to no Device: they show on the Staff member’s row only.
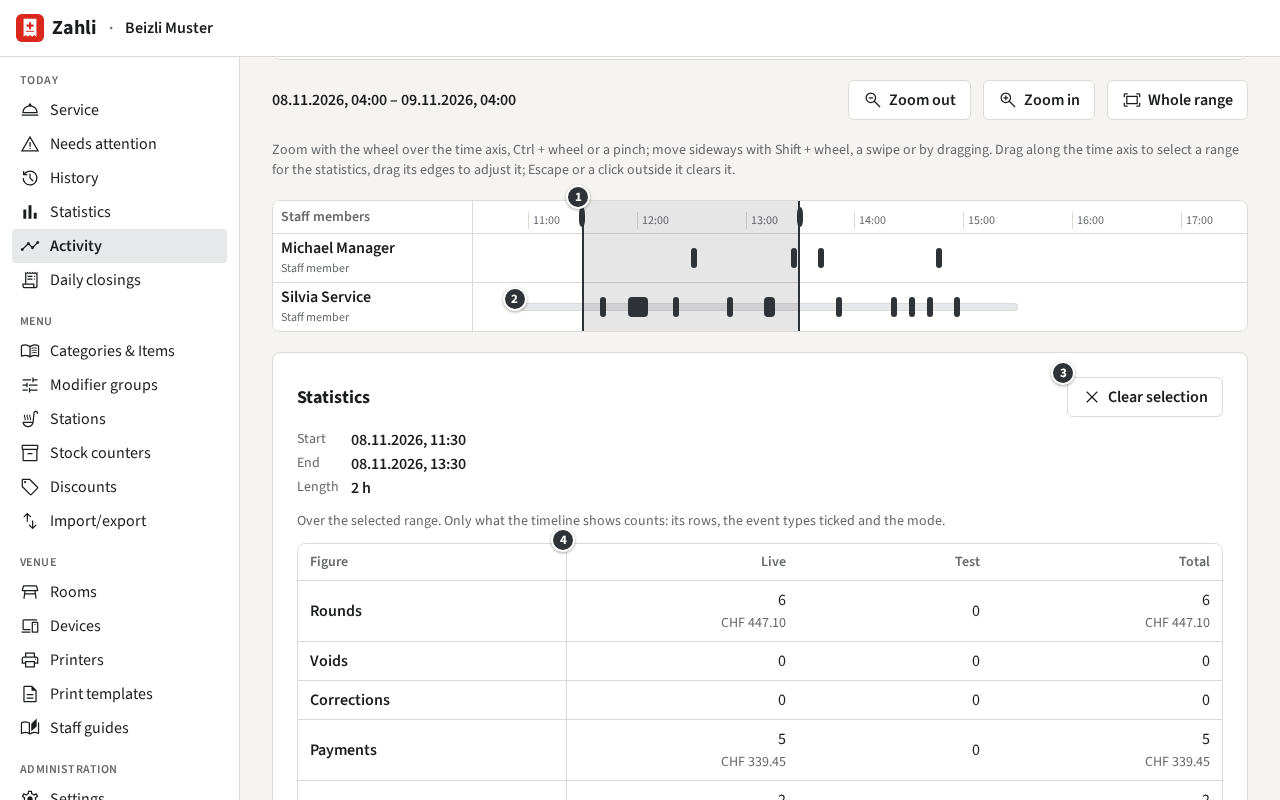
Below the timeline, Statistics adds up what the timeline shows: its rows, the
event types ticked and the mode. Drag along the time axis to select part of the range ①; drag its
edges to adjust it, and Clear selection ③ (or Escape) goes back to the whole range.
The figures stand in Live, Test
and Total columns ④: Rounds, Voids, Corrections, Payments per
method, Tips, Refunds and Net taken; for Printers also the Tickets, Receipts and
Guest slips printed and roughly how much paper they took. Then By row, and
under Never active the rows with nothing in the selection.
For revenue, use Statistics: it counts live Tabs only and by business day.
Example: Michael wants to know how lunch went. Under Devices he sees the
kitchen terminal K-001 marking Tickets done soon after Silvia’s Rounds from S-001. He switches to
Staff members, where Silvia’s pale bar ② shows her signed in from just
before eleven, and drags from 11:30 to 13:30 to see the Rounds and Payments of those two hours.
Daily closing
A Daily closing records a business day’s takings once and for all: revenue per Payment method, VAT
per rate, Tips per Staff member, cash rounding, and the cash you counted against the cash expected.
Like the statistics, it counts live Tabs only. Once made, a closing can never be changed.
Open Today → Daily closings. The page shows what closing the current business day
would record now; Business day picks another day not closed yet.
Check the figures. Expected cash is the cash taken, cash Tips included.
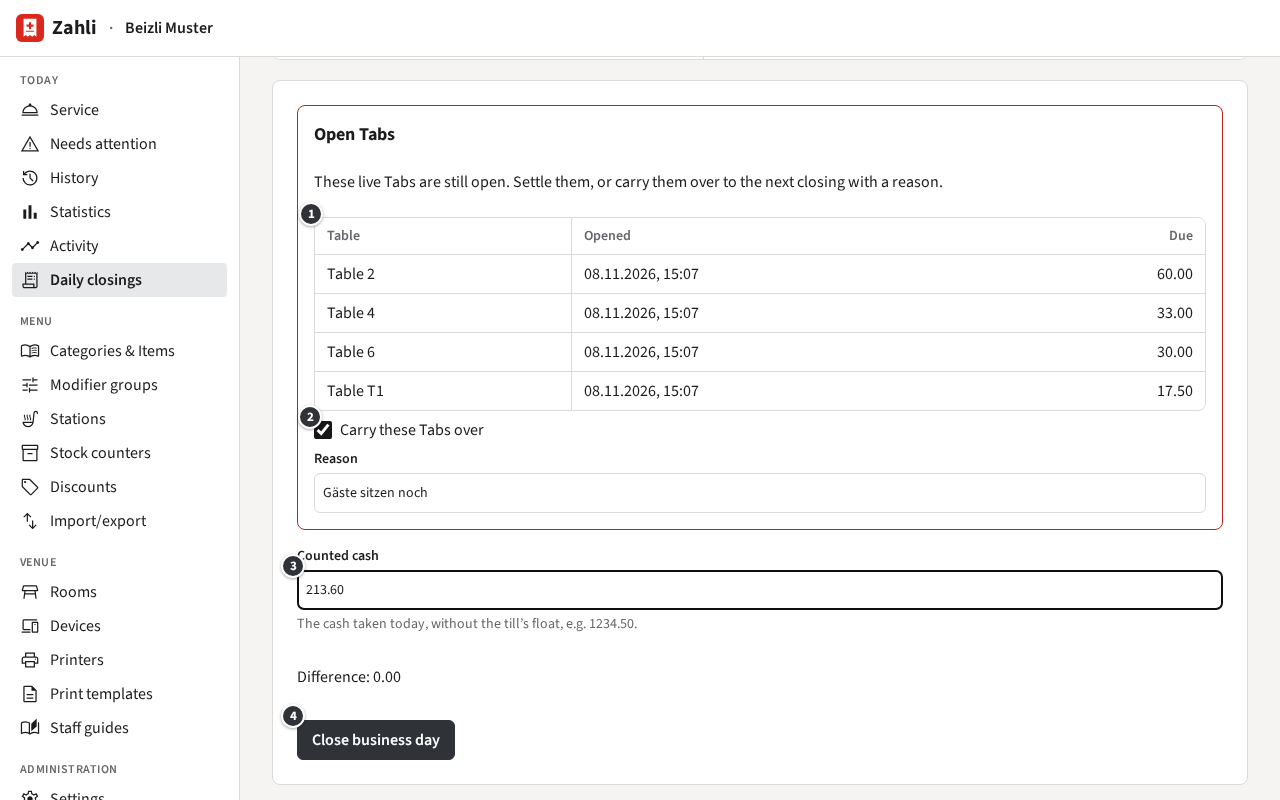
If live Tabs are still open, they are listed ① and block the closing. Settle them first, or tick
Carry these Tabs over ② and give a Reason: they then count in the next
closing once paid. Test Tabs never block.
Count the cash in the till, without its float, and enter it under Counted cash ③.
Difference shows how far it is off.
Click Close business day ④. The closing opens.
A closing also counts the Payments and Refunds of earlier days that no closing has counted yet, and
says so. A day before the latest closed one can no longer be closed.
Under Closings the page lists every closing, the latest first, with revenue,
expected and counted cash, the difference, how many Tabs were carried over and who closed it. Click
a day to open its closing.
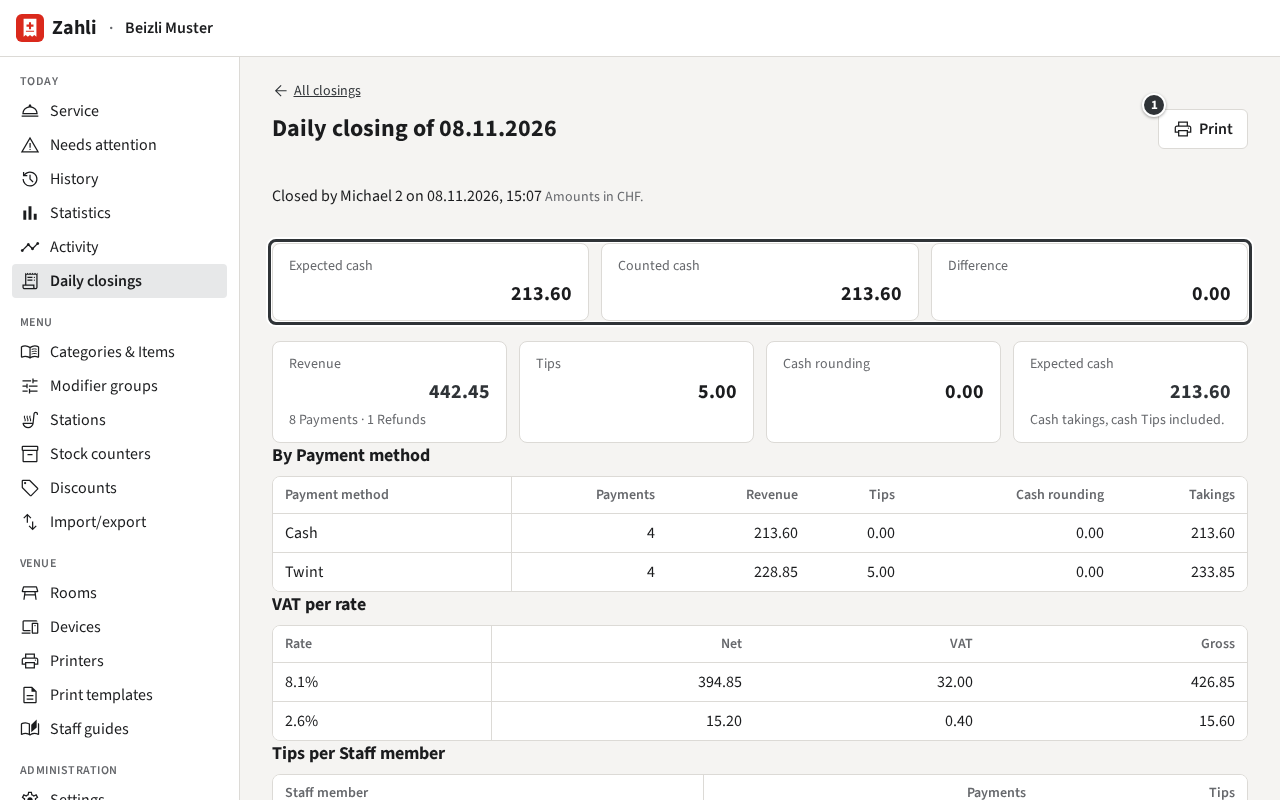
The top row compares the cash expected, counted and the difference; below come the figures and the
Tabs carried over with the reason. Print ① prints the closing on the venue’s
default receipt Printer (see Printers).
Example: at the end of lunch Michael counts CHF 213.60 in the till, exactly the expected cash, so
the difference is 0.00. Tables 2, 4, 6 and T1 are still sitting, so he ticks
Carry these Tabs over with the reason “Gäste sitzen noch”, clicks
Close business day and then Print for the folder behind the counter.
Categories and Items
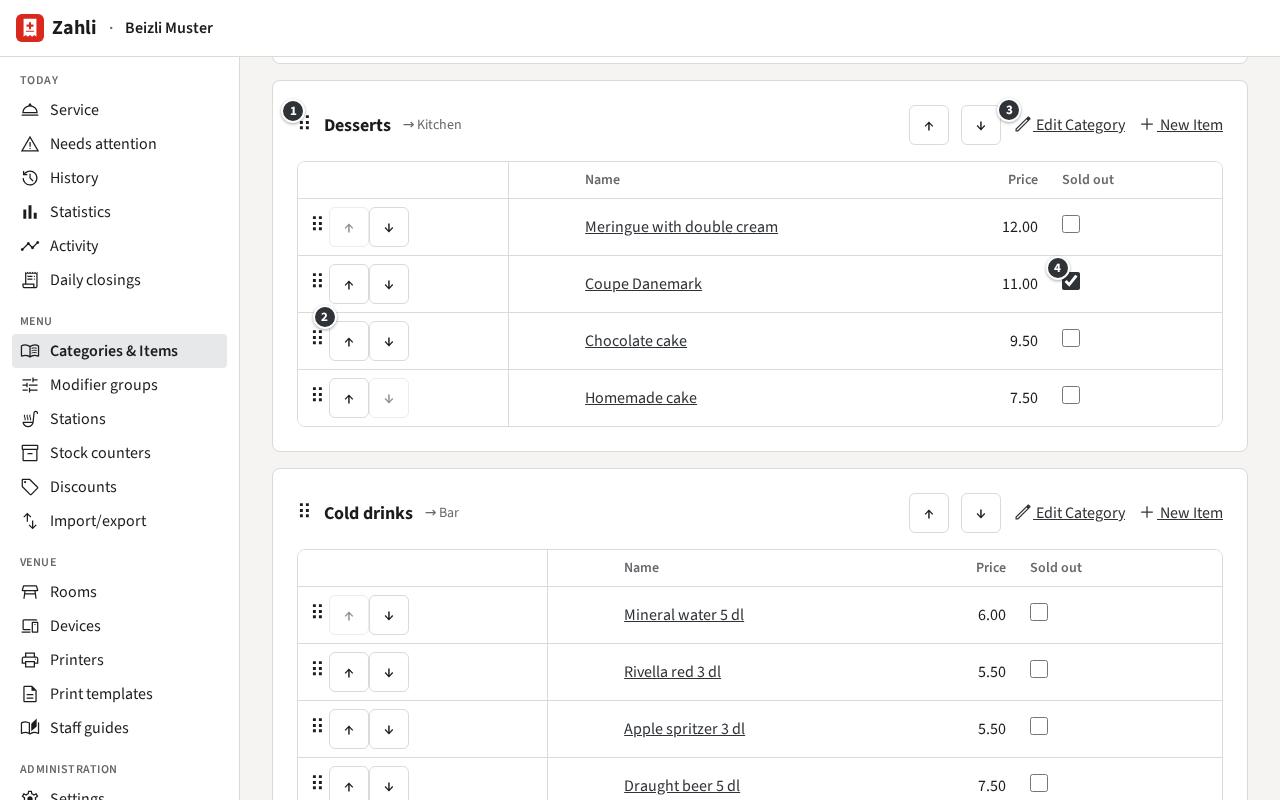
The menu is under Menu → Categories & Items: each Category is a tab of the staff app’s
menu (Taking a Round), with its Items in the order the staff app
shows them. After a Category’s name, the arrow names the Station its Tickets go to, such as
→ Kitchen.
① moves the whole Category: drag it by the handle ⠿.
② moves an Item within its Category: drag it by its handle, or click ↑ or ↓.
③ Edit Category; next to it, New Item adds an Item to this Category.
④ the Sold out box.
Moving and ticking are saved at once, and phones and browsers in service get each change by
themselves. Changes never touch Rounds already sent: they keep the name, price and VAT rate they
were sent with.
The forms enter one name for each thing, the German one, which every name has. Beizli Muster’s
English names, such as Chocolate cake for the Schoggikuchen, came with its menu file
(Menu import and export).
Enter the name and choose the Station its Items’ Tickets go to.
Leave On the menu ticked and click Create.
Example: for the summer, Michael adds a Category Glace, made in the Küche. It appears at the end
of the menu; he moves it up with ↑ until it follows the Desserts.
Untick On the menu to hide a Category and all its Items in the staff app, such
as the Glace in winter; the menu marks it Off the menu. Tick it again to bring
it back as it was. Remove Category works only for a Category without Items.
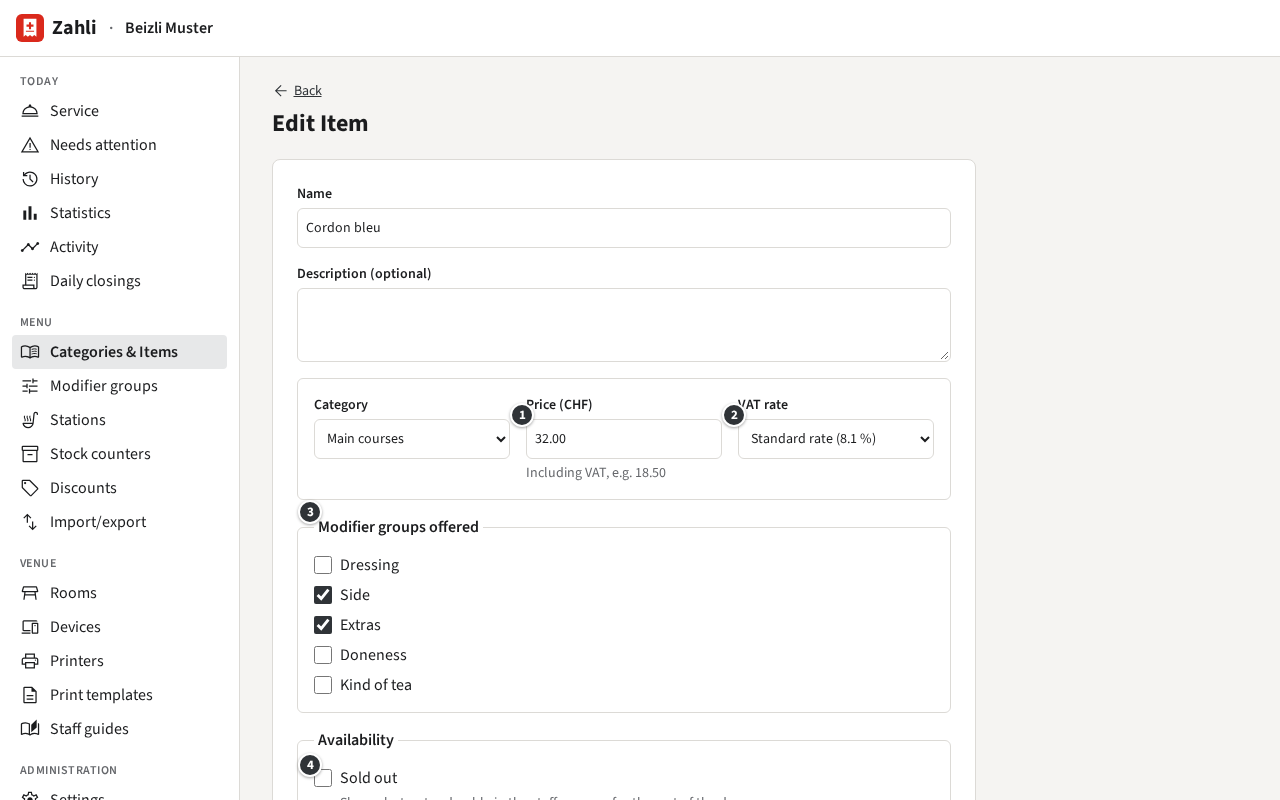
Click New Item next to its Category, or an Item’s name to change it.
① Price (CHF): what the guest pays, VAT included, such as 32.00.
② VAT rate: one of the venue’s rates. A Tenant admin sets them up; you choose
among them.
③ Modifier groups offered: the groups its dialog asks for, such as the side
(Modifier groups).
④ Availability: Sold out and
On the menu, as for a Category.
Note required, below: for an Item that stands for several things. Beizli
Muster’s Homemade cake asks which cake before it can be added.
Click Create or Save.
Example: the cordon bleu costs 32.00 at the standard rate and offers Side and Extras, so the
Waiter picks fries, rösti, noodles or salad and may add cheese or an egg.
Whether an Item is counted, like the chocolate cake, is set on its counter
(Stock counters).
Once the Item exists, the form’s Image part takes a picture:
Add image uploads a JPEG, PNG or WebP of up to 10 MB, cropped to a square
for the staff app. Where Zahli’s photo search is set up, the same part also has
Search for photos: type Cordon bleu, click Search
and click a photo. It is stored like an upload, with its photographer’s name.
Replace image and Remove image change it later.
Drag Categories and Items by their handles, or use ↑ and ↓. Items stay in their Category; to move
one to another Category, choose its Category in its form.
Example: the chocolate cake sells best, so Michael moves it to the top of the Desserts with ↑
twice.
Tick its Sold out box ④ in the menu, or in its form. In the staff app it keeps
its place, in red, and cannot be tapped (Sold out). It stays sold out,
also the next day, until you untick it. The staff app itself has no switch for it, so Waiters
tell you when something has run out.
Example: the Coupe Danemark ran out at lunch. Michael ticks it; in the evening, with fresh ice
cream, he unticks it.
An Item whose Stock counter is at zero is sold out by itself, and the menu marks it
Out of stock until the counter is refilled.
To hide an Item for a while, untick On the menu. Remove Item, at
the bottom of its form, removes it for good, without asking first; Rounds already sent keep it.
Modifier groups and Follow-up groups
A Modifier group is a set of choices the staff app asks for with an Item, such as the side of a
cordon bleu (Taking a Round). One group can be offered with many
Items. They are under Menu → Modifier groups.
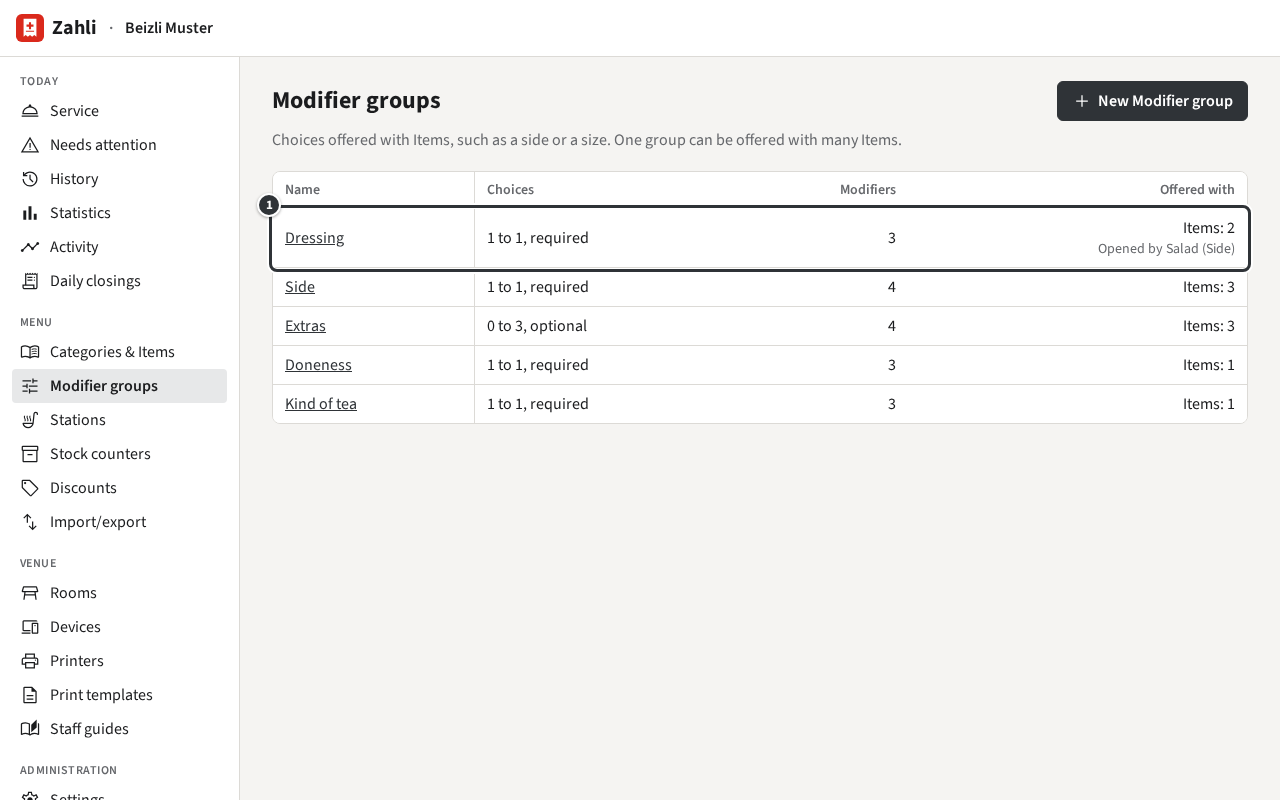
The list shows how many Modifiers each group has to pick, how many Modifiers it holds, and how
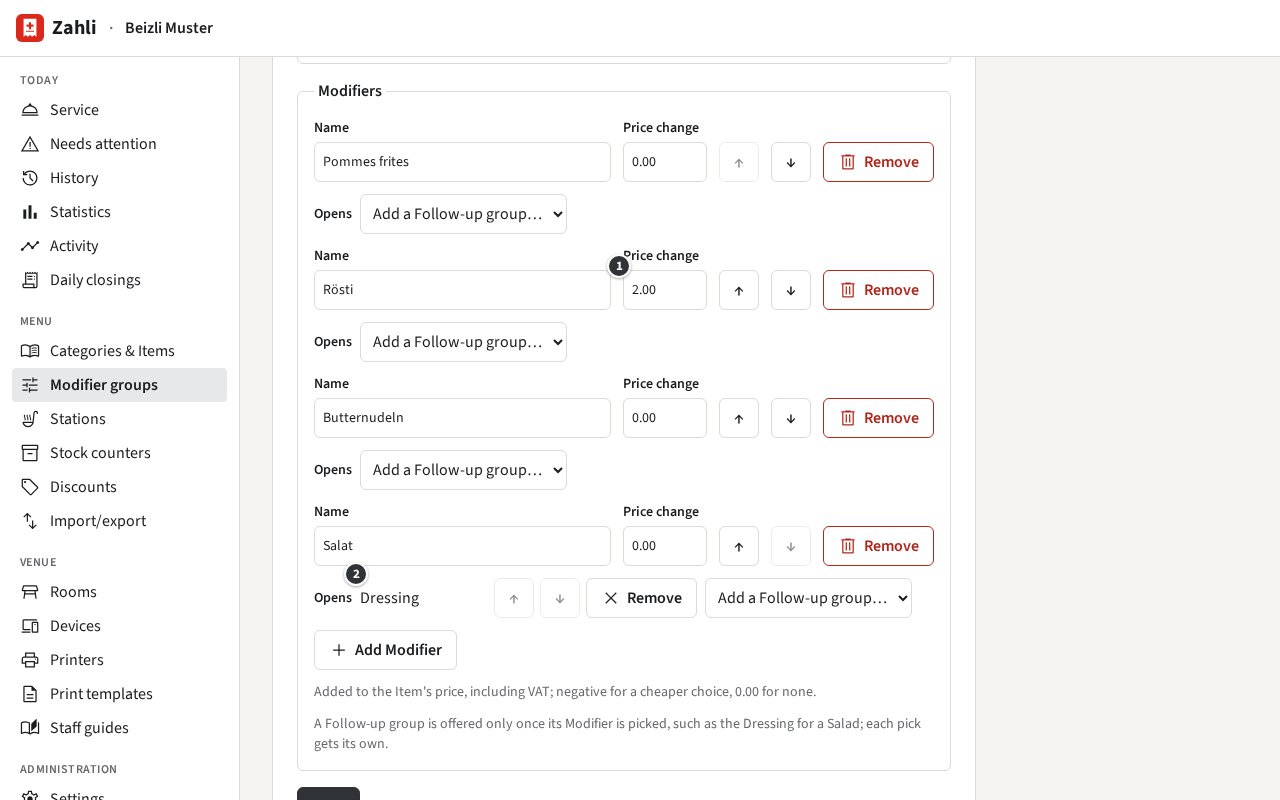
many Items offer it. A Follow-up group also says which Modifiers open it ①: Dressing is offered
with Items: 2 and is
Opened by Salad (Side).
Click New Modifier group, or a group’s name to change it.
Enter the name and, under Choices per unit, how many may be picked for
one unit of an Item: At least and At most.
Tick Required if the Waiter must pick; an optional group may
be skipped.
Under Modifiers, click Add Modifier
for each choice and enter its name and Price change ①: added to
the Item’s price, VAT included; 0.00 for none, negative for a cheaper choice. ↑ and ↓ set the
order the dialog shows; Remove takes a Modifier out.
Click Create or Save.
Offer the group with its Items: tick it under Modifier groups offered in each
Item’s form (Categories and Items).
Example: Beizli Muster’s Side is required, at least 1 and at most 1, so the Waiter picks
exactly one side; Rösti costs 2.00 more. Extras is optional, 0 to 3: up to three of cheese, egg,
bacon or no onions.
A required group needs at least 1, the minimum may not be above the maximum, and a group needs
at least as many Modifiers as its minimum; the form says which rule a change breaks. Rounds
already sent keep the picks and prices they were sent with.
A Modifier can open further groups, which the dialog offers only once it is picked. Under the
Modifier, Opens ② lists them:
Choose a group in Add a Follow-up group….
Choose another for a second one; ↑ and ↓ set their order, Remove
stops opening one.
Click Save.
Example: in Side, Salad (Salat in the form, which shows the German names) opens
Dressing. A cordon bleu with salad then asks for a dressing, one with rösti does not. The
Waiter sees the group right after the side, titled Dressing · Salad.
A Follow-up group is an ordinary group: Beizli Muster also offers Dressing directly with the
green salad.
Its rules apply only while it is offered: Dressing is required, but only once salad is picked.
Each pick opens its own copy, so two sides picked each get their own dressing.
A Follow-up group may open others in turn, at any depth, but never itself: a change that makes
a loop is refused, naming the chain.
When a required Follow-up group has fewer choices left than its minimum, because Stock counters
ran out, the Modifier that opens it is hidden. If all dressings were gone, Salad would disappear
from the sides.
Remove Modifier group, at the bottom of its form, deletes it at once, without
asking first. The hint next to it says how many Items offer it; they and the Modifiers that open
it no longer do. Removing a single Modifier from a group (Remove, then
Save) also drops the groups it opened. Rounds already sent keep their picks.
Stations
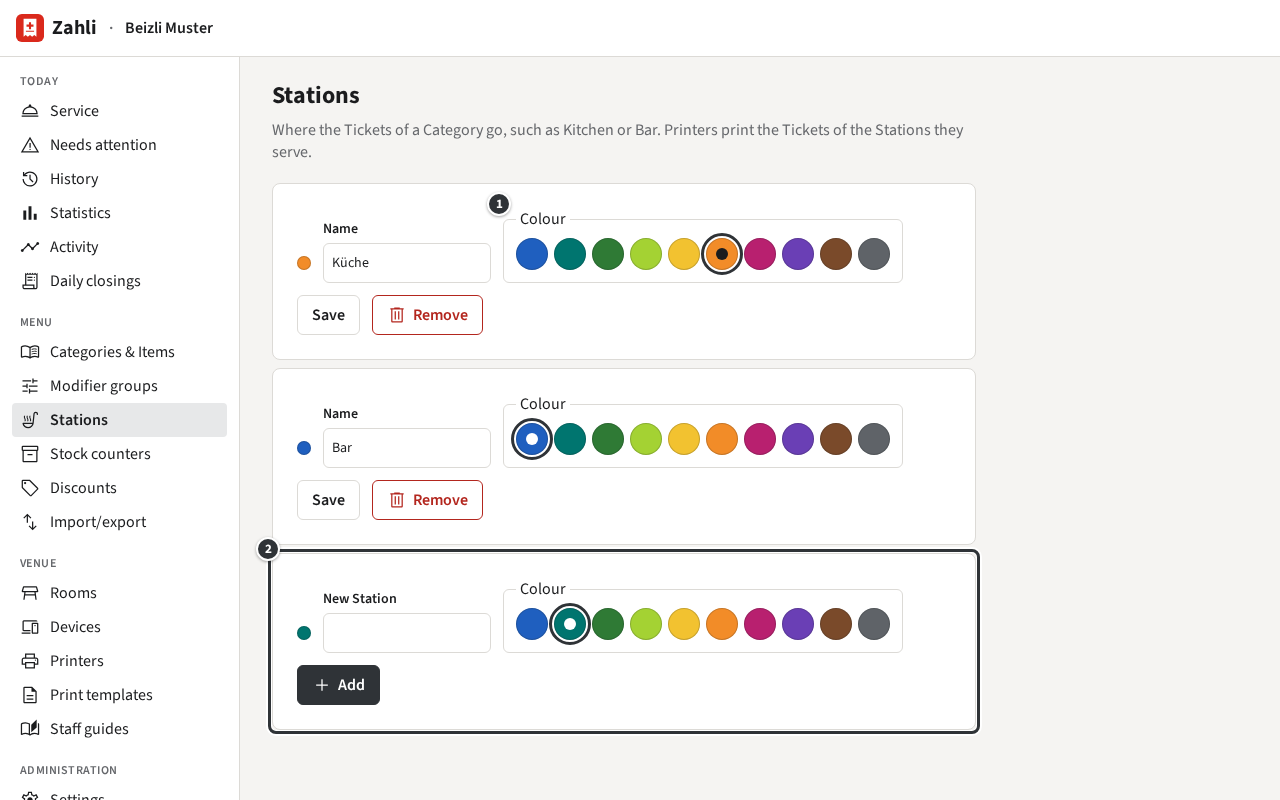
A Station is where the Tickets of a Category go, such as Beizli Muster’s Küche and Bar. Every
Category sends its Items to one Station; a Printer prints the Tickets of the Stations it serves,
and a kitchen terminal shows those of the Stations chosen on it. The Stations are under
Menu → Stations.
Change a Station’s name or pick another of the ten colours ① and click Save in its
row. When a kitchen terminal shows several Stations, each Ticket carries a badge with its
Station’s name in its colour: the orange Küche and the blue Bar
(Your screen). Pick colours that tell the Stations apart at a glance.
A Category’s Station is set on the Category: under Menu → Categories & Items, click
Edit Category, choose its Station and click
Save. The menu shows it after each Category’s name, such as → Bar for the Cold
drinks (Categories and Items).
Example: to send the Category To take away to the Küche instead, Michael chooses Küche as its
Station. Rounds sent from then on go to the Küche; Tickets already sent stay where they went.
Which Printer prints a Station’s Tickets is set on the Printer
(Printers). A kitchen terminal shows the Stations chosen on the tablet
itself (Choosing Stations).
Click Remove in its row. A Station that Categories still send to stays, with the
message Categories still send their Tickets to this Station. Route them elsewhere first.
Stock counters
A Stock counter counts something the venue can run out of, such as Beizli Muster’s chocolate cake
or its menu of the day. Each unit ordered of an Item or Modifier that draws from it takes one unit
when the Round is sent; a Void or a correction gives it back. The counters are under
Menu → Stock counters.
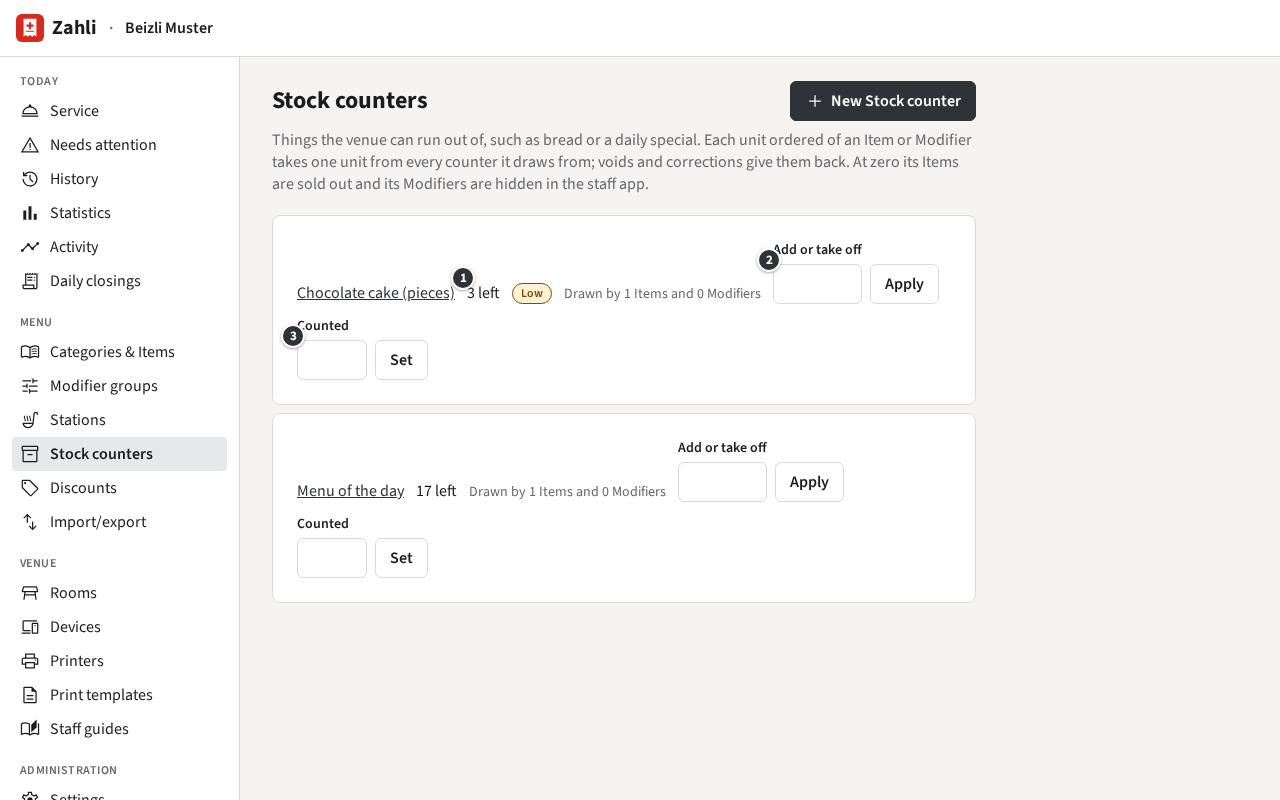
① how many are left; Low once few are left,
None left at zero.
② Add or take off adds units to what is there, or takes them off.
Under Show what is left from, enter from how many on the staff app shows what is left.
Tick the Items that draw from it and the Modifiers that draw from it, and click
Create.
Example: in the morning the Beizli bakes five pieces of chocolate cake. Its counter Chocolate
cake (pieces) starts at 5, shows what is left from 3, and the Item Chocolate cake draws from
it. After two pieces for Table 6, the staff app’s tile says 3 left
(Sold out).
One counter can serve several Items and Modifiers: a counter Rösti (portions) could be drawn by
the Zurich-style veal with rösti and by the Modifier Rösti of the sides. A unit ordered takes one
unit, also when the Item and its Modifier both draw from the same counter.
Click a counter’s name to change its name, where it shows what is left from, or what draws from
it. Remove Stock counter, at the bottom, stops its Items and Modifiers from drawing from it.
During service, add what comes in: enter the number under ② and click
Apply. A negative number takes units off, such as -1 for a piece that fell
on the floor; taking off more than is left is refused. Units ordered meanwhile still count, so
adding is safe while the Waiters keep ordering.
To set what is really there, enter it under ③ and click Set, best when
nobody is ordering.
Example: at three in the afternoon, Michael brings another cake of 12 pieces: he enters 12 and
clicks Apply, and 3 left becomes 15. At closing he counts 4 pieces where the
counter says 5: he enters 4 under Counted and clicks Set.
When a counter reaches zero, its Items are sold out in the staff app and its Modifiers are no
longer offered. A Round that would take more than is left is not sent; the Waiter sees which item
ran out. Under Menu → Categories & Items such an Item shows
Out of stock.
As soon as you add units, they can be ordered again by themselves: the counter does not tick
Sold out, so there is nothing to untick.
Discount presets
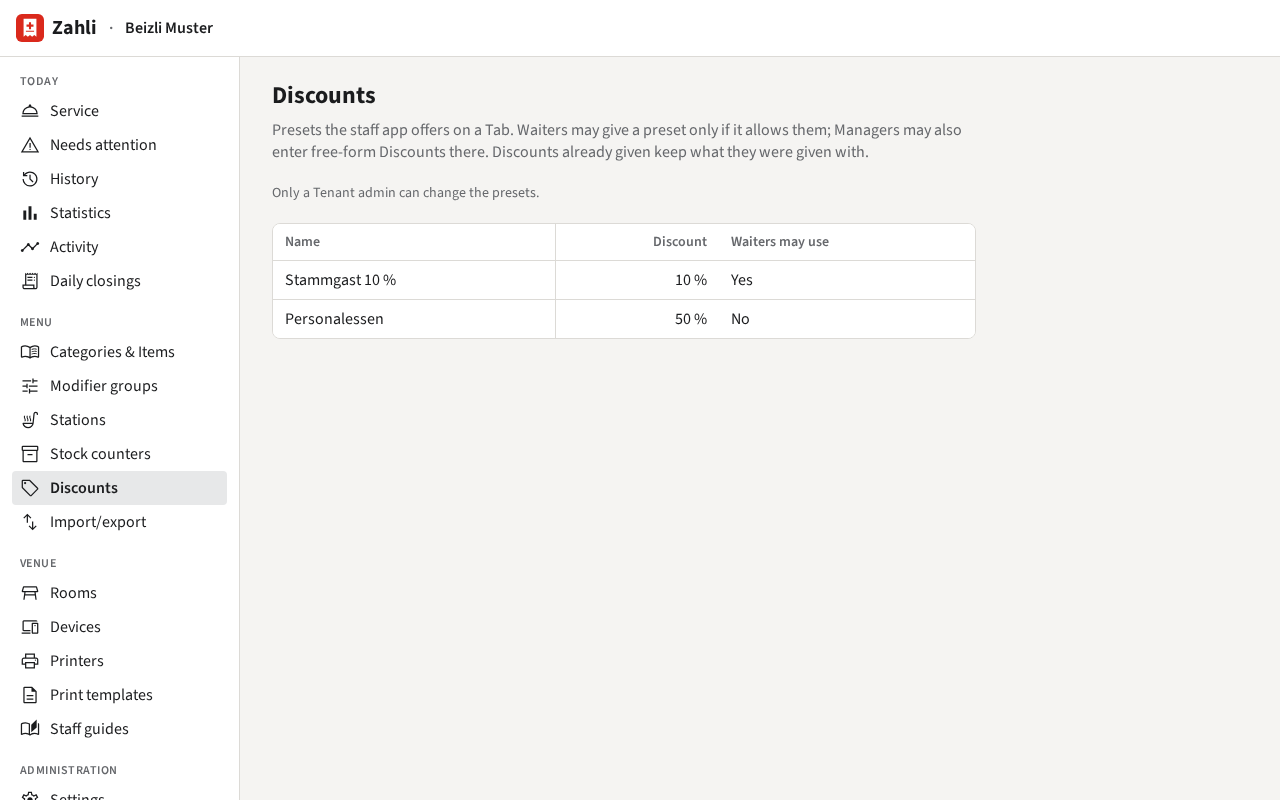
Discount presets are the Discounts your venue has prepared, so nobody types a percentage at the
table. Menu → Discounts lists them: their name, the Discount, and whether
Waiters may give them.
As the page says, Only a Tenant admin can change the presets. Ask yours for a new preset, another value, or to
let Waiters give one.
Example: Beizli Muster has two. Stammgast 10 % (Regular 10 % in the English staff app) gives
regulars 10 %, and Waiters may give it. Personalessen (Staff meal), 50 %, is for Managers only.
In the staff app, you give a preset like a Waiter does (Discounts), but
you may give every preset, also those Waiters may not use.
Example: after her shift, Silvia eats a cordon bleu at the Stammtisch. Michael opens her Tab and
gives Personalessen; Silvia could not have given it herself.
A Discount keeps the name and value the preset had when it was given; a later change to the
preset does not change it. A Discount of any other amount is a free-form Discount
(Discounts, Corrections and Refunds).
Menu import and export
Under Menu → Import/export, the whole menu travels as one JSON file: to keep a
copy before big changes, to change many prices at once in a text editor, or to copy the menu to
another venue. The Rooms have their own file, on the Rooms page (Rooms).
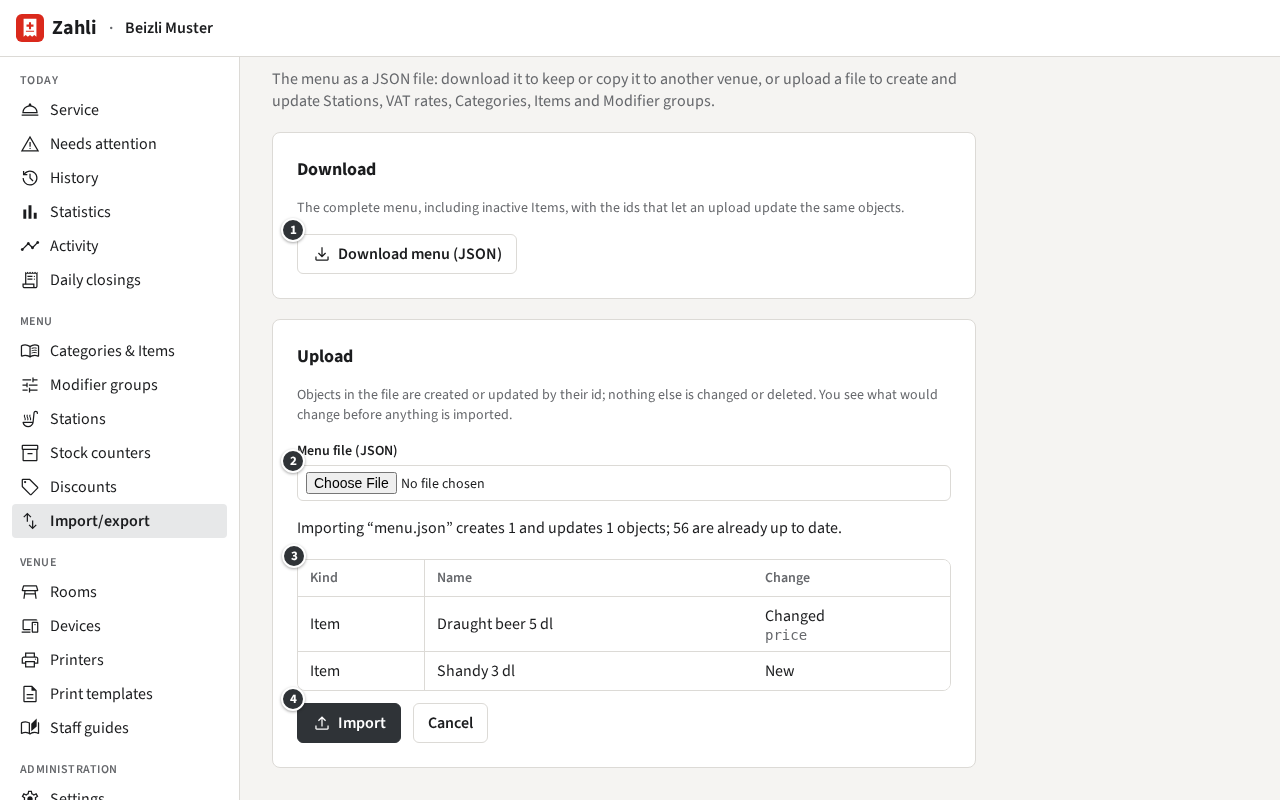
Click ① Download menu (JSON). You get menu.json: the Stations with their colours, the VAT
rates, the Categories with their Items (also those off the menu), and the Modifier groups with
their Follow-up groups, each with its id. Stock counters and Discount presets are not in it.
Pictures are only named: in the same venue they stay, in another one the Items have none until you
add them again.
Zahli checks it and shows what importing it would change ③, without changing anything yet:
each Station, Category, Item or Modifier group it would create (New)
or change (Changed, with the fields), and how many are already up to
date.
Click ④ Import to import it, or Cancel.
Example: Michael raises the draught beer from 7.50 to 8.00 and adds a Shandy 3 dl to the Cold
drinks in the downloaded file, then uploads it. The page shows one Item to create and one to
change, its price; everything else is up to date. He clicks Import.
What the file contains is created or updated by its id; what it leaves out stays as it is, and
nothing is ever deleted. The order of things in the file becomes their order on the menu. A file
that breaks a rule, such as prices in another currency or a Follow-up group that would open
itself, is not imported; the page lists each problem with where it is in the file.
A file that creates or changes VAT rates is refused with
This file creates or changes VAT rates, which only a Tenant admin may do. Ask a Tenant admin to import it, or leave the VAT rates as they are.
Download the menu in one venue and upload the file in the other, which must use the same
currency. Since the ids stay the same, uploading a newer file later updates the copies instead of
adding new ones.
The first copy brings the first venue’s VAT rates along as new ones, so a Tenant admin imports
it; later files, with the same rates unchanged, a Manager can import too.
Example: Beizli Muster opens a summer kiosk at the lake as a venue of its own. Michael downloads
the menu, Anna Admin uploads it in the kiosk, and Michael takes the hot meals off the menu
there.
A later upload sets everything the file names as the file has it, also what was changed in the
copy since: uploaded again, the Beizli’s file would put the kiosk’s hot meals back on its menu.
The menu is the same in test and live mode, so there is nothing to copy between them.
Laying out Rooms
The Rooms are the plans Waiters tap in the staff app
(Rooms and Tables). You draw them under
Venue → Rooms: each Room with its Tables, where a Tab can be opened, and
its decorations, shapes or text that help find the way, such as a bar counter or the entrance.
Beizli Muster has two Rooms, the Gaststube and the Terrasse.
To add a Room, enter its name in Name of the new Room and click Add Room.
Pick a Room by its tab above the plan. Under Room you change its
Name, its Width and Height and its
Grid size.
Move earlier and Move later change the order of the Rooms in the
staff app.
Clear Shown in the staff app to hide a Room, for example the Terrasse in winter. The Room and its
Tables disappear from the staff app and show Hidden here until you tick it
again. A Room with an open Tab at one of its Tables cannot be hidden.
Delete Room removes the Room with all its Tables and decorations, after you
confirm; not while one of its Tables has an open Tab. The Tabs of removed Tables stay in the
History.
Adding, moving and deleting a Room take effect at once. Everything else you change in a Room,
including the Tables and decorations, takes effect only when you click Save.
Add Table and Add round Table place a new Table in the Room, named
with the next free number. Add decoration adds a shape, and
Add text a text without a shape, such as Fensterseite in the Gaststube.
Then work on the plan:
Move: drag a Table or decoration. With Snap to grid ticked it follows the grid; hold
Alt to place it freely. The arrow keys move the selection too, Shift+arrow by one grid step. The
grid shows only here, never in the staff app, and the snap setting is kept in this browser.
Resize by its square corner, rotate by its round handle, in steps of 15° (with Shift in
single degrees).
Select several: Shift- or Ctrl-click (⌘ on a Mac), drag across the empty floor, Ctrl+A, or
Select all Tables. A selection moves together.
Delete: the Delete key, or Delete in the panel.
Undo (Ctrl+Z) and Redo (Ctrl+Shift+Z) go back and forward
over your changes, also after saving, until you open another Room.
Table names are unique across all Rooms: a second Table 5 is refused, also on the Terrasse.
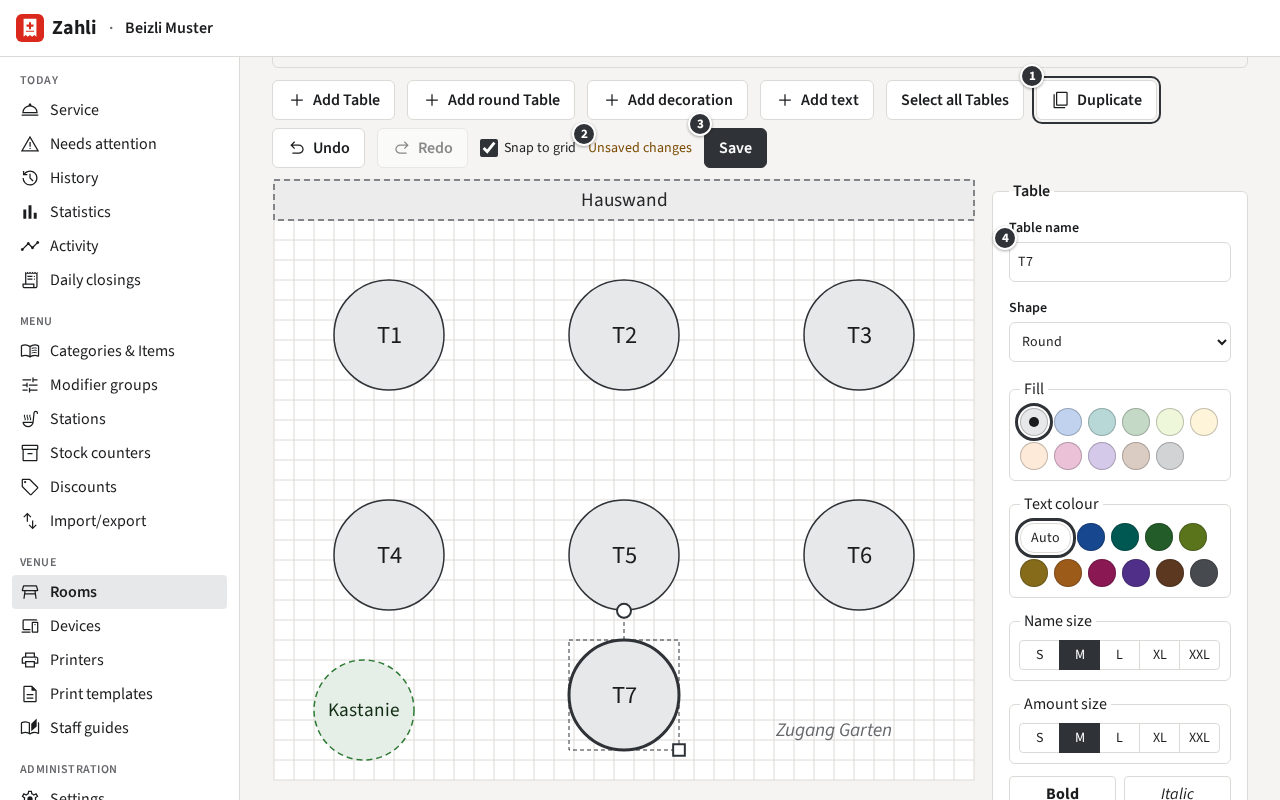
① Duplicate (Ctrl+D) copies the selection and places the copies right of it, or
below it where the Room has no space. Dragging with Ctrl held drags out copies. Ctrl+C, Ctrl+X and
Ctrl+V copy, cut and paste, also into another Room; pasted plain text becomes a text decoration.
A copy keeps the text of its Table’s name and counts the number on from the highest in use: T5
becomes T7 when the Terrasse already has T1 to T6, 3.1 becomes 3.2, and Bar becomes
Bar 2. Several copies are numbered in Tab order: row by row, from top to bottom and left to
right.
Until you save, ② shows Unsaved changes; ③ Save saves the Room. Leaving
the page or opening another Room asks first whether to discard the changes.
Example: for a summer party, Michael adds a Table to the Terrasse. He clicks T5 and
Duplicate; the copy T7 ④ appears right of T5, touching T6. He drags it below T5,
where the Terrasse has room, and clicks Save. The phones show T7 on the Terrasse
a moment later.
In the field Table name (④ above), Tab goes on to the next Table in Tab order and selects its name
for typing over, Shift+Tab goes back. To rename the Gaststube’s Tables 1 to 7 as G1 to G7,
Michael clicks Table 1 and types G1, Tab, G2, Tab, and so on, then saves.
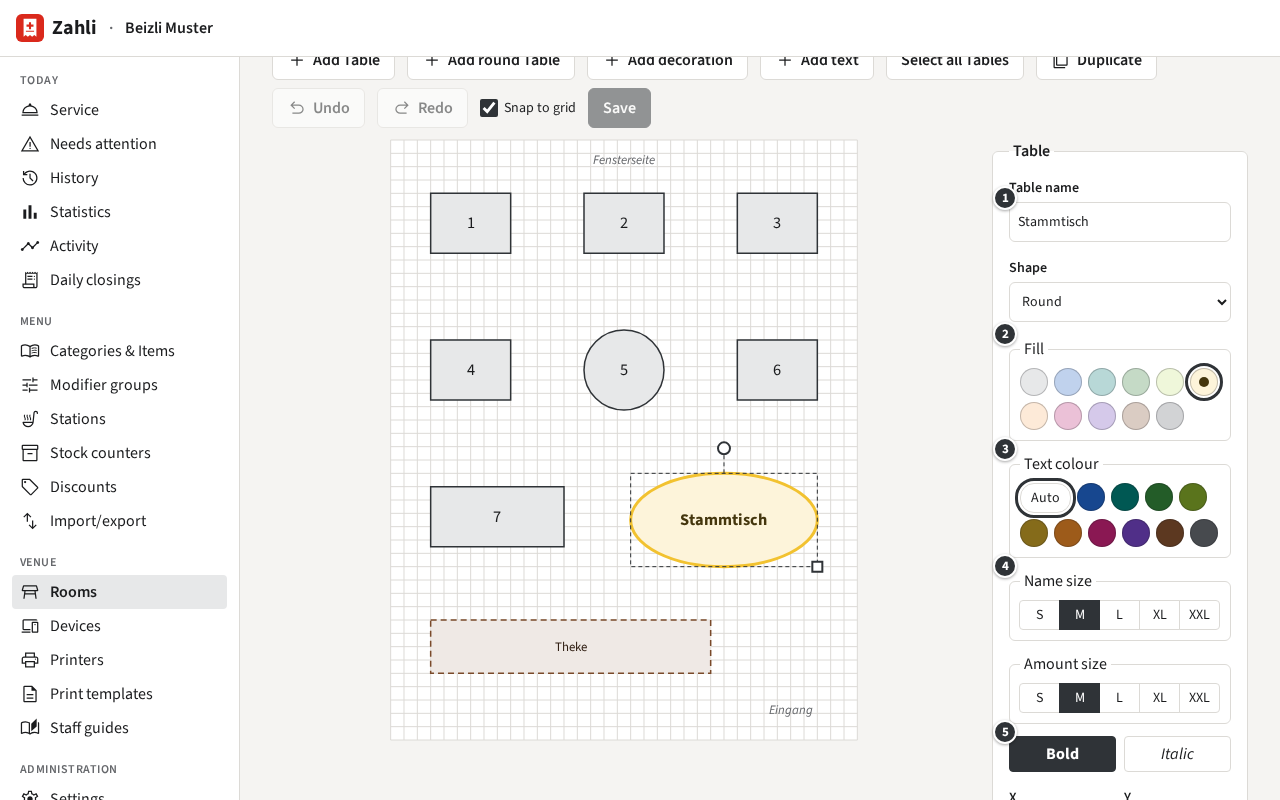
① its Table name and its Shape; a decoration has a
Label instead, and the shape Text only for text alone,
② the Fill: Default or one of the Station
colours. Each colour has a second shade that the phone shows while the Table has an open Tab,
so a coloured Table still shows when it is occupied,
③ the Text colour, Auto by default,
④ the Name size and Amount size (the open Tab’s
amount); for a decoration the Label size,
⑤ Bold and Italic.
With several items selected, the panel shows what they share and Mixed
where they differ; a choice applies to all of them. Text sizes are relative to the phone’s text,
so the plan here shows them as on a phone 400 dp wide; on a larger phone or tablet text takes less
space.
Example: the Stammtisch, the regulars’ table, stands out in yellow and bold, round and larger than
the other Tables.
Import and export (JSON) at the top of the page moves Rooms as a file, for a backup or for a
second venue:
Download Rooms (JSON) saves every Room, hidden ones too, with its Tables and
decorations.
Under Upload, choose a Rooms file (JSON). Zahli
first lists what it would create and change, and any Table name that is already taken; nothing
happens until you click Import.
An import creates and updates, but never deletes: a Room, Table or decoration missing from the
file stays as it is.
Devices
A Device is a phone or tablet set up for the venue: a phone that runs the staff app, or a
tablet that runs the kitchen terminal. Each is enrolled once with a one-time code; then the staff
sign in on it as often as they like. The Devices are under Venue → Devices.
Under Enrol a Device, enter a Name, which is how the list
shows the phone, and keep the KindStaff app.
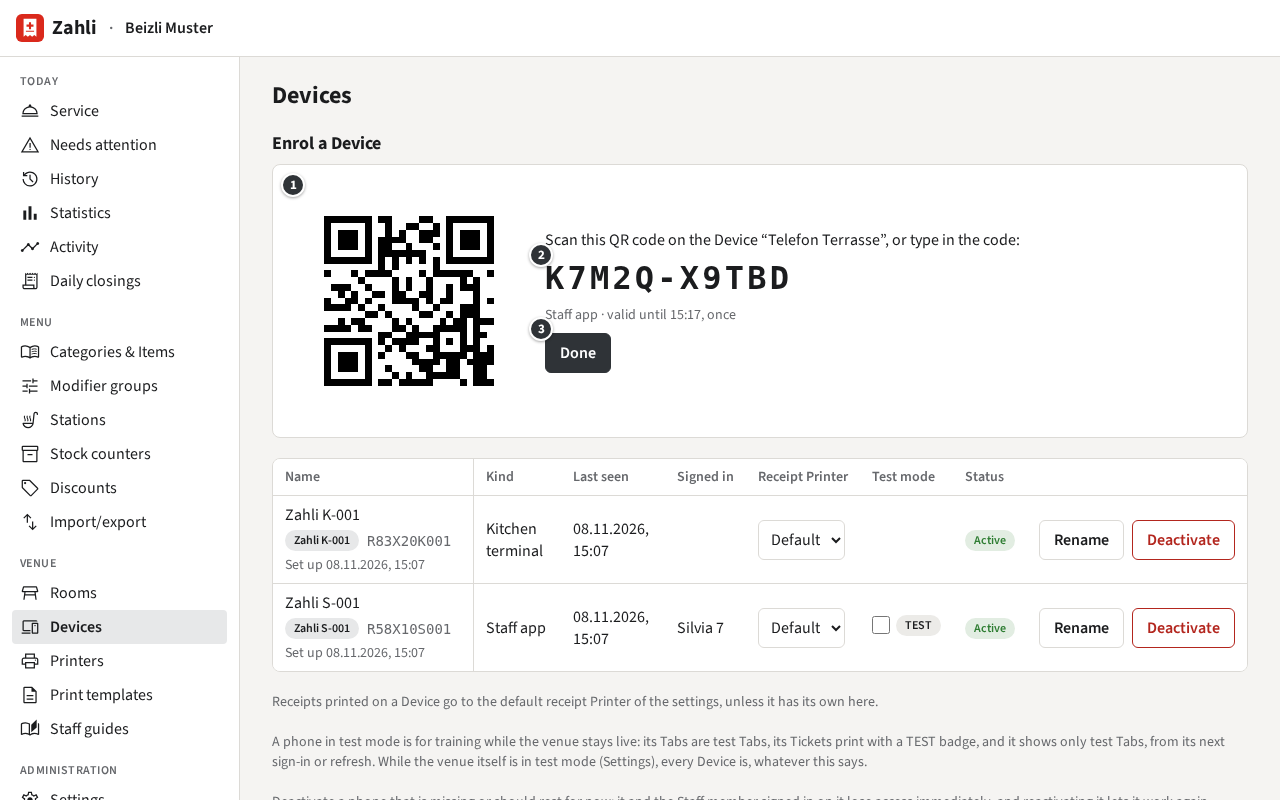
Click Create enrolment code. The page shows the code as ① a QR code and ② as text. It
works once, for 10 minutes.
On the phone, open the Zahli app. It shows Enrol this phone: tap
Scan enrolment code or Staff QR and scan ①, or type ② into
Enrolment code and tap Enrol.
The phone shows the sign-in with its name and the venue. Click ③ Done to
see it in the list.
Example: Beizli Muster buys a phone of its own for the Terrasse. Michael names it Telefon
Terrasse, creates the code and scans it with the new phone. Silvia can sign in on it at once
(Signing in).
Where the Tenant admin allows it, a Waiter can also enrol a phone by scanning their Staff QR on
it; such a phone shows in the list named after its model and the Waiter’s first name. A phone
still enrolled at another venue asks before it moves to yours: it is removed there, and what it
kept for that venue is discarded.
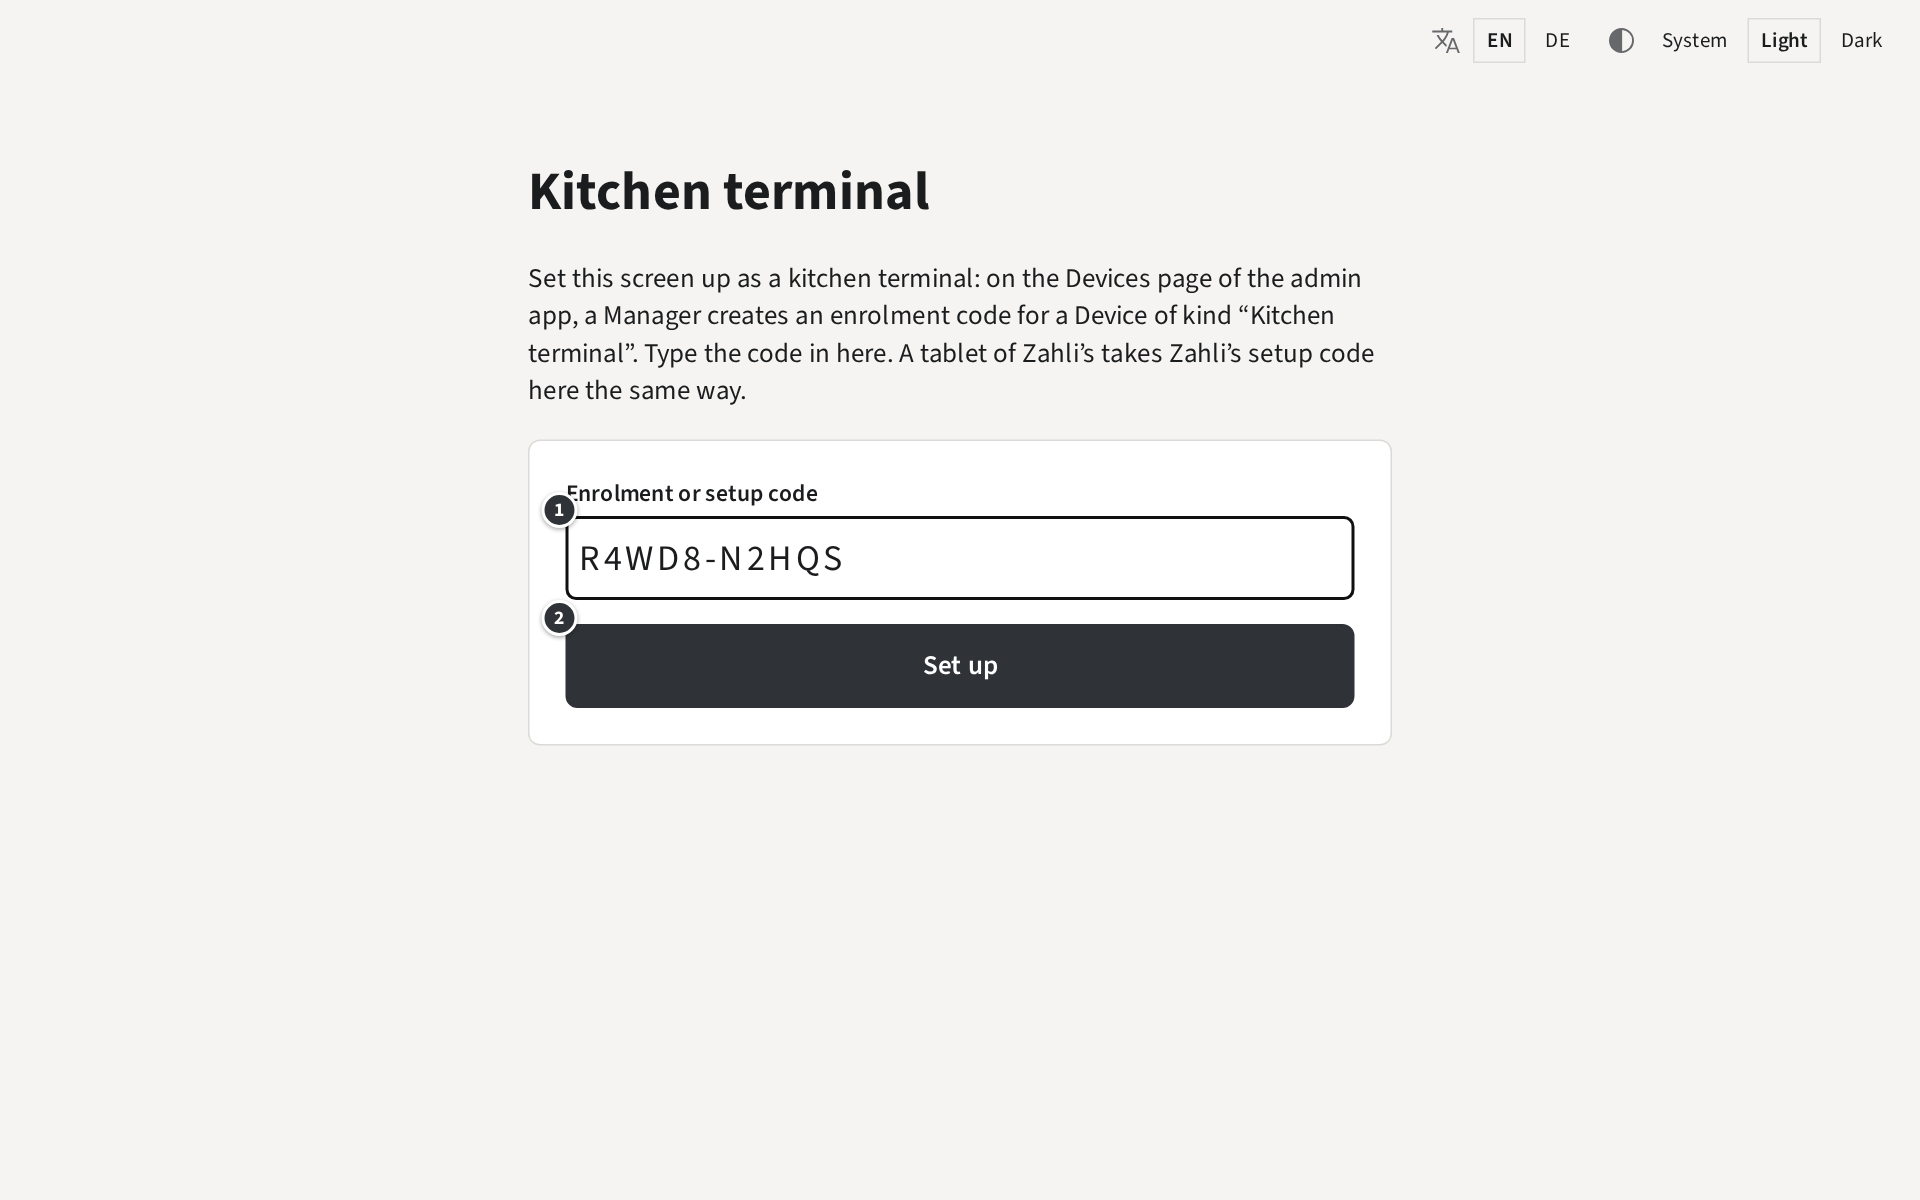
A kitchen terminal enrols only with a code of its kind, never with a Staff QR.
Example: when K-001 goes back to Zahli after the summer, Beizli Muster uses a tablet of its own.
Michael creates a code for Küchenbildschirm, types it on the tablet and chooses Küche and Bar
there.
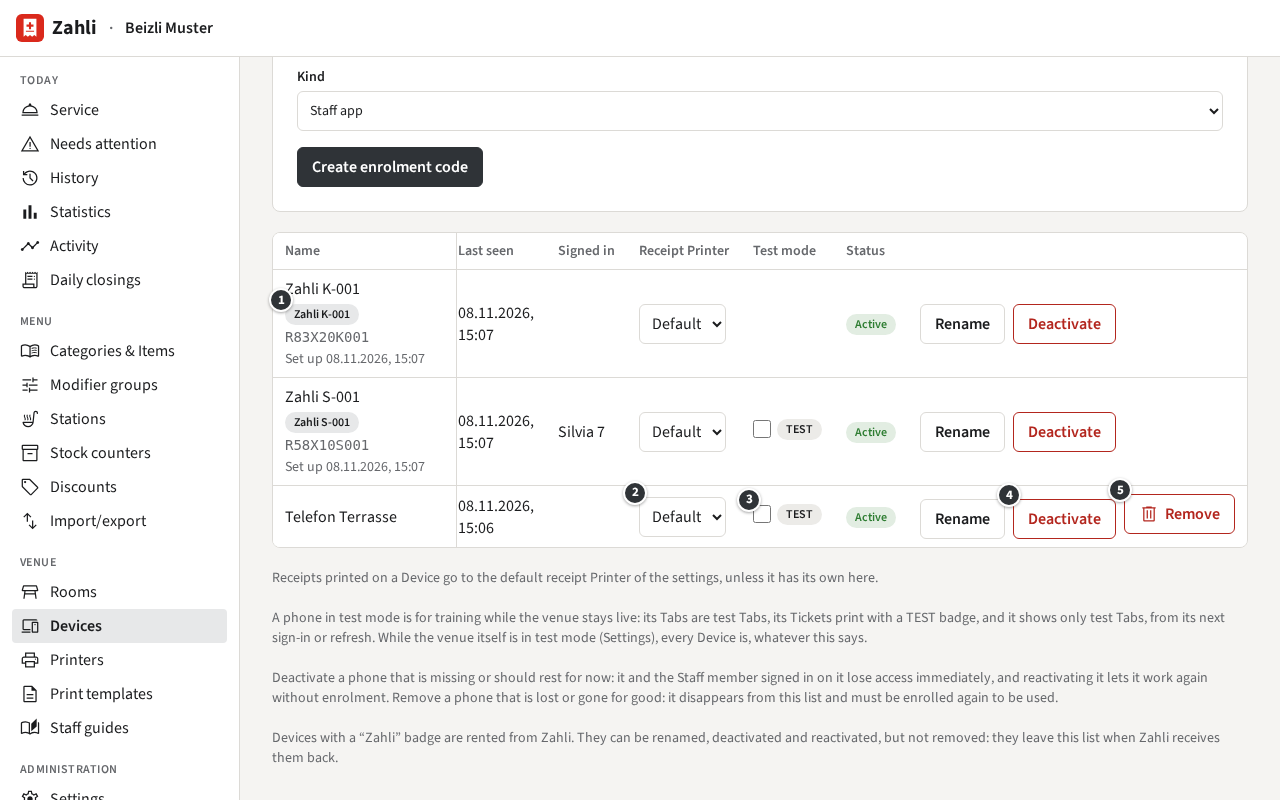
The list shows each Device’s Last seen and who is
Signed in on it.
② Receipt Printer: where Receipts printed on this phone go.
Default is the venue’s receipt Printer
(Venue settings); choose another Printer for a phone that works
next to it (Printers).
③ Test mode: puts a phone into test mode of its own, for training while the
venue stays live (Test mode).
Rename changes the name.
④ Deactivate: for a phone that is missing or should rest for now. Whoever is
signed in on it is signed out at once, and it shows This Device is deactivated
until you click Reactivate; then it works again without a new code.
⑤ Remove: for a phone that is lost or gone for good. It disappears from the
list and must be enrolled again with a new code to be used. Its Tabs and History stay.
Deactivating and removing ask first. A kitchen terminal shows its own message when deactivated or
removed (When the screen says deactivated).
Example: one evening Telefon Terrasse is nowhere to be found. Michael clicks
Deactivate, so nobody can take orders on it. The next morning it turns up under
the chestnut tree; he clicks Reactivate and it works again.
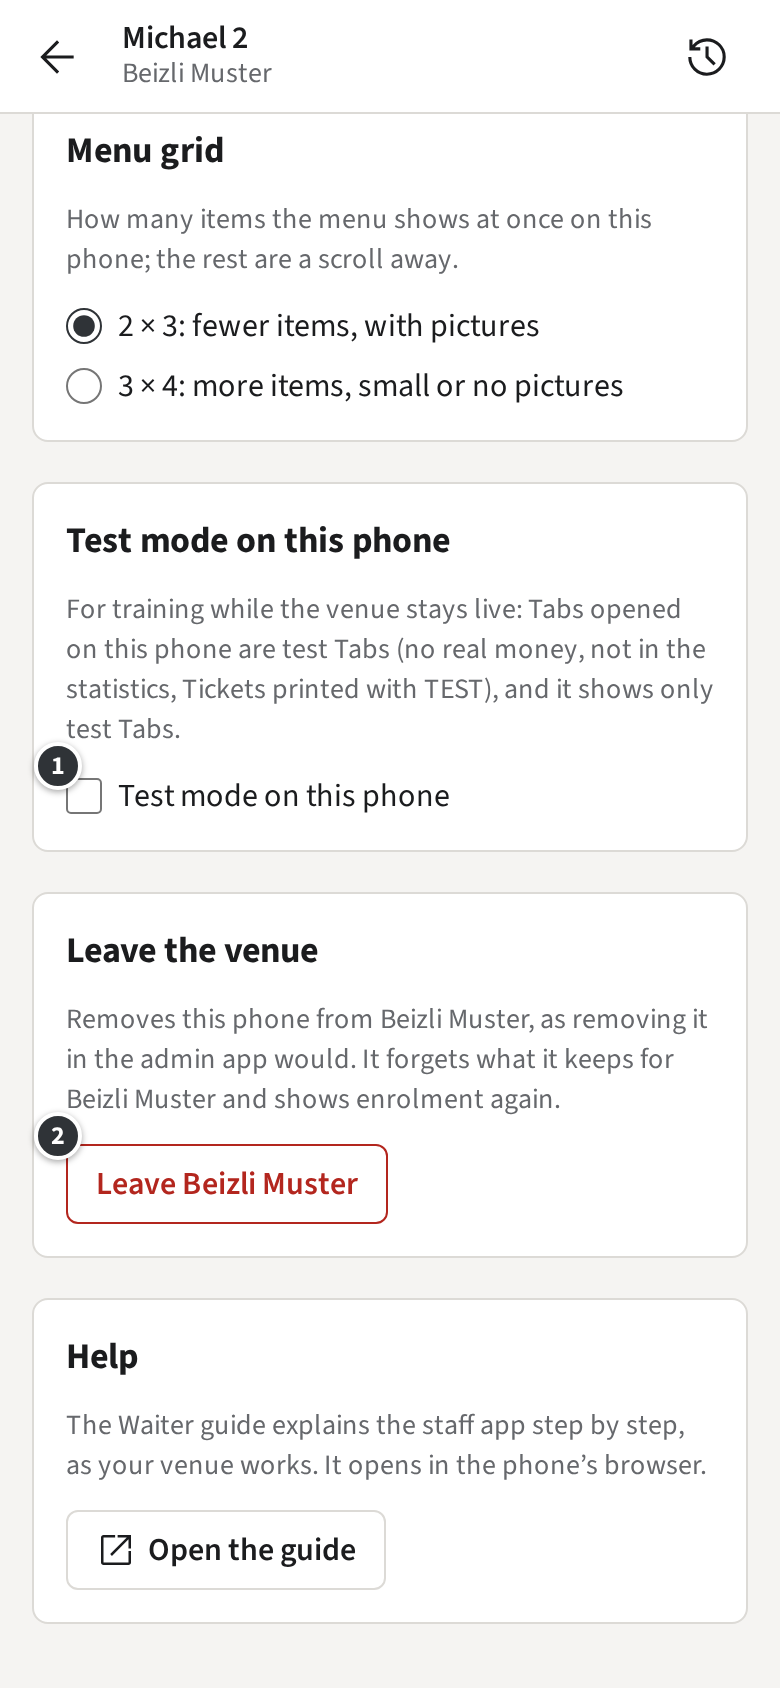
A Manager signed in on a phone finds two more things in its
Settings (the menu at the top left of the Rooms): ①
Test mode on this phone (Test mode), and ②
Leave Beizli Muster under
Leave the venue.
Leaving removes the phone from the venue, as Remove in the admin app would.
After you confirm, the phone forgets what it kept for the venue and shows enrolment again, ready
for another venue. Use it before you hand a phone on. It is refused while Payments taken offline
on the phone still wait to be sent; stay online until they are, then try again.
Beizli Muster rents the phone S-001 and the tablet K-001 from Zahli. They need no enrolment: they
belong to the venue for as long as the rental runs, and the list shows ① the badge
Zahli K-001 with the serial number and when Zahli set it up.
You rename, deactivate and reactivate them, and set the phone’s Receipt Printer and test mode,
like your own. You cannot remove them, and the phone’s Settings say that it belongs to Zahli
instead of offering to leave. When the rental ends, the Devices leave the list, and the phone
shows Not rented – please return to Zahli · S-001, the tablet the same with K-001
(Not rented). Give them back to Zahli as agreed.
Printers and Print templates
A Printer is a named place where Zahli prints: the Tickets of the Stations it serves, Receipts,
Guest slips, or all of them. An Epson receipt printer at the venue prints for it and fetches its
jobs from Zahli over the internet; nothing at the venue needs to be opened to the internet. The
Printers are under Venue → Printers.
At Beizli Muster, the Printer Theke at the counter prints the Bar’s Tickets, the Receipts and the
Guest slips, on the printer P-001 rented from Zahli. The Küche has no Printer yet: its Tickets show
on the kitchen terminal only.
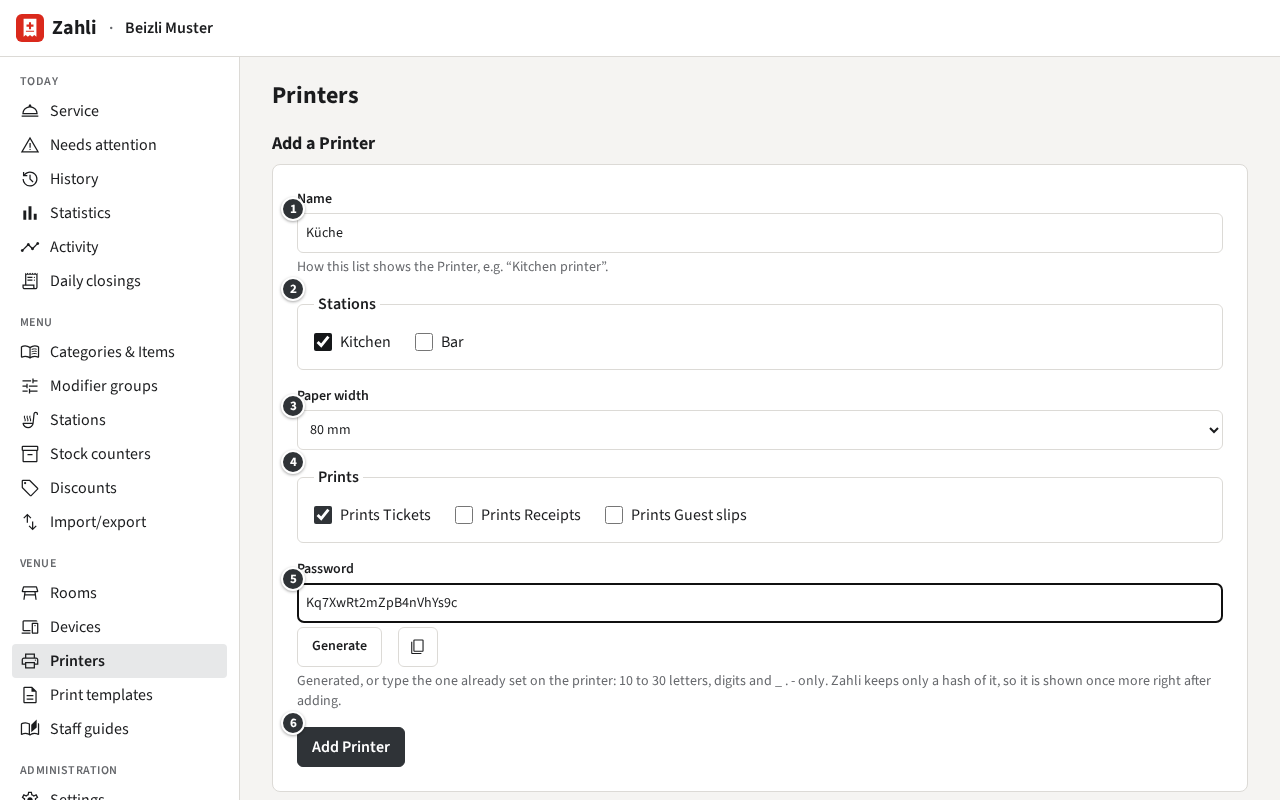
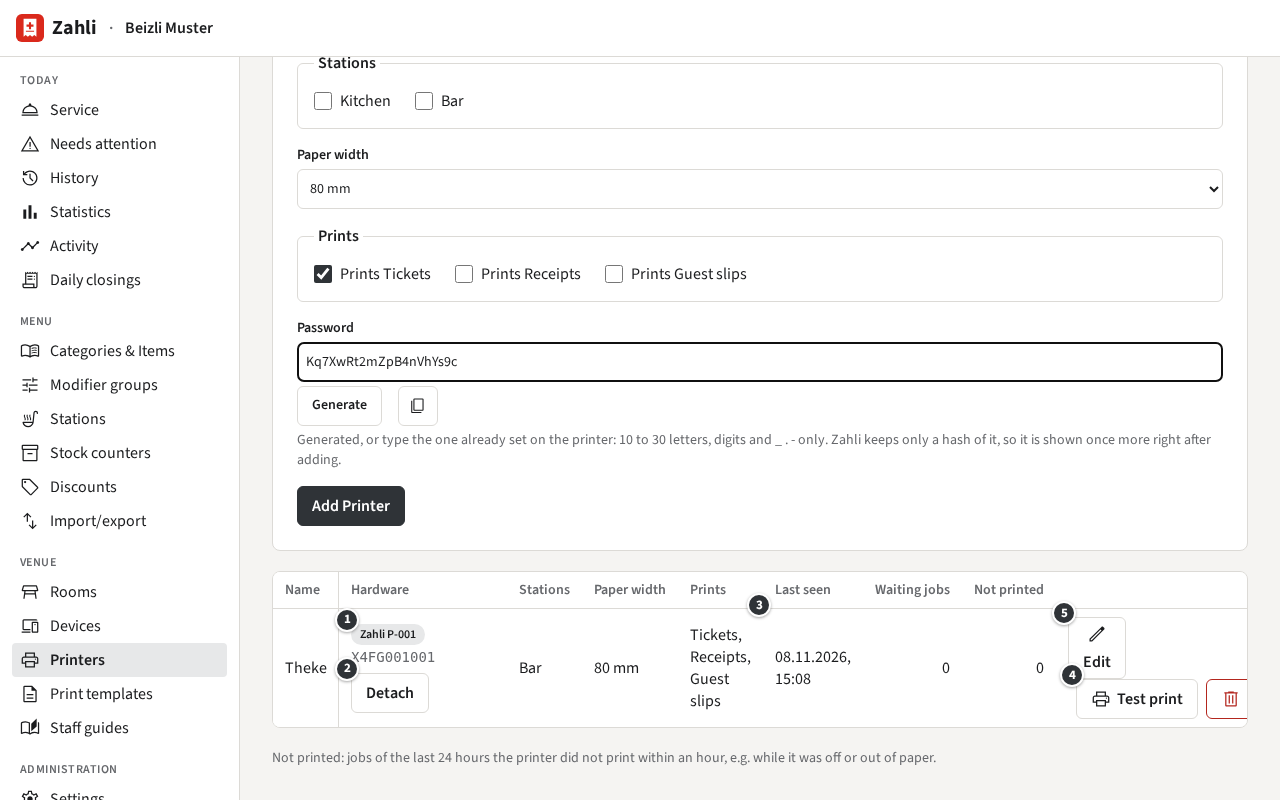
③ Paper width: 80 mm or
58 mm, as the printer’s paper roll.
④ Prints: Prints Tickets,
Prints Receipts, Prints Guest slips.
⑤ Password: generated for you. If the printer already has a password set
for Zahli, type that one instead.
Click ⑥ Add Printer.
Example: Michael buys an Epson printer for the kitchen. He adds the Printer Küche for the Station
Küche (shown as Kitchen in English), 80 mm, and only Prints Tickets. From then
on the Küche’s Tickets print there as well as showing on the kitchen terminal.
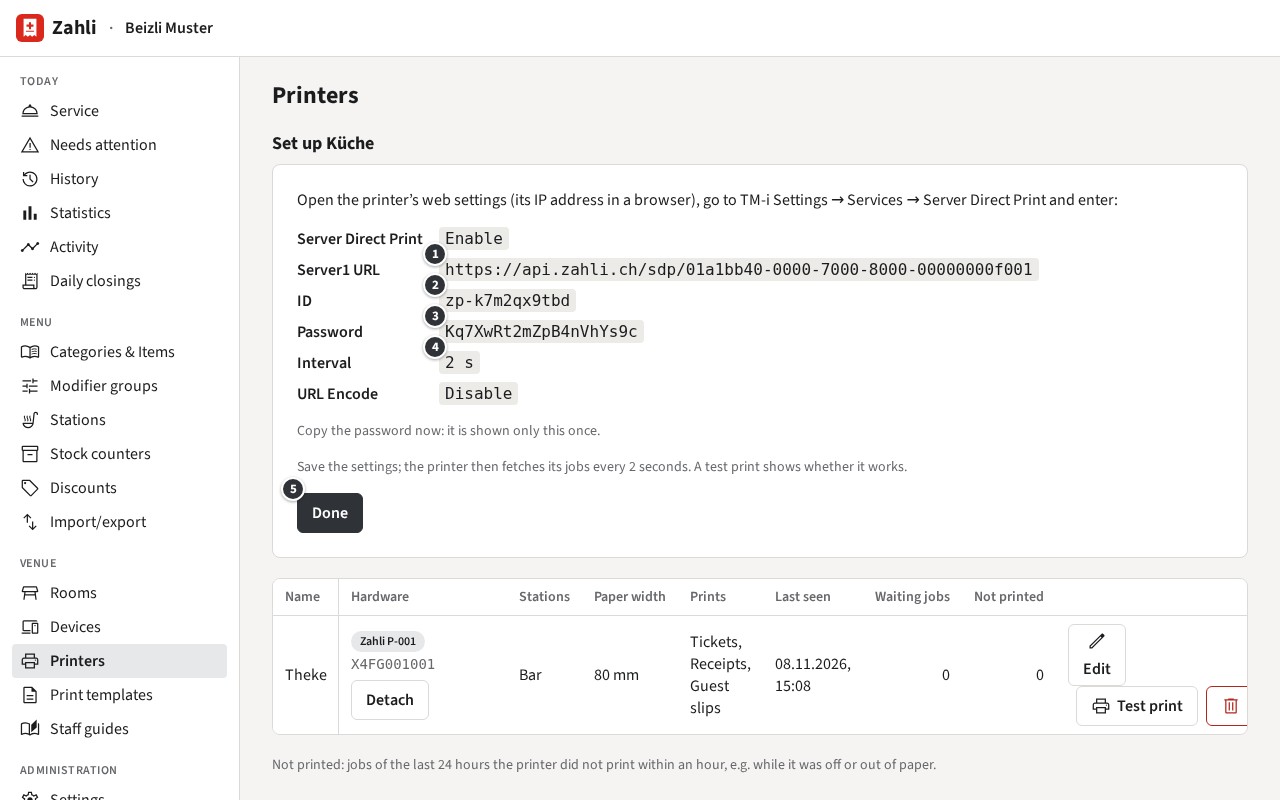
After adding, the page shows what to enter in the printer. Open the printer’s web settings (its IP
address in a browser on the venue’s network), go to TM-i Settings → Services → Server Direct
Print, set Server Direct Print to Enable and enter ① the
Server1 URL, ② the ID, ③ the
Password, ④ the Interval of 2 seconds and
URL EncodeDisable. Save there, then click ⑤
Done here.
Copy the password before you click Done: it is shown only this once. Later,
Setup in the list shows the card again without it; if it is lost,
New password there sets a new one, and the printer prints nothing until you
enter that in its settings too.
① Hardware: what prints for it. Own printer is the
venue’s printer; a badge such as Zahli P-001 a printer rented
from Zahli.
③ Last seen: when the printer last fetched its jobs. A working printer does
so every 2 seconds.
Waiting jobs: jobs not printed yet, for example while the printer is off or out
of paper. They print once it is back.
Not printed: jobs of the last 24 hours that did not print within an hour.
Click the number to see them and print each again with Print again.
④ Test print sends a test page, which prints at the printer’s next fetch.
⑤ Edit changes the name, Stations, paper width and what it prints.
Remove removes the Printer: its password stops working and jobs waiting for
it do not print. A Printer that Receipts go to stays until you choose another receipt Printer.
Example: before service, Michael clicks Test print on Theke. The page says
Test page queued for Theke; it prints at the printer’s next poll., and P-001 at the counter prints the test page.
A printer rented from Zahli needs no setup: you attach it to one of your Printers, which keeps its
name, Stations, paper width and what it prints.
Rented printers attached to no Printer are listed under Rented printers not attached and
print nothing.
Attach… on a Printer chooses one of them and Attach
attaches it. It prints the jobs waiting for the Printer too. A printer attached before is
detached.
② Detach stops it printing for the Printer; the jobs wait for the next
printer. Until one prints for it, the Printer shows No printer attached.
Example: P-001 jams during a busy evening, and Zahli brings the spare P-002. Michael clicks
Attach… on Theke and chooses P-002. Theke’s Tickets and Receipts, the waiting
ones too, now come out of P-002.
Receipts print on the phone’s own Receipt Printer, chosen on the Devices page
(Devices), or else on the venue’s default receipt Printer
(Venue settings). In a browser, a Manager chooses it in the staff
app’s Settings under Receipt printer.
Only Printers with Prints Receipts are offered. Whether Guest slips print is a
venue setting; they come out of the sending phone’s Receipt Printer if it prints Guest slips, or
else out of the first Printer that does.
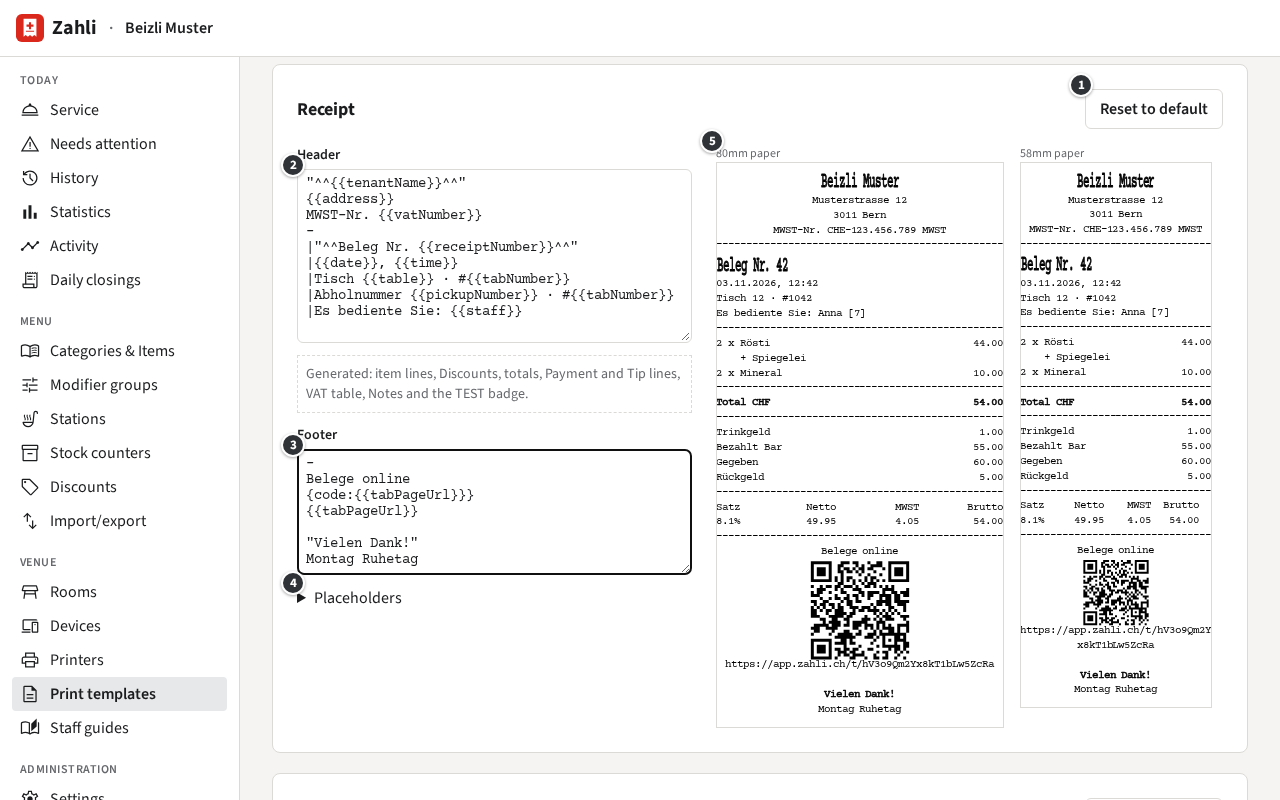
Under Venue → Print templates you write the top and bottom of Receipts and of
Tickets: ② Header and ③ Footer. What lies
between them, the items, totals, VAT and the TEST badge, Zahli adds itself.
A line prints as you type it. Text in double quotes prints bold, such as "Vielen Dank!"; the
defaults show more of the ReceiptLine signs.
④ Placeholders lists what Zahli fills in when printing, such as
{{tenantName}}, {{table}} or {{receiptNumber}}. A line whose placeholder has no value is
left out: the Table’s line on a Walk-in’s Receipt, for example.
⑤ Preview shows a sample print on 80 and 58 mm paper as you type.
① Reset to default puts back the built-in header and footer.
Click Save below the Ticket. An unknown placeholder is not saved; the
message gives its line. A Receipt without the venue’s name, address, VAT number, the date or the
Receipt number is saved, with a warning, since a Receipt should show them.
Example: Beizli Muster is closed on Mondays. Michael adds the line Montag Ruhetag to the end of
the Receipt’s footer, sees it under Vielen Dank! in the preview and clicks
Save. Every Receipt printed from then on says so.
Staff guides
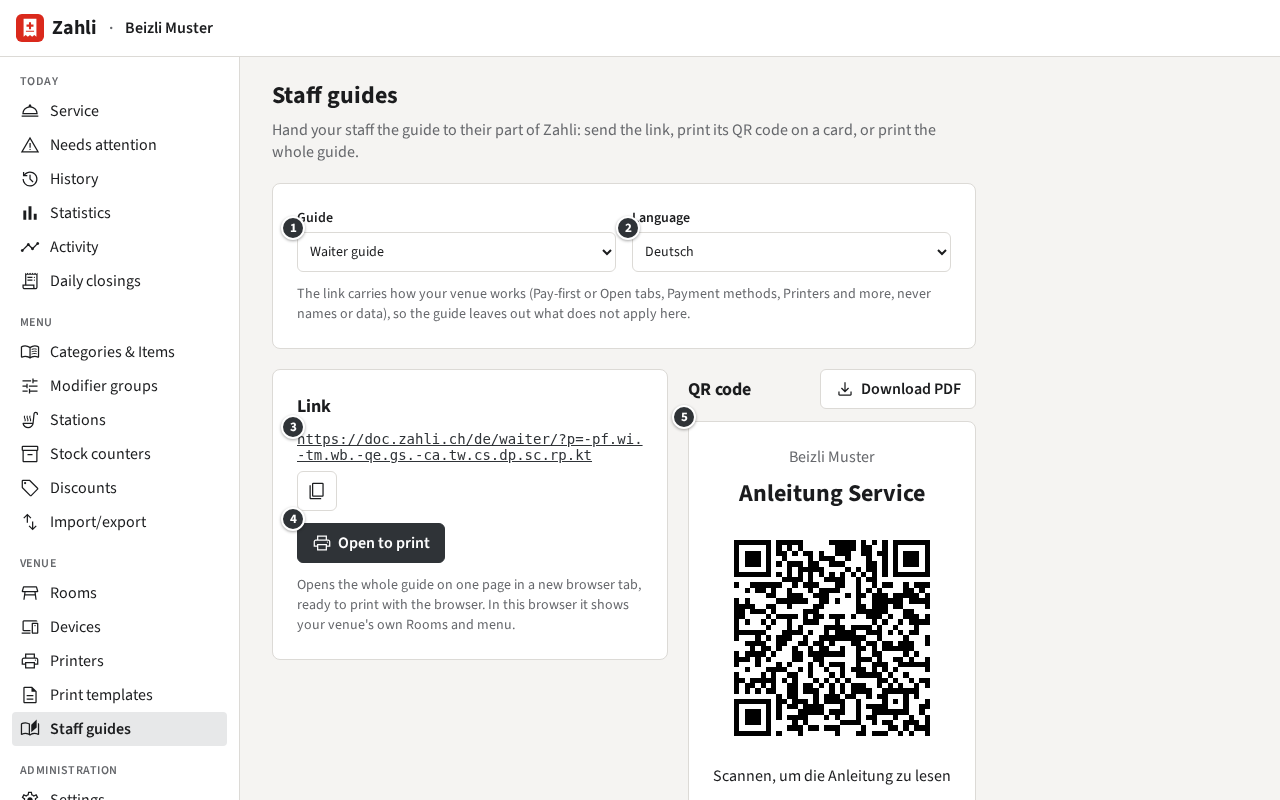
Under Venue → Staff guides you hand your staff the guide they need: the Waiter
guide to the Waiters, the Kitchen guide to whoever works at the kitchen terminal, this guide to
another Manager.
① Guide: Waiter guide,
Kitchen guide, Manager guide or
Tenant admin guide.
② Language: Deutsch or
English; at first your venue’s language.
③ The link, to send by message or email. The button beside it copies it.
④ Open to print opens the whole guide on one page in a new browser tab.
Print it there with the browser’s Print (Ctrl+P), on paper or as a PDF.
⑤ The QR code on a card: Download PDF makes a PDF of it to print, cut out
and lay by the till or pin up in the kitchen. A phone scanning it opens the guide.
The Waiter guide’s link carries how your venue works: Pay-first or Open tabs, Walk-ins, the
Payment methods, Discount presets for Waiters, Stock counters, a receipt Printer, a kitchen
terminal and a few settings more. Opened through it, the Waiter guide leaves out what does not
apply to you, so a Waiter at a venue without Card never reads about Card. The link holds only these
switches, never names or data. The other guides are the same for every venue.
The link follows your settings as they are when you open the page. Once you change them, for
example with a kitchen terminal or Card added, open the page again, hand out the new link and print
a new card.
Example: Beizli Muster takes Open tabs, Cash and Twint, prints Receipts on Theke and has the
kitchen terminal K-001. Michael picks Waiter guide in
Deutsch, clicks Download PDF and lays the card by
the till. Silvia scans it with her phone and reads the Waiter guide without the passages on
Pay-first and Card.
Opened in a browser where you or one of your staff are signed in to Zahli, the Waiter guide shows
your venue’s own screens in place of Beizli Muster’s: each of your Rooms, your menu, the choices of
your first item with Modifiers, and an example Tab of your first three items with its Pay sheet.
That Tab exists only on the page; nothing is sent or booked. Printed from there, the guide is a
picture of your venue at that moment, open Tabs included, so print it before service. Where nobody
is signed in, as on most phones scanning the card, it shows Beizli Muster’s screens.
Example: Michael clicks Open to print before opening time and prints the
Waiter guide with the Gaststube, the Terrasse and the menu of Beizli Muster as they are today.
Venue settings
How the venue works for everyone is set under Administration → Settings. A
Manager changes the card Service, and switches the whole venue between
test and live mode in the card above it (Test mode).
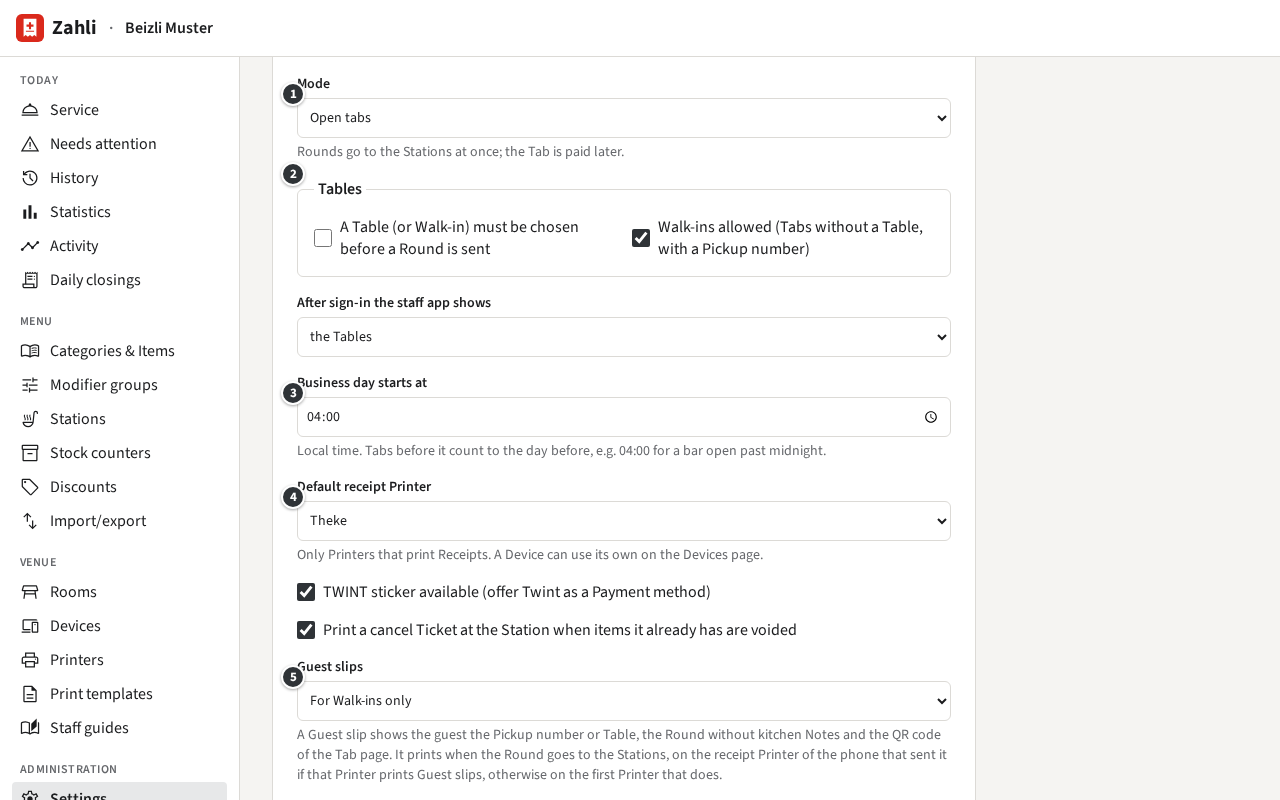
① Mode: Open tabs, where Rounds go to the Stations
at once and the Tab is paid later, or Pay-first, where a Round goes to
the Stations only once the Tab is paid (Pay-first).
② Tables: whether a Table (or a Walk-in) must be chosen before a Round is
sent, and whether Walk-ins, Tabs without a Table, are allowed.
After sign-in the staff app shows: the Tables, or
the menu, for a new Tab; the latter suits a counter where guests order and
pay at once.
③ Business day starts at: when one business day ends and the next begins, in local
time. Tabs before it count to the day before, in the History and the Daily closing.
④ Default receipt Printer: where Receipts print unless a phone has its own
(Printers).
TWINT sticker available (offer Twint as a Payment method): offers Twint at the Pay sheet.
Print a cancel Ticket at the Station when items it already has are voided: after a Void, the Station gets a cancel Ticket for what it
already had.
⑤ Guest slips: Never,
For Walk-ins only, Always, or
QR code on the kitchen Ticket instead. A Guest slip gives the guest their Pickup number
or Table, the Round, and the QR code of the Tab page. It needs a Printer with
Prints Guest slips.
Click Save at the end of the card. The staff app takes the change at its next
sign-in or refresh.
Example: Beizli Muster’s business day starts at 04:00, so a round of drinks at half past midnight
still belongs to the evening before and its Daily closing. Walk-ins are allowed, and only they get
a Guest slip with their Pickup number, printed at the Theke. For a summer festival, Michael would
switch the Mode to Pay-first, let the staff app open
with the menu, for a new Tab, and switch both back afterwards.
Further down, the cards Twint code (the venue’s Twint QR code shown on the
phones) and Locale and security (language and currency of the prints, sign-out after
idle time, Staff QRs enrolling phones, Waiters in a browser) say
Only a Tenant admin can change these. You see them, greyed or without buttons, but cannot change
them. At Beizli Muster, Anna does (Tenant admin guide).
Free-form Discounts, Corrections and Refunds
A Waiter gives Discounts from presets and items on the house, and
corrects only Payments they took themselves, on the same
business day. A Manager may do more, on every Tab, in the staff app.
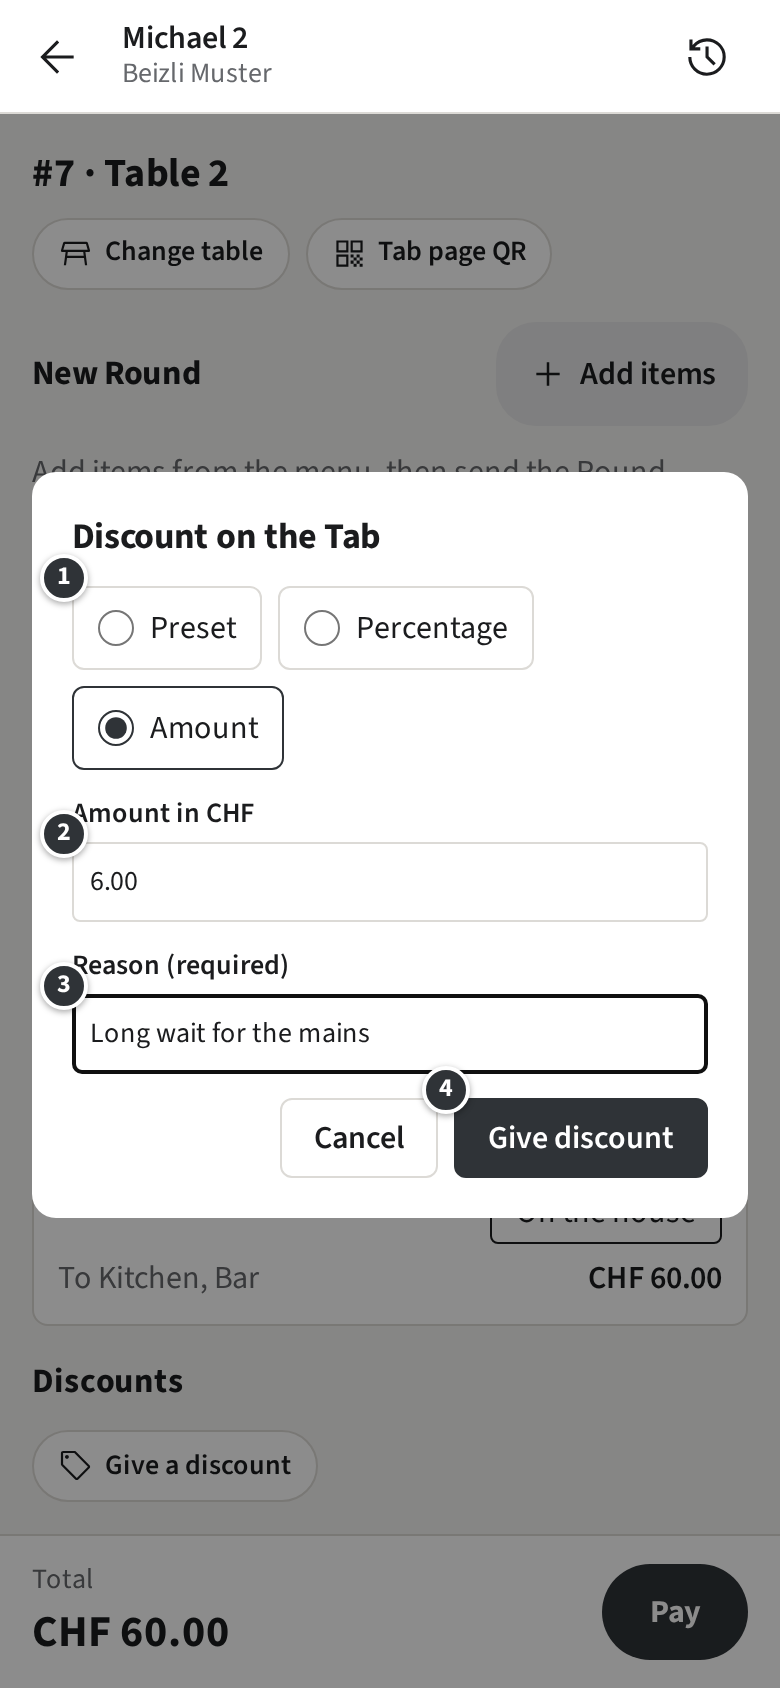
Example: Table 2 waited long for the mains, and Michael takes CHF 6.00 off.
On the open Tab, tap Give a discount.
Choose ① Percentage or
Amount and enter it ②: 6.00.
Write the reason ③; it is required and stays with the Discount. Tap
Give discount ④.
Table 2 then comes to CHF 54.00 instead of 60.00. Under
Preset you also find the presets Waiters may not give, such
as Staff meal at 50 %.
A Discount is given only on an open Tab, never for more than is left to pay, and stays once given.
A percentage also takes off Rounds sent after it. Once the Tab is paid, money goes back with a
Correction and a Refund.
You correct as the Waiter guide shows, but on any Tab, from any day, whoever took the Payment.
Example: the regulars at Table 3 paid CHF 104.85 by Twint to Silvia, with their 10 % off. Later it
turns out one of their three Pinot Noir never came. Michael opens the Tab, for example from the
History, taps Correct items, picks one Pinot Noir and taps
Correct. The guests are owed CHF 7.65, the CHF 8.50 less their
10 %, and the Refund opens on the Twint Payment with that amount filled in.
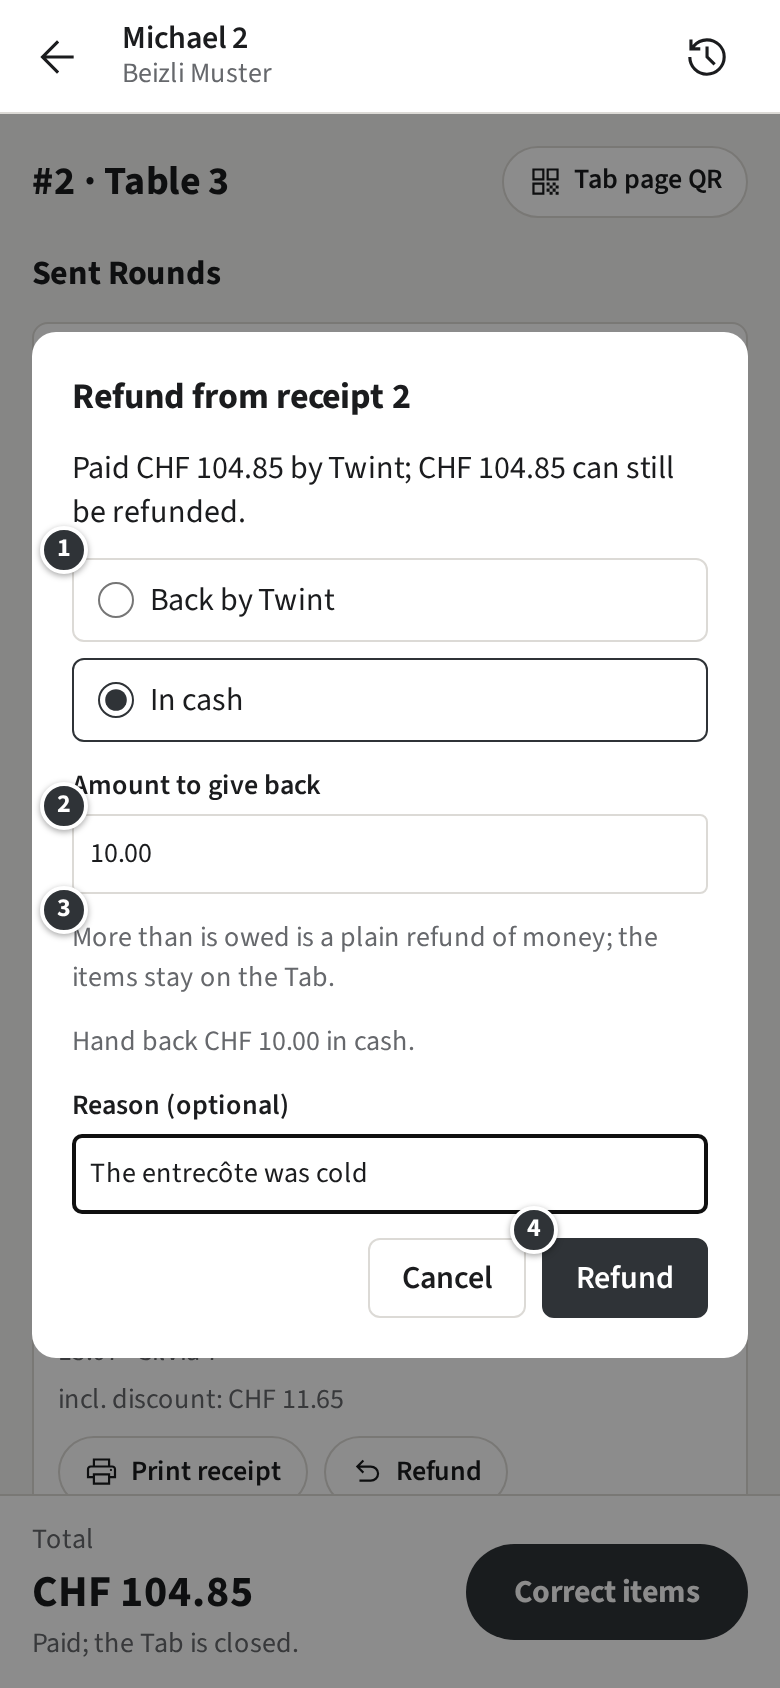
On a Payment of the Tab, tap Refund. Unlike a Waiter, you choose how
the money goes back ①:
By the way it was paid, such as Back by Twint: the default.
In cash, whatever the guest paid with, for example when the
guest stands at the counter and wants the money now.
Where the Payment provider can no longer refund a Payment it took, the Refund offers
In cash and Done in the provider’s back office:
for the second, refund it in the provider’s back office first, then record it here.
You may also give back more than a Correction owes, or money without any Correction: a plain
Refund ③, where the items stay on the Tab.
Example: a guest at Table 3 says the entrecôte was cold. Michael gives CHF 10.00 back in cash and
leaves the entrecôte on the Tab.
On the Twint Payment, tap Refund.
Choose In cash ①, enter 10.00 ② and add the reason if you
like.
Hand over the cash and tap Refund ④.
Each Refund gets its own Receipt number and shows on the Tab and in the History. The Tip is never
refunded; it stays with whoever took the Payment. Cash goes back rounded to 0.05, and a Payment
taken offline can be refunded once it is synced.