This Guide is for Tenant admins. A Tenant admin can do everything a Manager can, so for the admin
app’s daily work, the menu, Rooms, Devices and Printers read the Manager guide, and
for service the Waiter guide. This Guide holds only what a Tenant admin adds: who
works at the venue and how they sign in, the venue’s language and currency, how guests pay by
card, the VAT rates, and the Audit log. Each topic is one task, with an example from Beizli
Muster, where Anna is the Tenant admin, Michael the Manager and Silvia serves.
On Menu → Discounts you also create, change and remove the Discount presets,
which a Manager only reads (Discount presets): fill in the empty
row at the end with a name, the Type, the value and whether
Waiters may use, and click Add. A menu file that creates
or changes VAT rates can only be imported by you
(Menu import and export).
Besides the words of the Waiter and Manager guides:
Role: what a Staff member may do, one of Waiter, Manager and Tenant admin.
Staff QR: a printed card that signs its Staff member in on the venue’s phones instead of the
password.
Payment provider: the company that takes card Payments for the venue, today Stripe. The
venue’s Provider account is its account there, one for test and one for live mode.
Terminal Location: the venue’s address as Stripe knows it; the phones take Tap to Pay there.
VAT rate: a named percentage, such as the standard rate of 8.1 %. Every price includes it.
Audit log: the record of every change to the venue’s settings, staff and money.
Global admin: Zahli’s own staff, who set up the venue and can act as its Tenant admin when
you ask them for help.
Manager: serves too, and runs the venue in the admin app: the menu, Rooms,
Devices, Printers, the Daily closing, and money matters on any Tab
(Manager guide).
Tenant admin: everything a Manager does, plus this Guide.
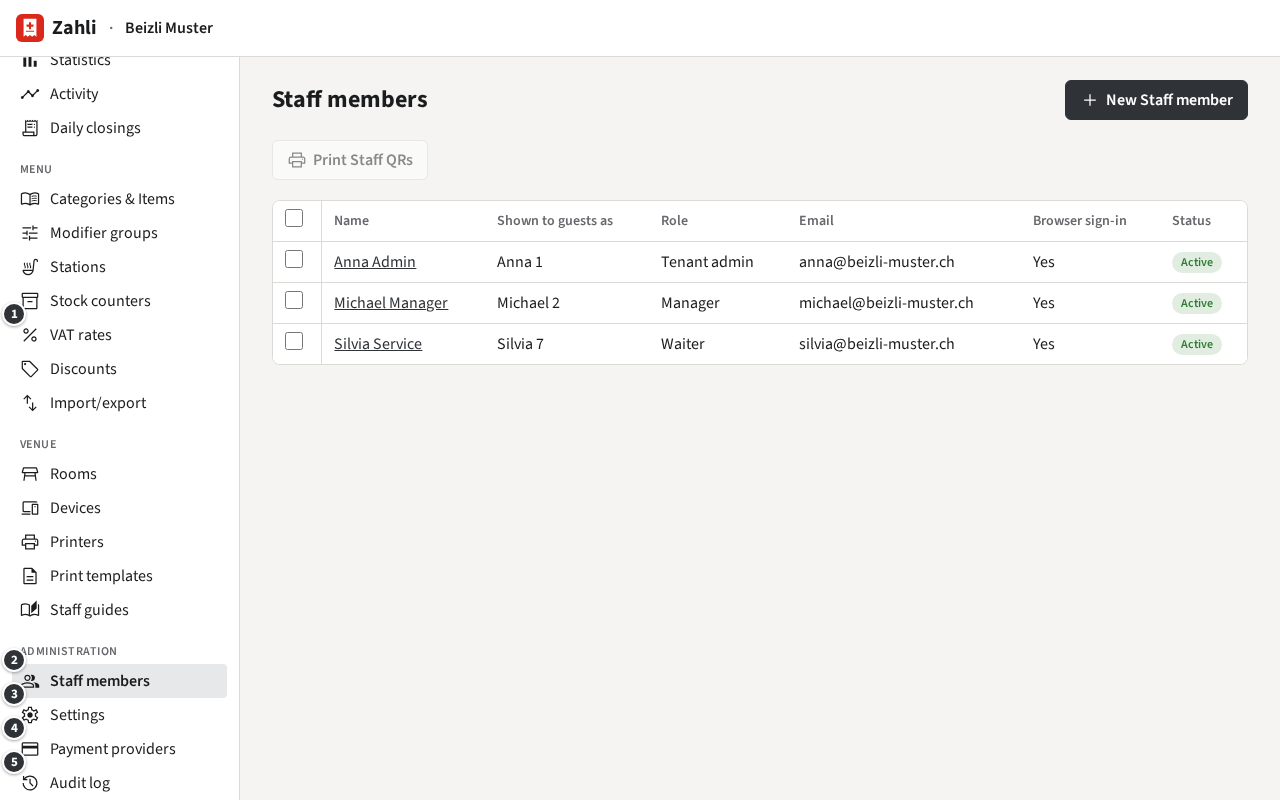
Administration → Staff members lists them, active first.
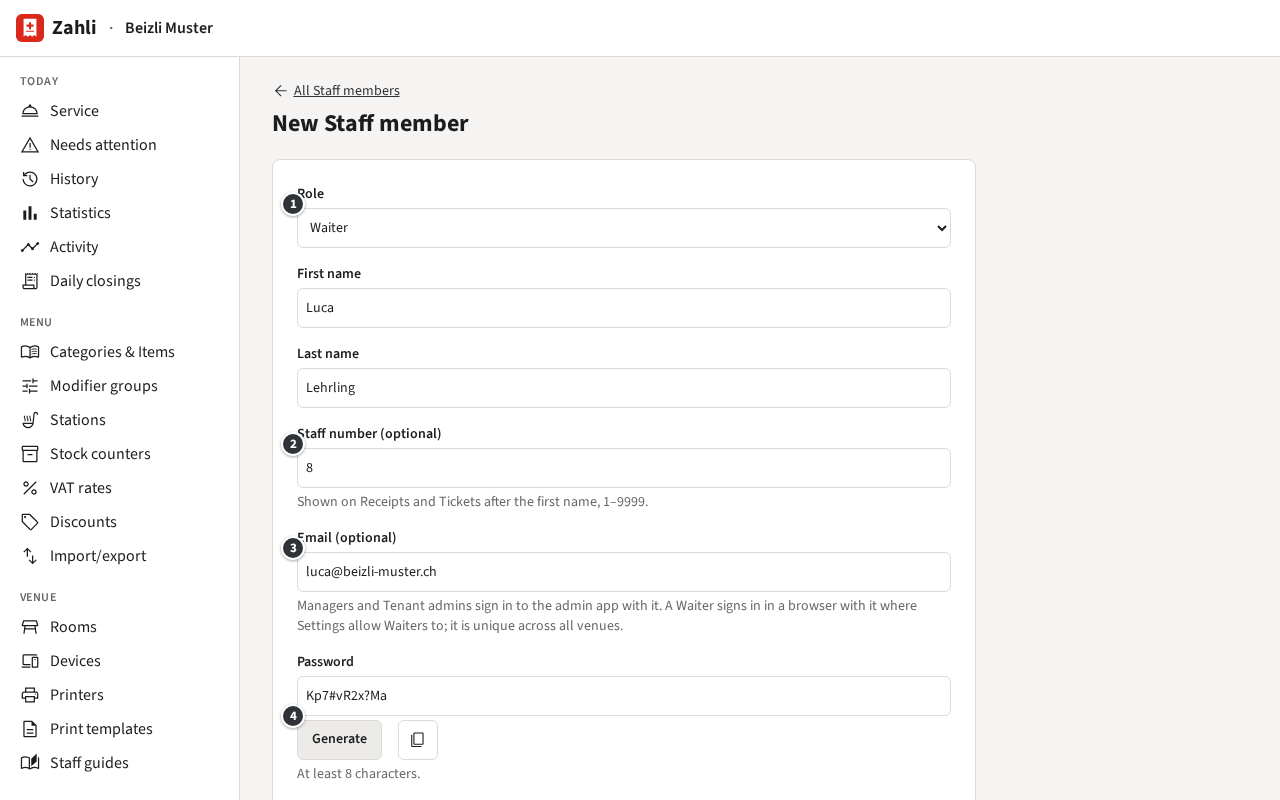
Choose the Role and enter the first and last name.
Optionally a Staff number (optional): Receipts and Tickets show the first name with it,
such as Silvia 7, so two people of the same name are told apart.
The Email: Managers and Tenant admins need one, since they sign in to the
admin app with it. For a Waiter it is optional; with one, they can sign in in a browser where
the venue allows it (Security settings). An email can
belong to only one Staff member, across all venues on Zahli.
A Password of at least 8 characters. Click Generate
for one that is hard to guess: 10 letters, digits and symbols, shown in plain text, without
characters that look alike (such as 0 and O). Copy copies it.
Click Create Staff member, and give the person their password.
Example: Beizli Muster takes on an apprentice, Luca Lehrling. Anna chooses ①
Waiter, gives him the number ② 8 (Silvia is 7), his email ③
luca@beizli-muster.ch so he can also serve from the laptop at the counter, and a generated
password ④, which she writes on a note for his first day.
Each person signs in with their own account; never share one. A Waiter or Manager who forgot
their password gets a new one from you: open them, enter it under Password and
click Save. Left empty, the password stays as it is.
Click a name to change their Role, name, number or email. When someone leaves, click
Deactivate: Signs them out everywhere immediately. Their Tabs, Payments and history stay
under their name, and Reactivate lets them sign in again. Staff members are never
deleted.
You cannot change your own Role or deactivate yourself, so a venue always keeps a Tenant admin.
To hand the role over, make the other person Tenant admin first; they can then change yours.
The column ④ Browser sign-in on the list says who can sign in in a browser now:
Managers and Tenant admins with an email, and Waiters with an email while
Waiters may sign in in a browser is on. In a browser, Managers and Tenant admins land in
the admin app; Waiters reach only the staff app. On the venue’s phones everyone signs in with name
and password or Staff QR, email or not.
A Staff QR is a card that signs its Staff member in on the venue’s phones with one scan. Zahli
keeps only a fingerprint of the code, so it cannot show it twice: printing always makes a new
code, and the person’s old card stops working at once.
For several people:
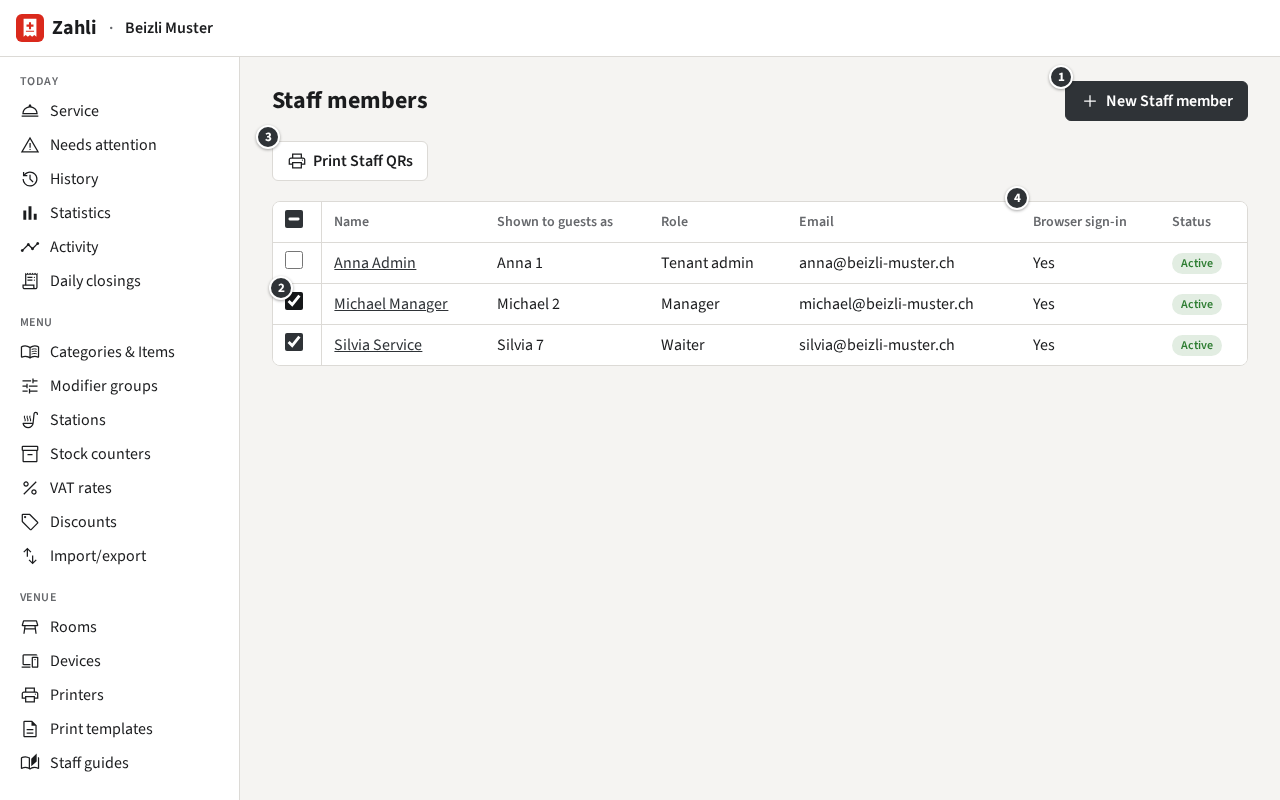
On the list, tick ② the people who need a card, or the box in the header for everyone.
Click ③ Print Staff QRs and confirm that their old cards stop working.
The browser downloads a PDF: A4 pages of six cards, 105 × 99 mm with cut marks, each with the
venue’s name, the person’s name, the code and the words Scan to sign in. Print
it, cut along the marks.
Download again fetches the same PDF again while you stay on the page; once
you leave, a new PDF means new codes.
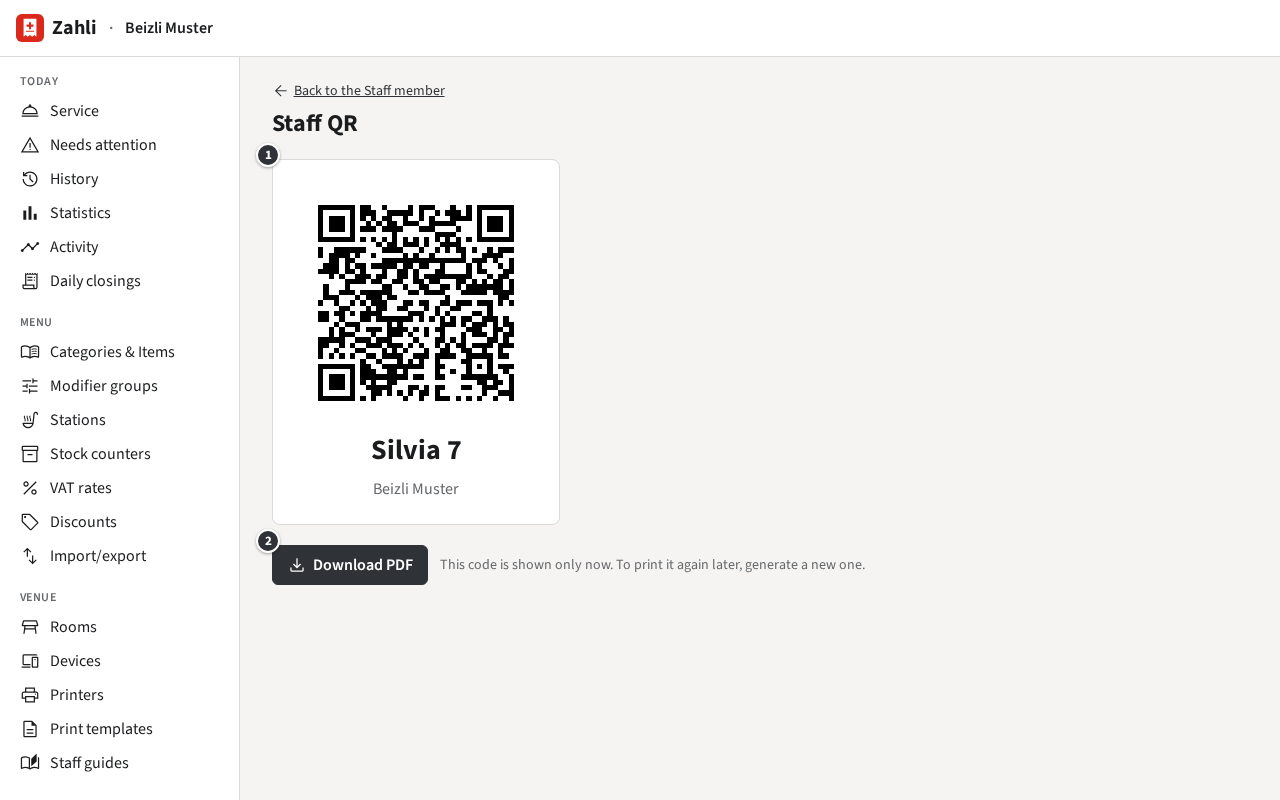
For one person, open them and click Staff QR, then
Generate new Staff QR: the page shows the card ① and Download PDF ② gives
the same PDF with one card.
Example: Silvia lost her card on the terrace. Anna opens Silvia, clicks Staff QR
and Generate new Staff QR, and prints the card. Whoever finds the old card cannot sign in
with it any more. At the start of the season she ticks Michael and Silvia on the list and prints
both cards on one page.
Security settings
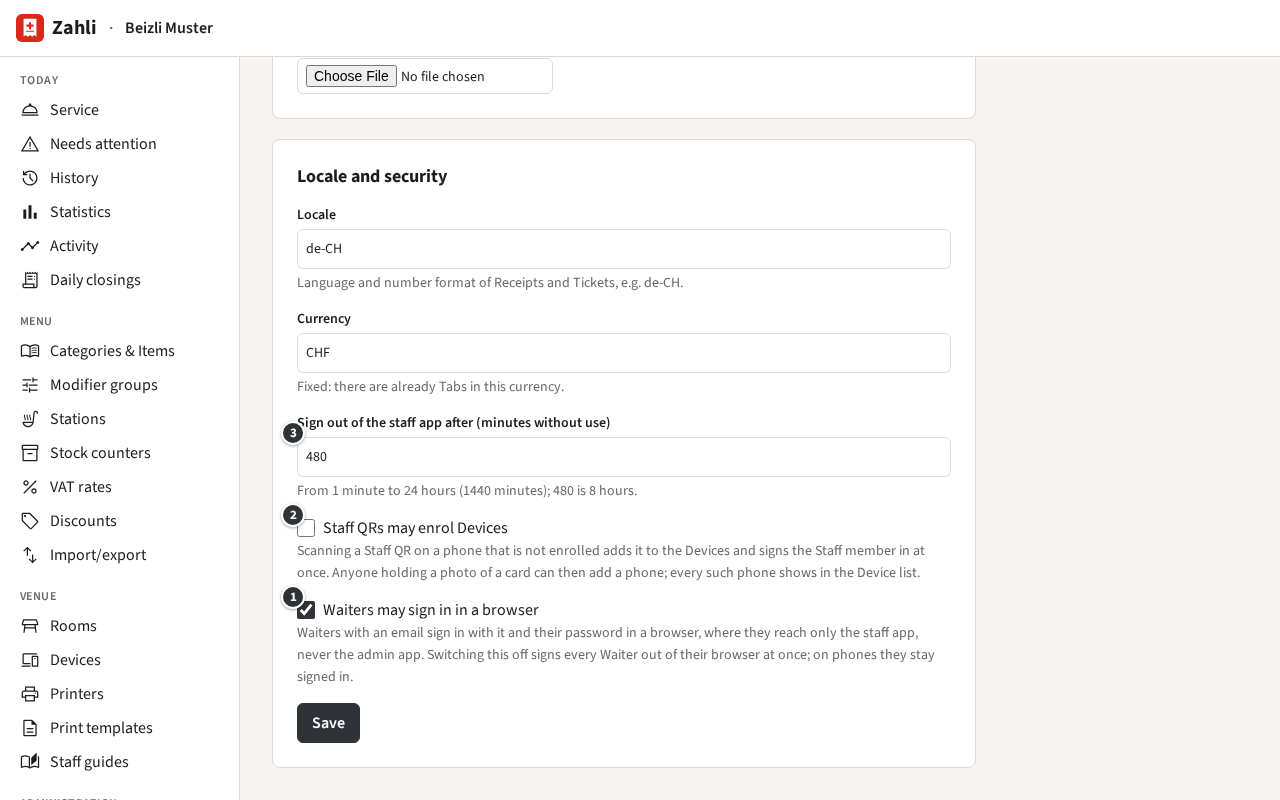
Three settings decide how easily people get in. They are in the card
Locale and security under Administration → Settings; a Manager sees
them there but cannot change them. Change what you need and click Save at the
end of the card.
① Waiters may sign in in a browser (off at first) lets Waiters who have an email sign in
with it and their password in a browser, on a laptop or tablet. There they reach only the staff
app, never the admin app. Managers and Tenant admins can always sign in in a browser.
Switching it off signs every Waiter out of their browser at once; on the venue’s phones they stay
signed in. Which Waiters can sign in this way shows on the list of
Staff members.
Example: Beizli Muster has a laptop at the counter for Walk-ins, so Anna has switched it on, and
Silvia signs in there with silvia@beizli-muster.ch.
Normally a phone joins the venue’s Devices only by a one-time code from the admin app
(Devices). With ② Staff QRs may enrol Devices (off at first),
scanning a Staff QR on a phone that is not enrolled yet enrols it and signs the Staff member in, in
one step. The phone is then called after its model and the person’s first name, such as
“Pixel 8 – Silvia”. A kitchen terminal is always enrolled by code.
This is handy when staff bring their own phones, but anyone holding a Staff QR card, or a photo of
one, can then add a phone to the venue. So if you switch it on:
look at Venue → Devices now and then, and deactivate or remove phones you do
not know; every enrolment is also in the Audit log;
print a new Staff QR for anyone who lost theirs; that stops the old card at once.
Example: Beizli Muster’s phones are its own and set up by Michael, so the setting stays off.
③ Sign out of the staff app after (minutes without use) signs a Staff member out of the staff app on a phone once it
has not been used for that long: from 1 to 1440 minutes (24 hours), 480 (8 hours) at first. Each
use starts the count again. It does not apply in a browser, where a session ends at signing out
or 12 hours after signing in.
Choose it so a shift with quiet hours does not sign anyone out, but a phone left on the counter
overnight does. Example: Beizli Muster keeps 480: Silvia stays signed in through lunch and the
afternoon break, and the phones are signed out by the next morning.
Locale and currency
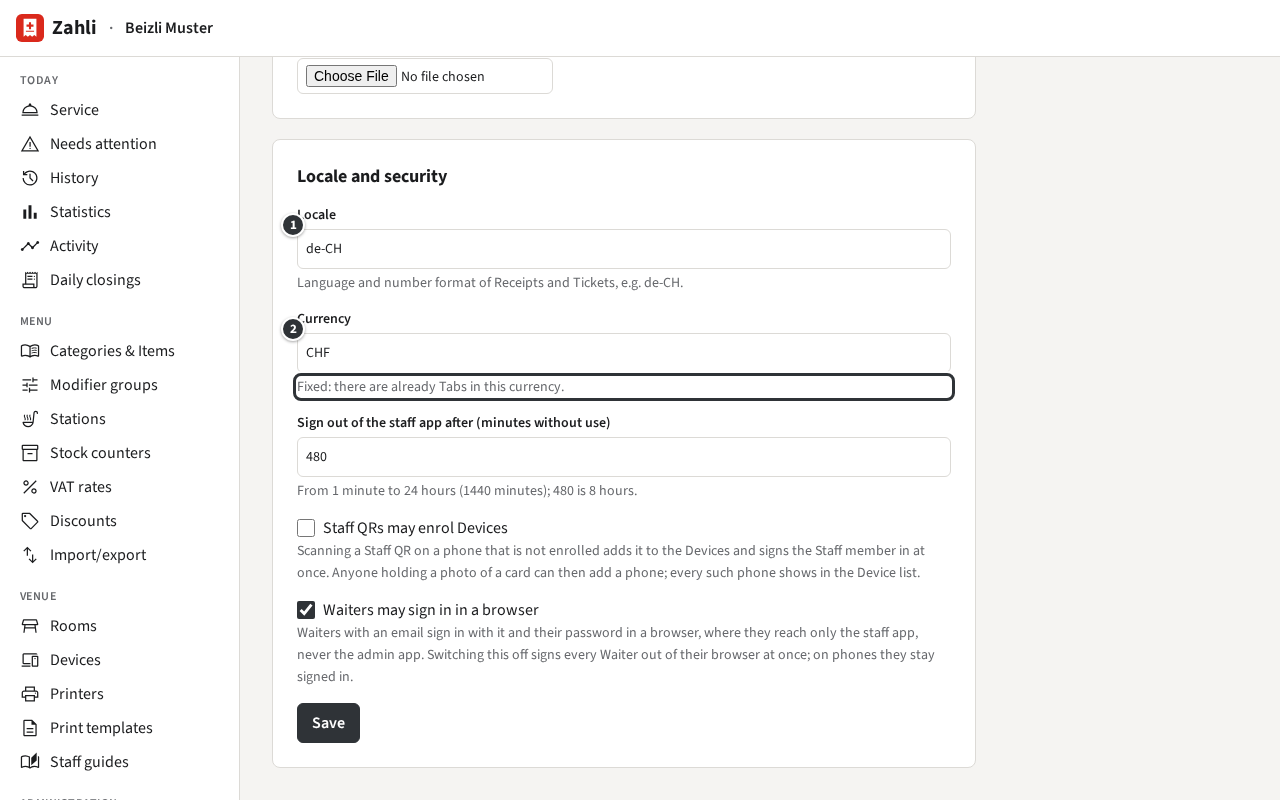
The venue’s locale and currency are in the card Locale and security under
Administration → Settings. Change them and click Save at
the end of the card.
① Locale is a language and a country, such as de-CH, fr-CH, it-CH or
en-CH. It sets:
the language of Receipts, Tickets, Guest slips and Daily closings: German for a German locale
(de-…), English for every other;
how amounts, dates and times are written on them, and in the staff and admin app for everyone.
It does not set the language of the apps: each Staff member chooses their own
(Your language in the admin app, Your language in
the staff app), and the words the Tenant wrote, such as Item names, stay as they were entered.
② Currency, CHF or EUR, is what every price and Payment is in. It can be
chosen only until the first Tab is opened, test Tabs included; then the card says
Fixed: there are already Tabs in this currency. Set it before the venue starts serving, even for training.
Example: Beizli Muster in Zürich has de-CH and CHF. Its Receipts are in German, even when
Silvia has switched her staff app to English. A venue in Lausanne would choose fr-CH; its prints
are then in English, since Zahli prints in German and English only.
Payment providers
Guests pay by Card, Twint or cash. Cash is always counted by hand. Card goes through the venue’s
own account at a Payment provider, today Stripe, with Tap to Pay on the venue’s phones: the
venue is Stripe’s customer, signs its contract and gets the money; Zahli only keeps the key. Twint
is taken by hand: the guest scans the venue’s TWINT sticker or Twint code and the Waiter confirms
the Payment.
The venue’s accounts are under Administration → Payment providers. Each account
belongs to one mode: the test mode account uses Stripe’s sandbox, for training and trying things
out without real money (Test mode); the live mode account takes real
money.
You need the venue’s own Stripe account. Do this once for test mode
and once for live mode, in the card of that mode under Stripe at the foot of the page.
In the Stripe Dashboard, under Developers → API keys, copy the secret key, sk_test_… for
test mode (with the Dashboard in test mode) or sk_live_… for live mode. A restricted key
(rk_…) with access to Terminal works too.
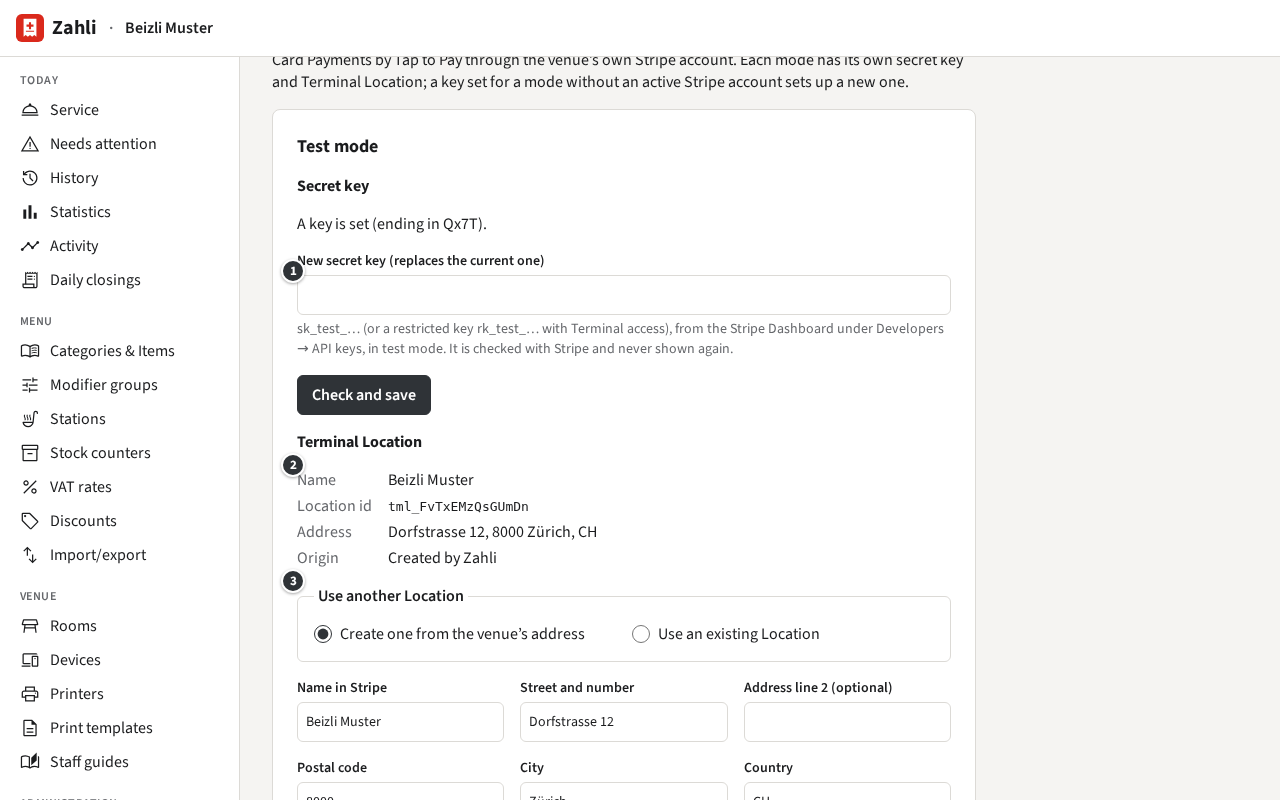
Paste it into ① Secret key and click Check and save. Zahli checks it with
Stripe and stores it encrypted; from then on it shows only its last four characters. The mode
now has a Stripe account in the list Provider accounts.
Set the ② Terminal Location, the address where the phones take Payments: choose
Create one from the venue’s address, check the name and address (it must be in Switzerland) and
click Create in Stripe, or choose Use an existing Location and enter its
tml_… id from the Stripe Dashboard under Terminal → Locations.
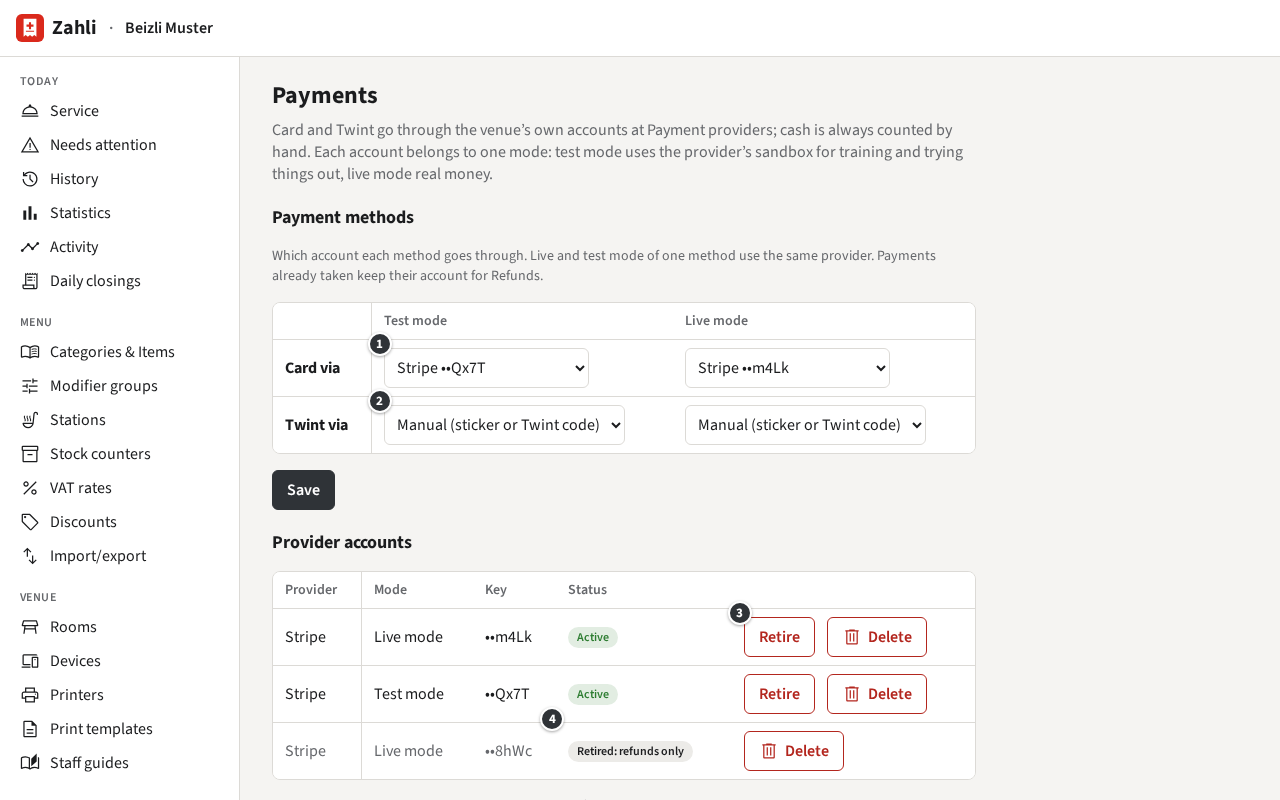
At the top, under Payment methods, choose the account for
Card via in that mode and click Save.
Card is then offered on the Pay sheet in that mode, on the venue’s Android phones running the
Zahli app (Paying). Without an account, or without a Location, it is not.
Example: Anna first connects Beizli Muster’s test mode account, ending in Qx7T, so Michael can
train Silvia with Stripe’s test cards in test mode. Once that works, she adds the live key, ending
in m4Lk, creates the Location from the venue’s address, and chooses it for Card in live mode.
Stripe may ask you to replace a key, for instance after rolling it in its Dashboard. Enter the new
one in ① New secret key (replaces the current one): the account stays the same, with its Payments and Refunds.
The new key must belong to the same Stripe account; for another Stripe account, see below.
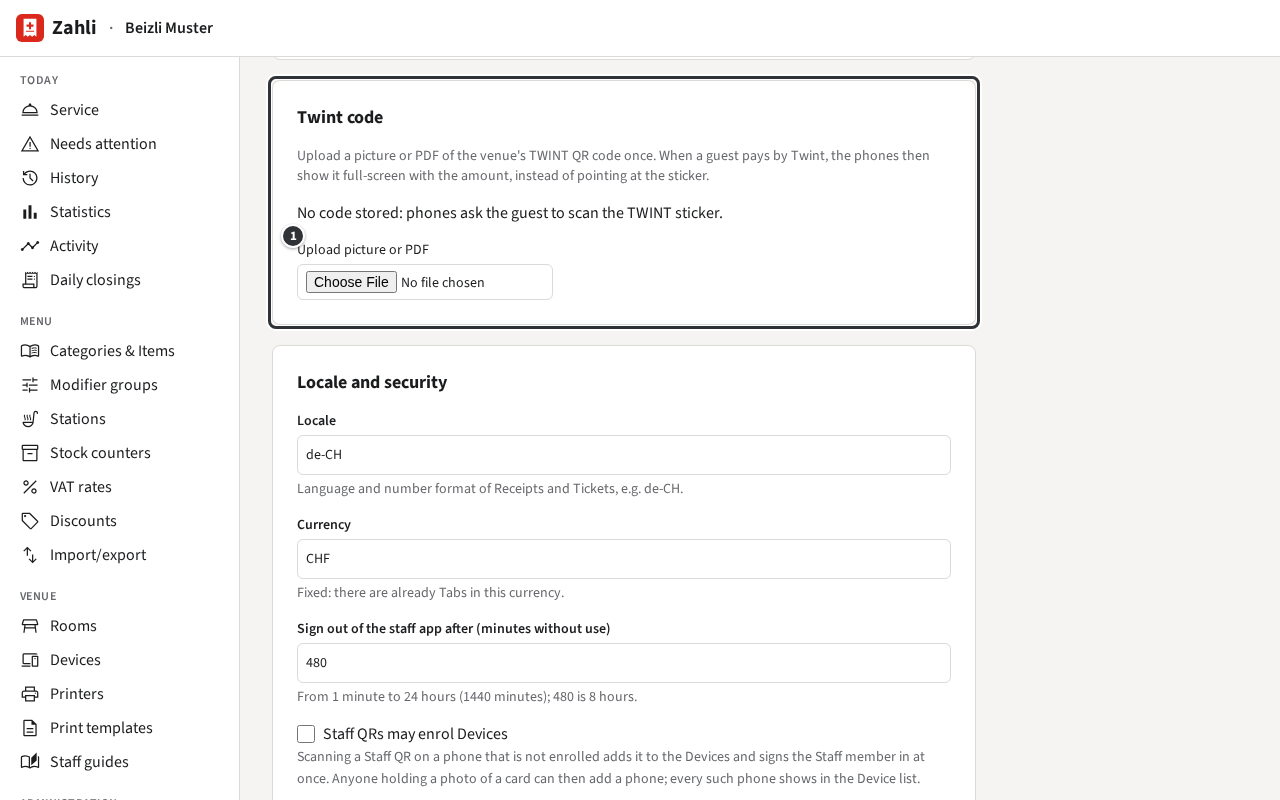
Without anything set up, the phones show the amount and ask the guest to scan the venue’s TWINT
sticker and type it in. If you upload the venue’s TWINT QR code, the phones show the code
full-screen with the amount instead, so the guest scans it from the phone at the table.
Under Administration → Settings, in the card Twint code,
click ① Upload picture or PDF and choose a sharp photo of the sticker or a PDF of
the TWINT QR code. Zahli reads the code and shows it to check.
Remove code goes back to the sticker.
Twint is offered at all only while TWINT sticker available (offer Twint as a Payment method) is on, in the card
Service above, which a Manager may also change
(Venue settings). Example: Beizli Muster’s sticker hangs by the
till; Anna uploads the PDF of the same code, so on the terrace Silvia just shows her phone.
Under Payment methods, each method has a choice per mode:
Card via: one of the mode’s Stripe accounts, or
None: Card is not offered.
② Twint via: Manual (sticker or Twint code). No Payment provider takes Twint
in Zahli yet.
Test and live mode of one method must use the same provider. A change applies to new Payments;
a Payment already taken is refunded through the account that took it.
To move the venue to another Stripe account, do not replace the key: the old account’s Payments
would then be refunded through the new account, which does not know them. Instead:
In the list Provider accounts, click ③ Retire on the old
account and confirm. It takes no new Payments, but still refunds the ones it took, and shows ④
Retired: refunds only. Card is no longer offered in its mode for now. Retiring
cannot be undone.
Connect the new Stripe account as above: its key makes a new account in that mode. Set its
Location and choose it for Card.
Example: in September Beizli Muster moved to the Stripe account of its new owners. Anna retired
the live account ending in 8hWc before a quiet lunch, added the new key ending in m4Lk, and
chose it for Card. A Refund of a summer Payment still goes through 8hWc.
Delete destroys an account’s key: A retired account takes no new Payments but still refunds the ones it took. A deleted account’s key is destroyed: its Payments can then only be refunded in cash or in the provider’s back office. Delete an
account only when it can no longer be used at Stripe, for instance after closing it there. Zahli
refuses while one of its Payments or Refunds is still pending.
VAT rates and Takeaway
Every Item names one of the venue’s VAT rates, and every price includes it: Zahli works out the
VAT in each price for the Receipt and the Daily closing. The rates are under
Menu → VAT rates; Managers choose one per Item but cannot change them.
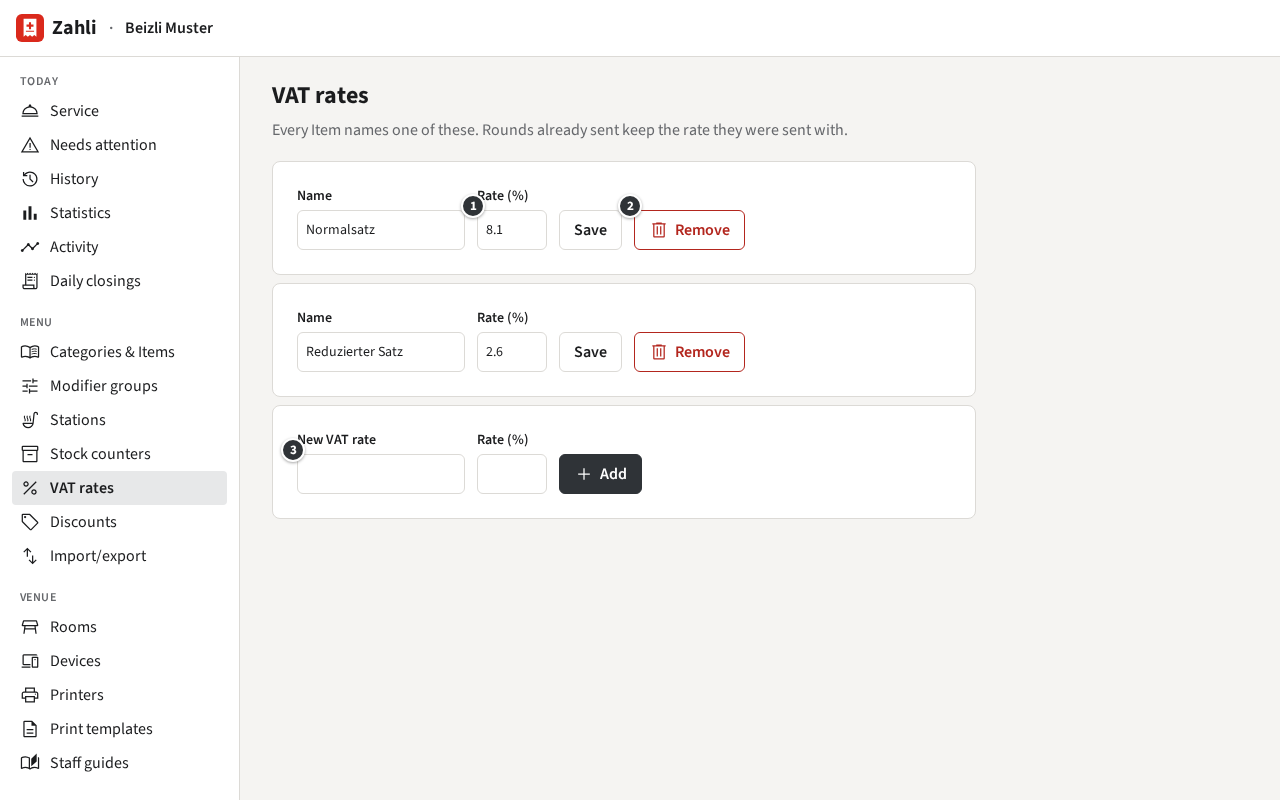
In the empty row at the end, enter a name and the ③ Rate (%), such as
8.1, and click Add. The name appears on the Receipt’s VAT table and the Daily
closing, so name it as your accountant does.
Example: Beizli Muster has two. Normalsatz at 8.1 % for what guests eat and drink at the table,
Reduzierter Satz at 2.6 % for what they take away.
When the law changes a rate, change ① Rate (%) in its row and click
Save on the day it takes effect, ideally before service. Prices stay as they are,
since they include VAT; what changes is how much of each price is VAT. Rounds already sent keep
the rate they were sent with, so Receipts and Daily closings of earlier days do not change.
Example: should the standard rate rise from 8.1 % to 8.3 %, Anna changes Normalsatz to 8.3
after the last Daily closing of the old year. A cordon bleu still costs CHF 32.00; a little more of
it is VAT. If Beizli Muster wants to pass the rise on, Michael changes the prices
(Categories and Items).
② Remove works only for a rate no Item uses: give those Items another rate first.
Zahli has no Takeaway switch on a Tab yet: an Item is always sold at its own VAT rate, wherever the
guest eats it. Where food to take away pays the reduced rate, make it an Item of its own with that
rate.
Example: Beizli Muster sells a Kafi crème at the table for CHF 4.50 at 8.1 %, and a Kafi zum
Mitnehmen for CHF 4.00 at 2.6 %, in a Category of its own, Über die Gasse. When a guest at the
counter takes the coffee along, Silvia taps Kafi zum Mitnehmen there.
Audit log
Zahli records every change to the venue’s settings, staff, menu prices, Devices and Printers, and
every money matter beyond a plain Payment, such as a Void, a Discount, a Correction or a Refund. The record
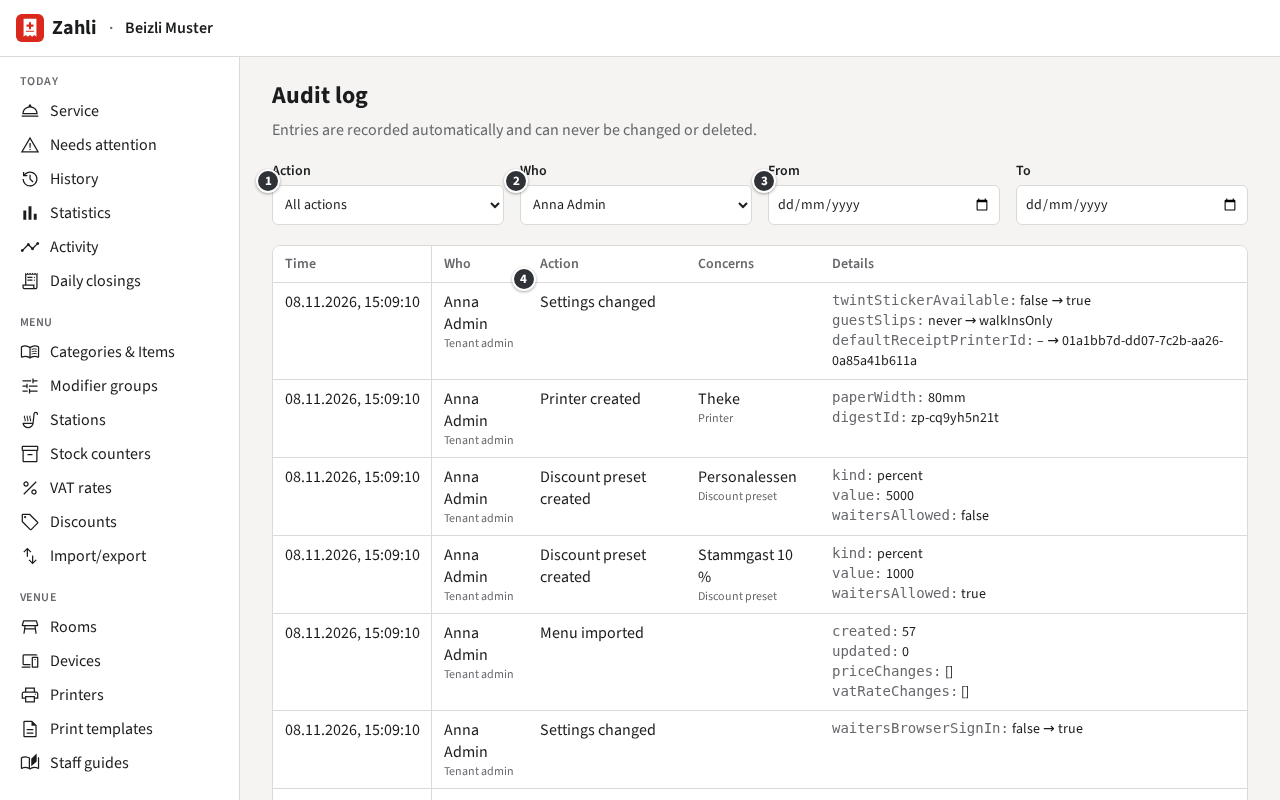
is under Administration → Audit log, newest first. Entries are recorded automatically and can never be changed or deleted.
Each entry says:
Time: when, to the second.
Who: the Staff member, with their Role. Not signed in marks a failed
sign-in; Global admin acting as Tenant admin marks a Global admin of Zahli
who acted as your Tenant admin, for instance while helping you set up.
④ Action: what happened, such as Settings changed or
Payment refunded.
Concerns: the Staff member, Device, Item or Tab it was about.
Details: what changed, as the value before → after, or the amounts and reasons.
Narrow the list with the filters at the top; they combine:
① Action: one kind of change.
② Who: one Staff member.
③ From and To: a range of days.
Show older entries at the foot loads earlier entries.
Example: on Monday the staff app opens with the menu instead of the Tables. Anna chooses
Settings changed under Action and sees that Michael
changed After sign-in the staff app shows on Saturday for the village fair; she asks him to switch
it back. Later she checks who refunded the Rivella at lunch: under ActionPayment refunded, the entry shows Michael, CHF 5.50 in cash and his reason
“Rivella war warm”.
The plain course of service, Tabs opened, Rounds sent and Payments taken, is not in the Audit log:
see it in the History and the Activity. The Audit
log cannot be exported or cleared.